After my brief introduction to the Intel Edison it’s time to get more familar with the platform’s software aspects.
I’m going to show how you can start to develop and deploy your ideas, how you can read/write from sensors/actuators and how you can communicate with the Cloud. Giving you what you need to start tinkering and hacking IoT devices.
Installing and configuring the SDK
The first thing is to choose your preferred language for the project. To accommodate the needs of more developers, Intel made it easy to use many different programming languages and have provided several SDKs.
You can read about all the options in this article.
Intel Edison Board Installer
The latest version of the Intel Edison SDK is available through a unified installer that you can get here.
Make sure to have a recent version of Java JDK/JRE and continue the installation process.
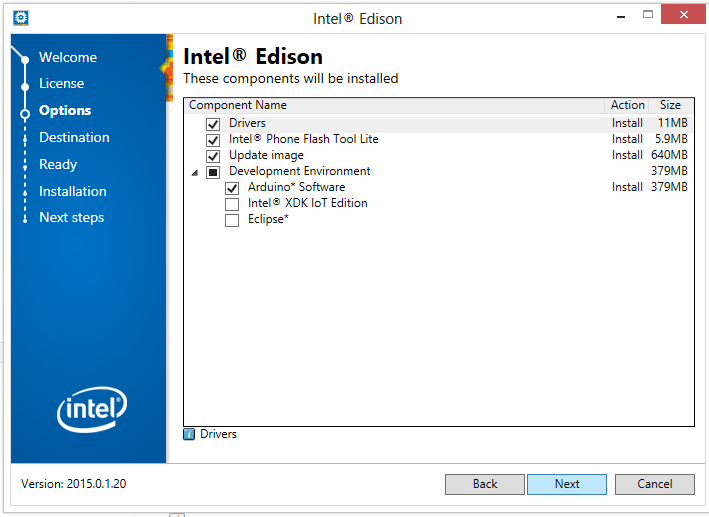
This will install the appropriate driver for the board, updates the Yocto Linux image on the Edison and lets you choose your preferred IDE. The installer is available for Windows and Mac OS, Linux users need to install the preferred IDE separately.
Getting ready to develop
Assemble the development board, setup a serial terminal and connect the Edison to WiFi.
Make a note about the board IP address, Edison should expose itself via Zeroconf, but we all know that tech doesn’t always work.
Now we can configure our IDE.
Eclipse
If you are going to develop in C++, open Eclipse and select the IoT DevKit -> Create Target connection item.
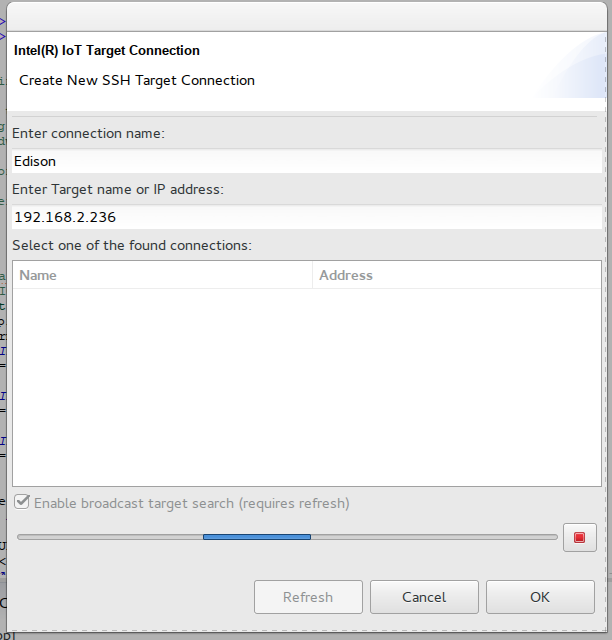
You should see your board listed, else just enter a name and the ip address noted before.
Intel XDK
Start XDK and look at the bottom panel of the screen.
Click the IoT Device drop down menu and select re scan for device or enter the board ip address as shown below.
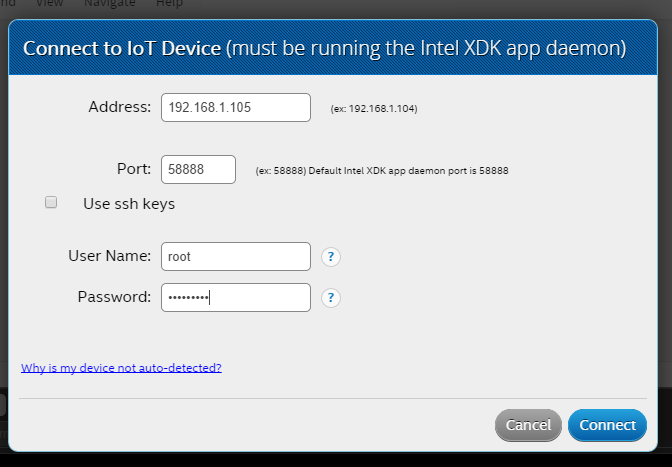
You should see a success message in the console.
Shell access
SSH is enabled on the board, so you can skip all the IDE fuss and do everything from the shell if you are more comfortable there.
Hello Edison
It’s time to say hello.
C++
In Eclipse click, IoT DevKit – >Create C++ project and select a blank template.
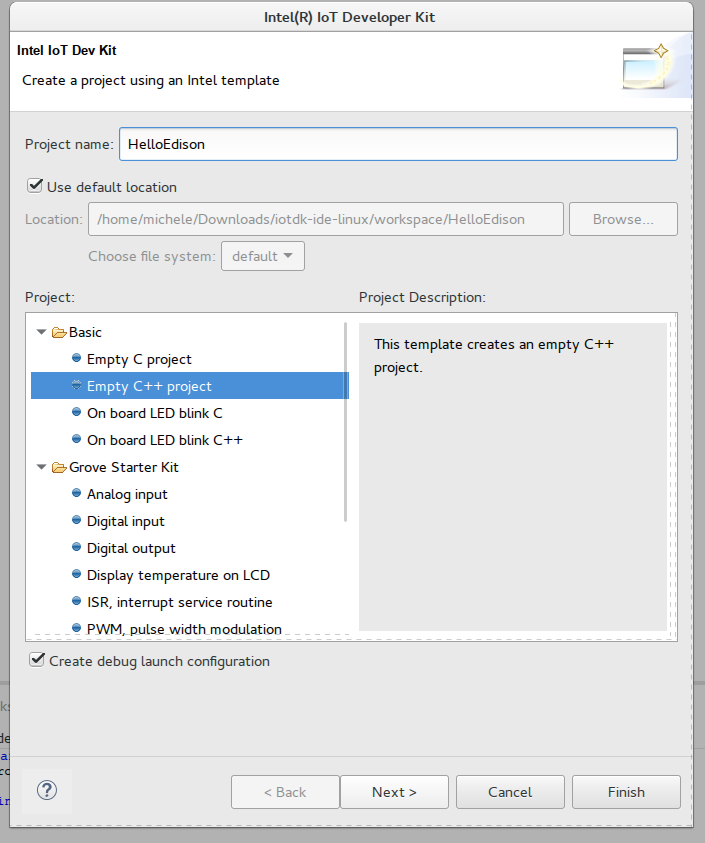
And choose the already defined target.
Add the following code:
#include <iostream>
using namespace std;

int main() {
    std::cout << "Hello, Edison!\n";
    return 0;
    }
Run the code by clicking the green play button. Eclipse will build the project, deploy to the board and run it. On this first run, Eclipse will ask for the board password.
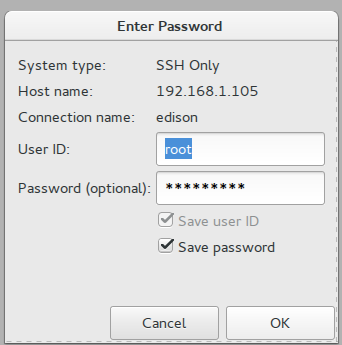
You an follow progress and the application output in the console at the bottom of the screen.
Javascript/Node JS
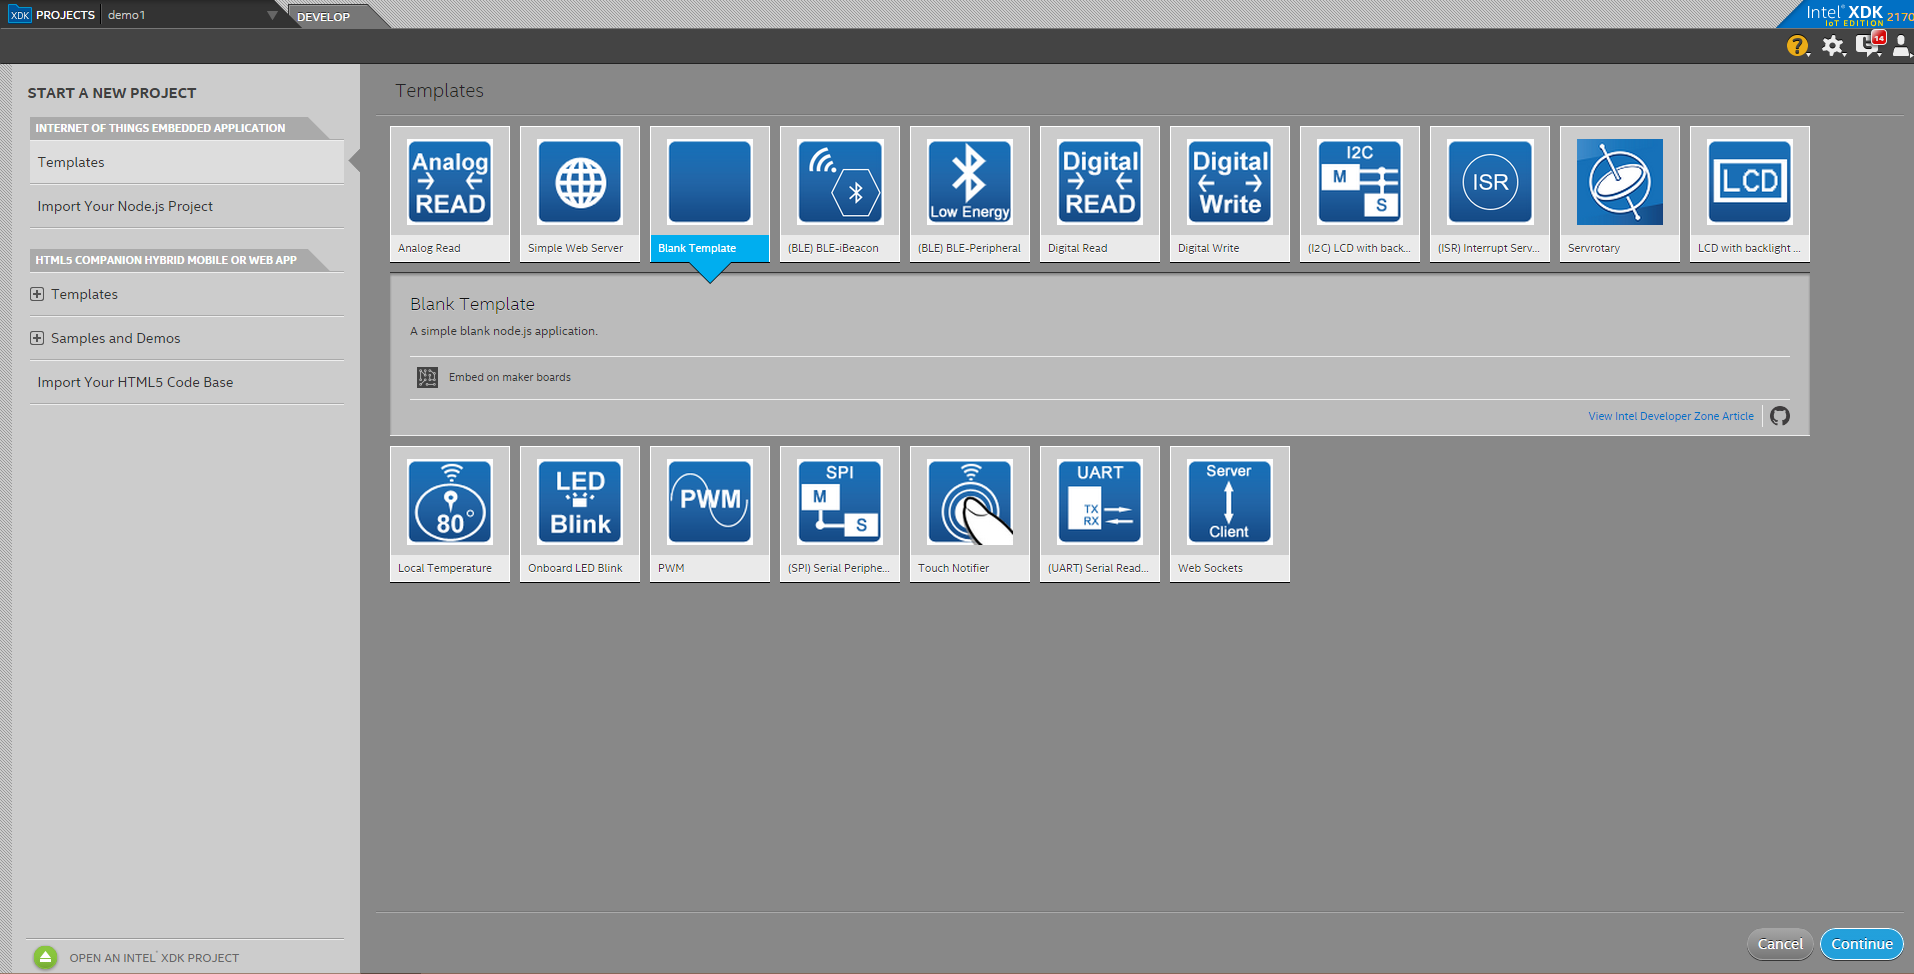
Open XDK, click on the Projects tab, and start a new project choosing the blank IoT template.
Add the following code:
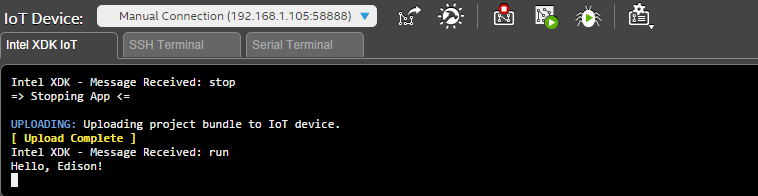
console.log("Hello, Edison!")Use the run button on the bottom toolbar. XDK will ask if you want to upload the updated project, click yes and check the output in the bottom console.
Python
In your favorite text editor, write the following code:
print "Hello, Edison!"save as hello.py and run it with:
python hello.pySummary
One of the great aspects to using the Edison is that there’s nothing new to learn. You can code in your current preferred language, use libraries of your choice, and do whatever you normally do on a Linux system.
The main difference is that you can run your project on a tiny device, ready to make wearable or internet things
.
But we are interested in making something more interesting, taking advantage of the platform’s I/O ability to make things
smart.
Dealing with Sensors and Actuators
One of my favorite aspects of Edison, is that even a software guy like me can deal with the hardware. Intel provides two useful libraries for this purpose, lib rmaa and lib upm.
The first provide an abstraction to the board, so that ports and other hardware features can be accessed through abstract classes without needing to know exact model numbers and data sheet details.
It’s time to make something exciting… blink a led! (OK, not that exciting).
Thanks to lib mraa it’s simple:
C++
include <iostream>
#include <unistd.h>
#include <signal.h>
#include "mraa.hpp"

static int iopin = 13;
int running = 0;

void
sig_handler(int signo)
{
    if (signo == SIGINT) {
        printf("closing IO%d nicely\n", iopin);
        running = -1;
    }
}

int
main(int argc, char** argv)
{

    mraa::Gpio* gpio = new mraa::Gpio(iopin); // Select the pin where the led is connected
    if (gpio == NULL) { // Check for errors
        return MRAA_ERROR_UNSPECIFIED;
        }

    mraa_result_t response = gpio->dir(mraa::DIR_OUT); // Set "direction" of our operation, we use it as output here
    if (response != MRAA_SUCCESS) {
        mraa::printError(response);
        return 1;
    }


    while (running == 0) { // infinite loop just to test
        response = gpio->write(1); // set the output pin to "high" value, this will cause the led to turn on
        sleep(1);

        response = gpio->write(0); // set the output pin to "low" value, this will cause the led to turn on
        sleep(1);
    }

    delete gpio; // cleanups
    return 0;
    }
Javascript
var m = require('mraa');

var gpio = new m.Gpio(13); // Select the pin where the led is connected
gpio.dir(m.DIR_OUT); // Set "direction" of our operation, we use it as output here
var ledState = true; // Led state

function blinkblink() // we define a function to call periodically
{
  gpio.write(ledState?1:0); // if ledState is true then write a '1' (high, led on) otherwise write a '0' (low, led off)
  ledState = !ledState; // invert the ledState
  setInterval(blinkblink,1000); // call this function every second
}

blinkblink(); // call our blink function
Python
import mraa
import time

gpio = mraa.Gpio(13) # Select the pin where the led is connected
gpio.dir(mraa.DIR_OUT) # Set "direction" of our operation, we use it as output here

while True:
    gpio.write(1) # set the output pin to "high" value, this will cause the led to turn on
    time.sleep(0.2)
    gpio.write(0) # set the output pin to "low" value, this will cause the led to turn off
    time.sleep(0.2)
Simple, isn’t it?
Now let’s see how we read values from a sensor. In this example I’ll use a temperature sensor attached to the pin Aio 0.
Usually, to retrieve the temperature value from a sensor, you read raw values and then check the sensor data sheet, understand the meaning of the raw value and process the value before using it.
Here Lib UPM comes to the rescue and we can use the class provided from the library to abstract all the low level details. I’ll use javascript, but as you have seen before, the same can be acheived in any language.
var groveSensor = require('jsupm_grove');
var tempSensor = null;
var currentTemperature = null;
var celsius = 0;

function init() {
    setup()
    readRoomTemperature();
    }

function setup() {
    // Create the temperature sensor object using AIO pin 0
    tempSensor = new groveSensor.GroveTemp(0);
}

function readRoomTemperature() {
        celsius = tempSensor.value();
        console.log("Temperature: "+ celsius + " degrees Celsius");
}


init();
Now we can combine the above examples and turn on a led only when a predefined temperature is reached.
var m = require('mraa');
var MAX_TEMP = 30;
var groveSensor = require('jsupm_grove');
var tempSensor = null;
var currentTemperature = null;
var gpio = null;

function init() {
        setup()
    setInterval(checkTemperature, 1000);
        }

function setup() {
        // Create the temperature sensor object using AIO pin 0
        tempSensor = new groveSensor.GroveTemp(0);
        gpio = new m.Gpio(13); // Select the pin where the led is connected
        gpio.dir(m.DIR_OUT); // Set "direction" of our operation, we use it as output here

}

function readRoomTemperature() {
        var celsius = tempSensor.value();
        console.log("Temperature: "+ celsius + " degrees Celsius");
                return celsius;
}


function checkTemperature() {
        var temp = readRoomTemperature();
        if(temp>MAX_TEMP)
                gpio.write(1);
        else
                gpio.write(0);
                }

init();
We can show a message on the LCD display with just few more lines of code, using classes provided by Lib UPM.
// LibUpm requires
var groveSensor = require('jsupm_grove');
var LCD = require('jsupm_i2clcd');

var myLcd;
var currentTemperature = null;

function init() {
        setup()
        setInterval(checkTemperature, 1000);
        }

function setup() {
        // Create the temperature sensor object using AIO pin 0
        tempSensor = new groveSensor.GroveTemp(0);
        myLcd = new LCD.Jhd1313m1 (6, 0x3E, 0x62); // setting up the grove lcd connected with i2c

}

function readRoomTemperature() {
        var celsius = tempSensor.value();
        console.log("Temperature: "+ celsius + " degrees Celsius");
        return celsius;
}

function checkTemperature() {
        var temp = readRoomTemperature();
        var lcdMessage = "Room temp:" +  temp + " C";
        myLcd.setCursor(1,1);
        myLcd.write(lcdMessage);
}

init();
Browse the lib UPM docs to get an idea of supported sensors and actuators and you’ll understand how many things you can use in the same, simple, way.
But IoT is about the Internet, so let’s get connected.
One of the advantages of the full Linux stack on Edison is that you can use any existing standard library to access the web and all the needed tools to use REST API, xml and json etc are available in a project.
Web services
In JavaScript we can use lib http to make API calls. I’m going to use this to query the Open Weather Map api and show the current weather on the LCD.
var myLcd;
var LCD = require('jsupm_i2clcd');
var http = require('http');

//  openweathermap apu uri
var owmUrl = "http://api.openweathermap.org";
// prepare the query
var owmPath = "/data/2.5/weather?unit=metric&q="
// My lovely city name
var yourCity = "Brescia,it";

function init() {
    setup()
    setInterval(checkWeather, 60000);
    }

function setup() {
    myLcd = new LCD.Jhd1313m1 (6, 0x3E, 0x62); // setting up the grove lcd connected with i2c, the address is in the doc
}

function checkWeather() {
    // url building
    var url = owmUrl + owmPath + yourCity

    try {
    // api docs : http://openweathermap.org/api

    // build the http request
    http.get(url, function(res) {
        var body = '';

        // read the response of the query
        res.on('data', function(chunk) {
        body += chunk;
        });

        res.on('end', function() {
        // now parse the json feed
        var weather = JSON.parse(body)

        // http://openweathermap.org/weather-conditions
        var id = weather.weather[0].id; // get the current weather code

        // show the message on the display
        lcdMessage = weather.weather[0].description;
        myLcd.setCursor(0,0);
        myLcd.write(lcdMessage);

        });
    }).on('error', function(e) {
        // check for errors and eventually show a message

        lcdMessage = "Weather: ERROR";
        myLcd.setCursor(0,0);
        myLcd.write(lcdMessage);


    });
    } catch(e) {
    lcdMessage = "Weather: ERROR";
    myLcd.setCursor(0,0);
    myLcd.write(lcdMessage);
    }
};

init();
Conclusion
These brief examples could serve as a foundation to more complex applications integrating sensors, actuators and the internet.
In the next article we are going to build a complete project to show the possibility enabled by this platform and not a lot of code, giving anyone the ability to join the hype of IoT and, have fun in the process.
Frequently Asked Questions about Programming the Intel Edison
What is the Intel Edison and what can it be used for?
The Intel Edison is a compact computing platform that’s small in size but big on functionality. It’s designed for inventors, entrepreneurs, and consumer product designers who are looking to quickly prototype and produce IoT and wearable computing products. It’s a powerful tool for developing smart devices and IoT applications, with built-in wireless capabilities and support for multiple programming languages.
How do I get started with programming the Intel Edison?
To get started with programming the Intel Edison, you’ll first need to set up your development environment. This involves installing the Intel Edison drivers, setting up the Arduino IDE, and connecting your Edison to your computer. Once your environment is set up, you can start writing and uploading code to your Edison.
What programming languages can I use with the Intel Edison?
The Intel Edison supports a variety of programming languages, including C++, Python, Node.js, and Arduino. This makes it a versatile platform for developers with different programming backgrounds and preferences.
How do I connect the Intel Edison to my computer?
The Intel Edison can be connected to your computer via a micro-USB cable. Once connected, you can upload code to the Edison and communicate with it using a serial terminal program.
Can I use the Intel Edison with Arduino shields?
Yes, the Intel Edison is compatible with Arduino shields. This means you can extend the functionality of your Edison by connecting it to a variety of Arduino-compatible hardware modules.
How do I power the Intel Edison?
The Intel Edison can be powered via a micro-USB cable or an external power supply. The power requirements will depend on the specific use case and the hardware modules connected to the Edison.
What operating systems are supported by the Intel Edison?
The Intel Edison supports a variety of operating systems, including Linux, Windows, and Mac OS. This makes it a versatile platform for developers using different operating systems.
Can I use the Intel Edison for commercial products?
Yes, the Intel Edison is designed for both prototyping and production of commercial products. Its small form factor and powerful capabilities make it an ideal choice for developing smart devices and IoT applications.
What wireless capabilities does the Intel Edison have?
The Intel Edison has built-in Wi-Fi and Bluetooth capabilities. This allows it to connect to the internet and communicate with other devices wirelessly.
How do I debug code on the Intel Edison?
Debugging code on the Intel Edison can be done using the Arduino IDE’s built-in serial monitor. This allows you to view output from your code and troubleshoot any issues that may arise.
 Michele Tameni
An unconventional software engineer, interested in research and development of innovative apps, experimenting on emerging technology and interaction methods. A contributor to some open source projects, some for work, mostly for passion. When not at a keyboard Michele is usually travelling around the world, taking photographs or writing about adventures.