A friend of mine operates a multi-author blog powered by WordPress.
To prevent any legal trouble, he often adds a ‘Disclaimer’ in every post made by guest authors which he did by editing and including the disclaimer text before publication.
I’m sure you will agree, that editing and adding disclaimers in every post made by guest authors seems a daunting task.
In this article, we will build a simple Disclaimer Notice plugin that will have an option page where a site administrator can add the disclaimer text which automatically gets appended immediately before or after the post content.
Plugin Development
To begin the plugin development, we need to include the plugin header in the plugin PHP file. Without the header, WordPress will not recognize the plugin.
<?php
/*
Plugin Name: Disclaimer Manager
Plugin URI: https://www.sitepoint.com
Description: Easy Disclaimer Manager for Multi-author blogs.
Version: 1.0
Author: Agbonghama Collins
Author URI: http://w3guy.com
License: GPL2
*/
To get started building the settings page for the plugin; first, we will add the sub menu page to the ‘Settings’ menu using the function add_options_page placed in a function registered with the admin_menu.
// Add the admin options page
add_action( 'admin_menu', 'dm_settings_page' );

function dm_settings_page() {
	add_options_page( 'Disclaimer Manager', 'Disclaimer Manager', 'manage_options', 'disclaimer-manager', 'dm_options_page' );
}
The argument passed to add_options_page() are as follows:
Disclaimer Manager: The text to be displayed in the title tags of the page when the menu is selected.Disclaimer Manager: The text to be used for the menu.manage_options: The capability required for this menu to be displayed to the user.disclaimer-manager: The slug name to refer to this menu.dm_options_page: The function to be called to output the plugin settings page.
Below, is the code for the callback function dm_options_page that will display the settings page.
// Draw the options page
function dm_options_page() {
	?>
	<div class="wrap">
		<?php screen_icon(); ?>
		<h2> Disclaimer Manager for Authors </h2>

		<form action="options.php" method="post">
			<?php settings_fields( 'disclaimer_manager_options' ); ?>
			<?php do_settings_sections( 'disclaimer-manager' ); ?>
			<?php submit_button(); ?>
		</form>
	</div>
<?php
}
The WordPress Settings API is being used to build and manage the settings form.
The settings_fields function in dm_options_page() above output the nonce, action, and form fields for the settings page while the do_settings_sections() prints out all settings sections added to a particular settings page.
Below is the full Settings API code for the settings page.
// Register and define the settings
add_action( 'admin_init', 'dm_admin_init' );
function dm_admin_init() {
	register_setting( 'disclaimer_manager_options', 'disclaimer_manager_options',
		'' );

	add_settings_section( 'dm_main', 'Plugin Settings',
		'', 'disclaimer-manager' );

	add_settings_field( 'dm_textarea-id', 'Enter Disclaimer Text',
		'disclaimer_text_textarea', 'disclaimer-manager', 'dm_main' );

	add_settings_field( 'dm_select-id', 'Disclaimer Position',
		'disclaimer_text_position', 'disclaimer-manager', 'dm_main' );
}

	// Display and fill the form field
function disclaimer_text_textarea() {
	// get option 'disclaimer_text' value from the database
	$options         = get_option( 'disclaimer_manager_options' );
	$disclaimer_text = $options['disclaimer_text'];

	// echo the field
	echo "<textarea rows='8' cols='50' id='disclaimer_text' name='disclaimer_manager_options[disclaimer_text]' >$disclaimer_text</textarea>";
}

function disclaimer_text_position() {
	// get option 'disclaimer_position' value from the database
	$options             = get_option( 'disclaimer_manager_options' );
	$disclaimer_position = $options['disclaimer_position'];

	echo '<select name="disclaimer_manager_options[disclaimer_position]">';
	echo '<option value="top"' . selected( $disclaimer_position, 'top' ) . '>Top</option>';
	echo '<option value="bottom"' . selected( $disclaimer_position, 'bottom' ) . '>Bottom</option>';
	echo '</select>';
}
Take Note: The register setting() registers the setting.
The add_settings_section() creates settings sections – groups of settings you see on WordPress settings pages with a shared heading.
The add_settings_field() registers a settings field to a settings page and section.
The get_option() retrieves the values of the settings form from the database and the update_option() saves the form values to the database.
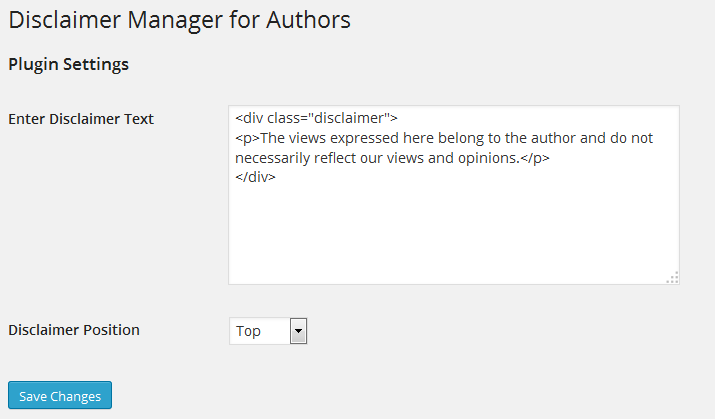
We are done building the settings page for the plugin.
Below is a screenshot of the plugin settings page.
The function add_disclaimer_to_post as its name implies, appends the ‘Disclaimer’ text to the top or bottom of every post as defined in the plugin settings page.
function add_disclaimer_to_post( $content ) {

	$options = get_option( 'disclaimer_manager_options' );

	// get disclaimer text form DB
	$disclaimer_text = $options['disclaimer_text'];

	// get disclaimer position from DB
	$disclaimer_position = $options['disclaimer_position'];

	// ensure we are in a post and not a page
	if ( is_single() ) : // if disclaimer position is set to top
	{
		if ( $disclaimer_position == 'top' ) {
			$content = $disclaimer_text . $content;
		}

		// if disclaimer position is set to bottom
		if ( $disclaimer_position == 'bottom' ) {
			$content .= $disclaimer_text;
		}
	}

	endif;

	return $content;
}
Allow me to explain what the code above does.
The ‘Disclaimer Text’ and its position are retrieved from the database and saved to the variables $disclaimer_text and $disclaimer_position.
Next, we use the Boolean WordPress function is_single() to ensure we are dealing with a post and not an attachment or page.
The next two if conditional statements append the disclaimer to the top or bottom of the post content depending on the outcome of $disclaimer_position.
To put the function to work, we need to hook it to the content filter (used to filter the content of a post after it is retrieved from the database and before it is printed to the screen).
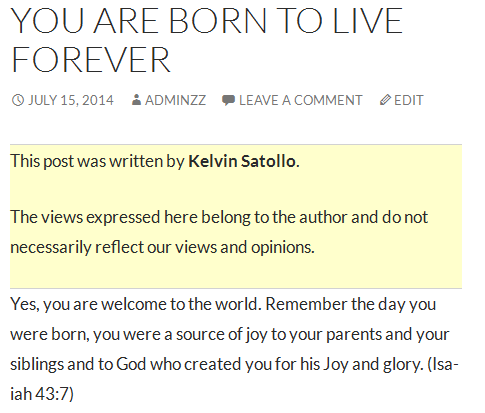
add_filter( 'the_content', 'add_disclaimer_to_post' );Voila! We are done coding the ‘Disclaimer Plugin’.
Here is a screenshot of the plugin in action:
Conclusion
To further understand how the plugin was built and how you can implement it in your WordPress site, download the plugin.
If you are looking for an advanced disclaimer plugin with features such as:
- Ability to choose the authors that will have a disclaimer or notification displayed in their post.
- Built-in editor for adding CSS Styles for the ‘Disclaimer’ text / notification and lots more.
Grab the improved version from the WordPress Plugin Directory.
Let me know your thoughts in the comments.
Frequently Asked Questions about Building a Disclaimer Notice Plugin
How can I customize the design of my disclaimer notice plugin?
Customizing the design of your disclaimer notice plugin can be done through the plugin’s settings. You can change the color, font, size, and position of the disclaimer notice. Some plugins also allow you to add images or logos. If you have knowledge of CSS, you can further customize the design by adding custom CSS codes.
Can I add a disclaimer notice to specific pages or posts only?
Yes, most disclaimer notice plugins allow you to choose where you want the disclaimer to appear. You can select specific pages, posts, or categories. This feature is useful if you have content that requires a specific disclaimer.
Is it possible to make the disclaimer notice appear only once for each visitor?
Yes, most disclaimer notice plugins have a feature that allows you to set the frequency of the disclaimer notice. You can choose to show the disclaimer only once for each visitor, or every time they visit your website.
Can I add a link to my privacy policy or terms of service in the disclaimer notice?
Yes, you can add links to your privacy policy or terms of service in the disclaimer notice. This is a good practice as it allows visitors to easily access these important documents.
How can I make sure that visitors cannot ignore the disclaimer notice?
Some disclaimer notice plugins have a feature that prevents visitors from accessing the rest of your website until they accept the disclaimer. This ensures that visitors cannot ignore the disclaimer notice.
Can I translate the disclaimer notice into different languages?
Yes, many disclaimer notice plugins are compatible with multilingual plugins, allowing you to translate the disclaimer notice into different languages. This is important if your website has visitors from different countries.
Is it possible to track how many visitors have accepted the disclaimer notice?
Some disclaimer notice plugins have a tracking feature that allows you to see how many visitors have accepted the disclaimer. This can be useful for legal purposes.
Can I add a disclaimer notice to my website without using a plugin?
Yes, you can add a disclaimer notice to your website without using a plugin. However, this requires knowledge of HTML and CSS. Using a plugin is easier and more convenient, especially for beginners.
Are there any legal requirements for the content of the disclaimer notice?
The content of the disclaimer notice depends on the nature of your website and the laws of your country. It is recommended to consult with a legal expert to ensure that your disclaimer notice complies with all legal requirements.
Can I use the same disclaimer notice for all my websites?
While it is possible to use the same disclaimer notice for all your websites, it is not recommended. Each website is unique and may require a different disclaimer. It is best to create a custom disclaimer for each website.
 Collins Agbonghama
Collins is a web developer and freelance writer. Creator of the popular ProfilePress and MailOptin WordPress plugins. When not wrangling with code, you can find him writing at his personal blog or on Twitter.


