Kena: Bridge Of Spirits map: all collectible locations including Rot, Meditation Spots, and more
Use these maps to find all the collectibles in Kena: Bridge Of Spirits

Looking for a map of Kena: Bridge Of Spirits which shows the locations of all collectibles and hidden areas? Well, you're in luck, because I've spent a painstaking number of hours hundred-percenting Ember Lab's marvellous story-driven action-adventure game, and during my travels I jotted down the exact locations of every single Rot, Hat, Flower Shrine, Meditation Spot, Cursed Chest, and Spirit Mail in the game.
Below you'll find ten maps of various areas in Kena: Bridge Of Spirits, annotated with the locations of every single collectible and hidden area in the game, so you can have a far easier time hunting down those pesky remaining achievements. Take a look!
On this page:
- Kena: Bridge Of Spirits map of collectibles
- Map 1: Ruins
- Map 2: Village
- Map 3: Taro's Tree
- Map 4: Rusu Mountain
- Map 5: Forgotten Forest
- Map 6: Storehouse
- Map 7: Fields
- Map 8: Village Heart
- Map 9: Mountain Shrine

Kena: Bridge Of Spirits map of collectibles
Before we go any further, here's the full world map of Kena: Bridge Of Spirits, with all collectible locations highlighted:
The Kena: Bridge Of Spirits map is divided into 10 areas. I've put together a map for each one below so you can view all the areas independently of each other. The only map I haven't created is for the Mountain itself, which has no collectibles.
On each map you'll find a key explaining what each marker signifies. They're certainly going to speed up how long it takes to beat Kena: Bridge Of Spirits if you're intent on collecting everything in the game.
Before you ask - yes, I myself have collected everything in the game, and I can tell you that yes, that thing is in that location. Perhaps it is below you, or above you, or perhaps it hasn't revealed itself to you yet because you need to complete a story beat before it can appear (as is the case with certain meditation spots and "trios" of Rot, which are usually given to you after defeating a boss or completing a major story moment). The point is: these maps are accurate. Good? Good.
Map 1: Ruins
The Ruins make up the tutorial area of Kena: Bridge Of Spirits. In this segment you are taught the basic systems of the game, and introduced to a few important characters. It's pretty bereft of collectibles, although you'll find your first 8 Rot here. Please note: the very first Rot you come across does not count as one of the 100 Rot you can collect throughout the game.
Map 2: Village
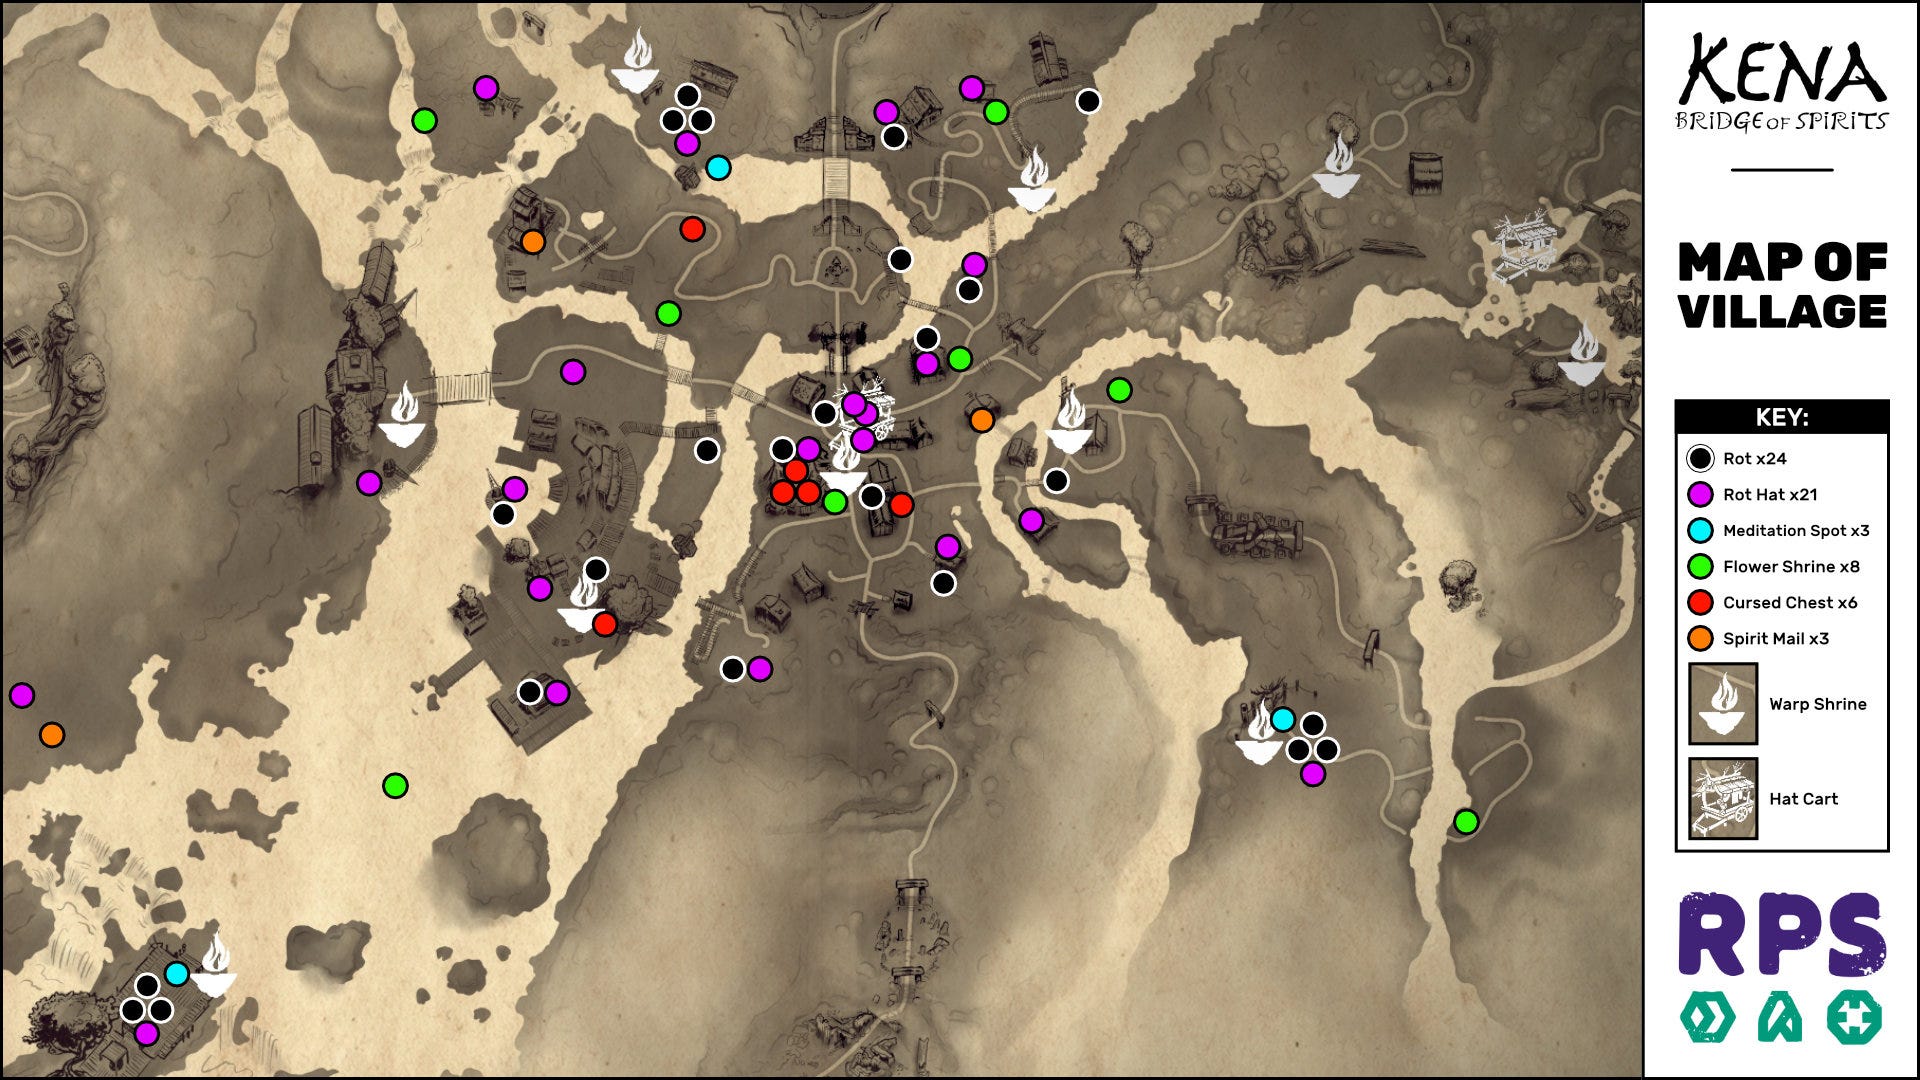
The Village is the central hub of Kena: Bridge Of Spirits, and it's where you'll return to time and time again. The Village starts off overrun by corruption, but by collecting and delivering Spirit Mail to the correct houses you can unlock the barriers that bar you from various areas of the Village in order to slowly cleanse it of this corruption. Each cleared area also means you can explore and uncover more Rot, more Hats, and other collectibles besides.
The important thing to note here is: the furthest reaches of the Village are off-limits to you until you enter into the "final act" of the game's story. You'll know when you gain the ability to traverse these areas, because it's made very clear as part of your main quest. But until then, don't waste time trying to find ways to get to these far-off parts of the Village, because it ain't gonna happen.
Map 3: Taro's Tree
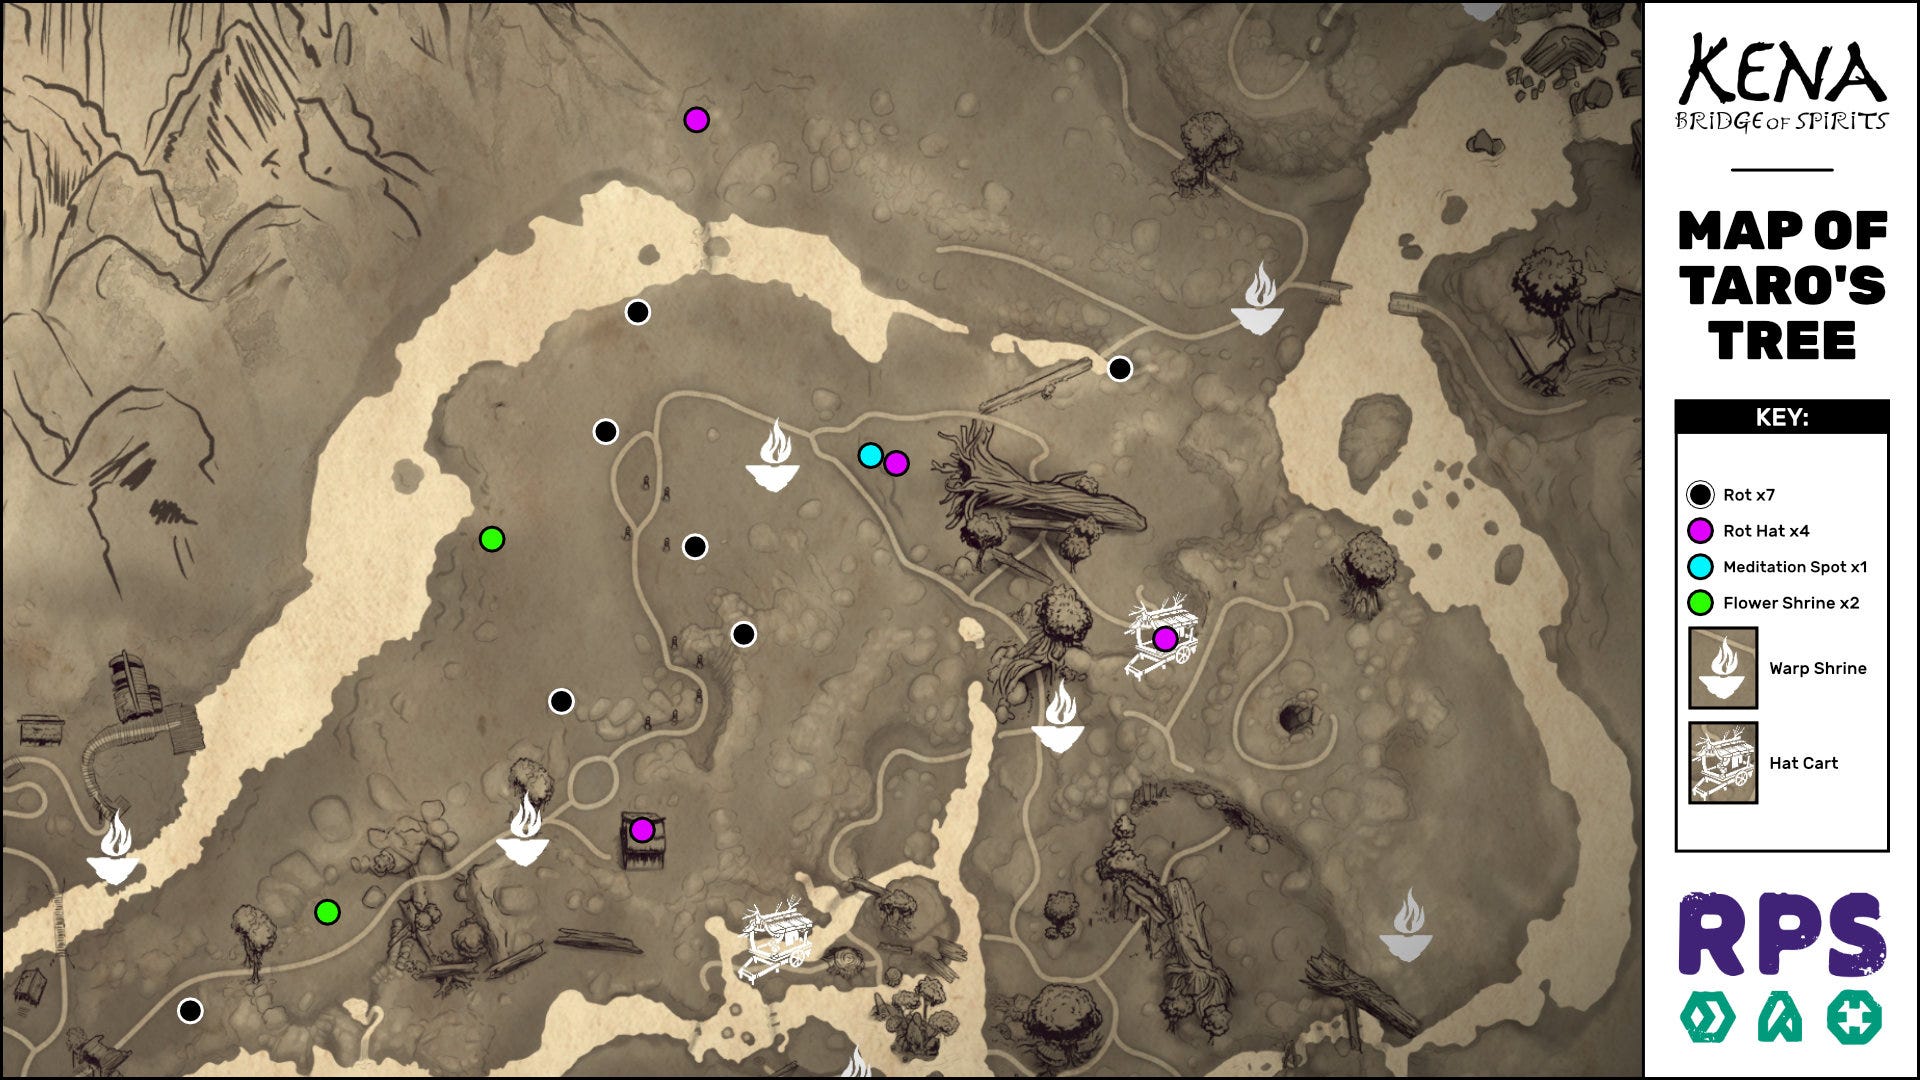
Taro's Tree is a fairly simple area of the overarching map, containing only 13 collectibles in total (plus one meditation spot). It should be fairly simple collecting them all. The only thing to bear in mind is that the meditation spot cannot be meditated upon until you complete the main quest of this area.
Map 4: Rusu Mountain
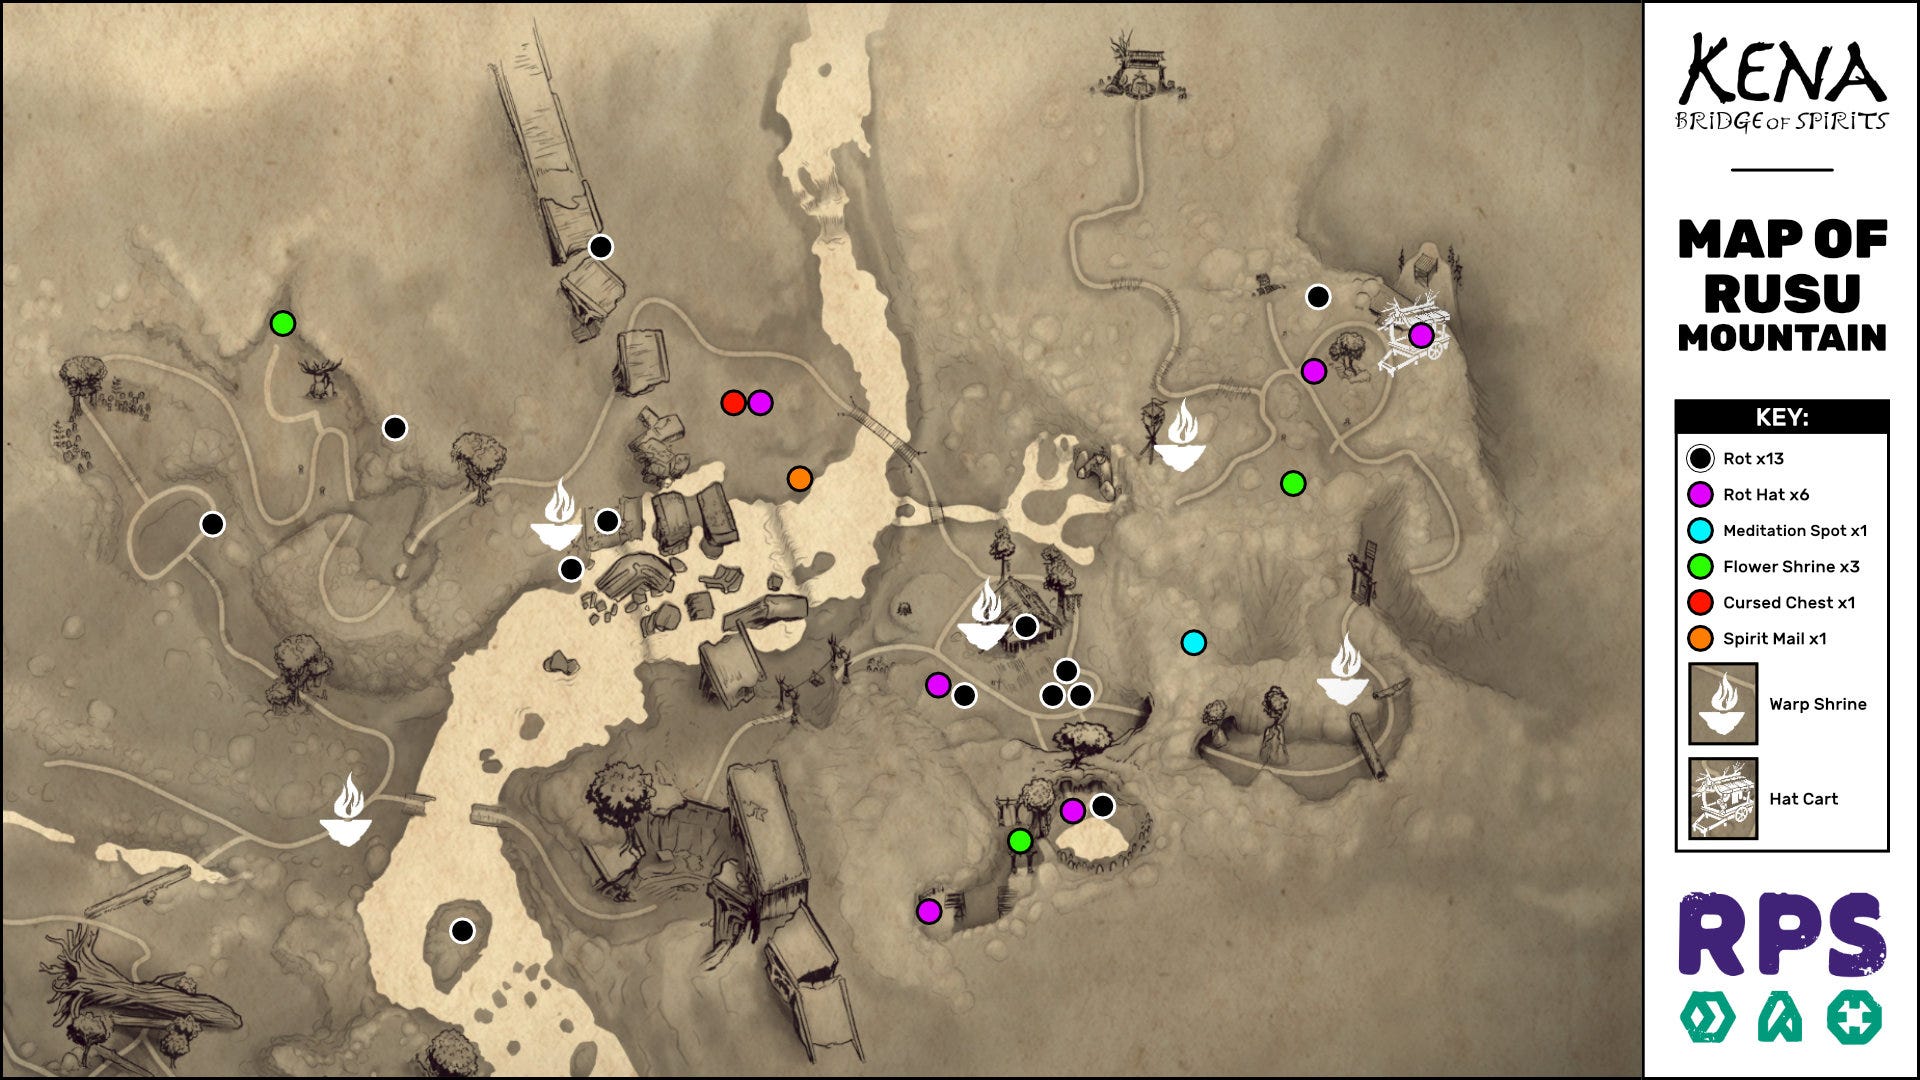
Rusu Mountain is a cliff-dotted area of the map that is home to Rusu, a hunter who holds the key to unlocking the bow in Kena: Bridge Of Spirits. If that's not reason enough to visit this area, it's also home to over 20 collectibles of various types.
Map 5: Forgotten Forest
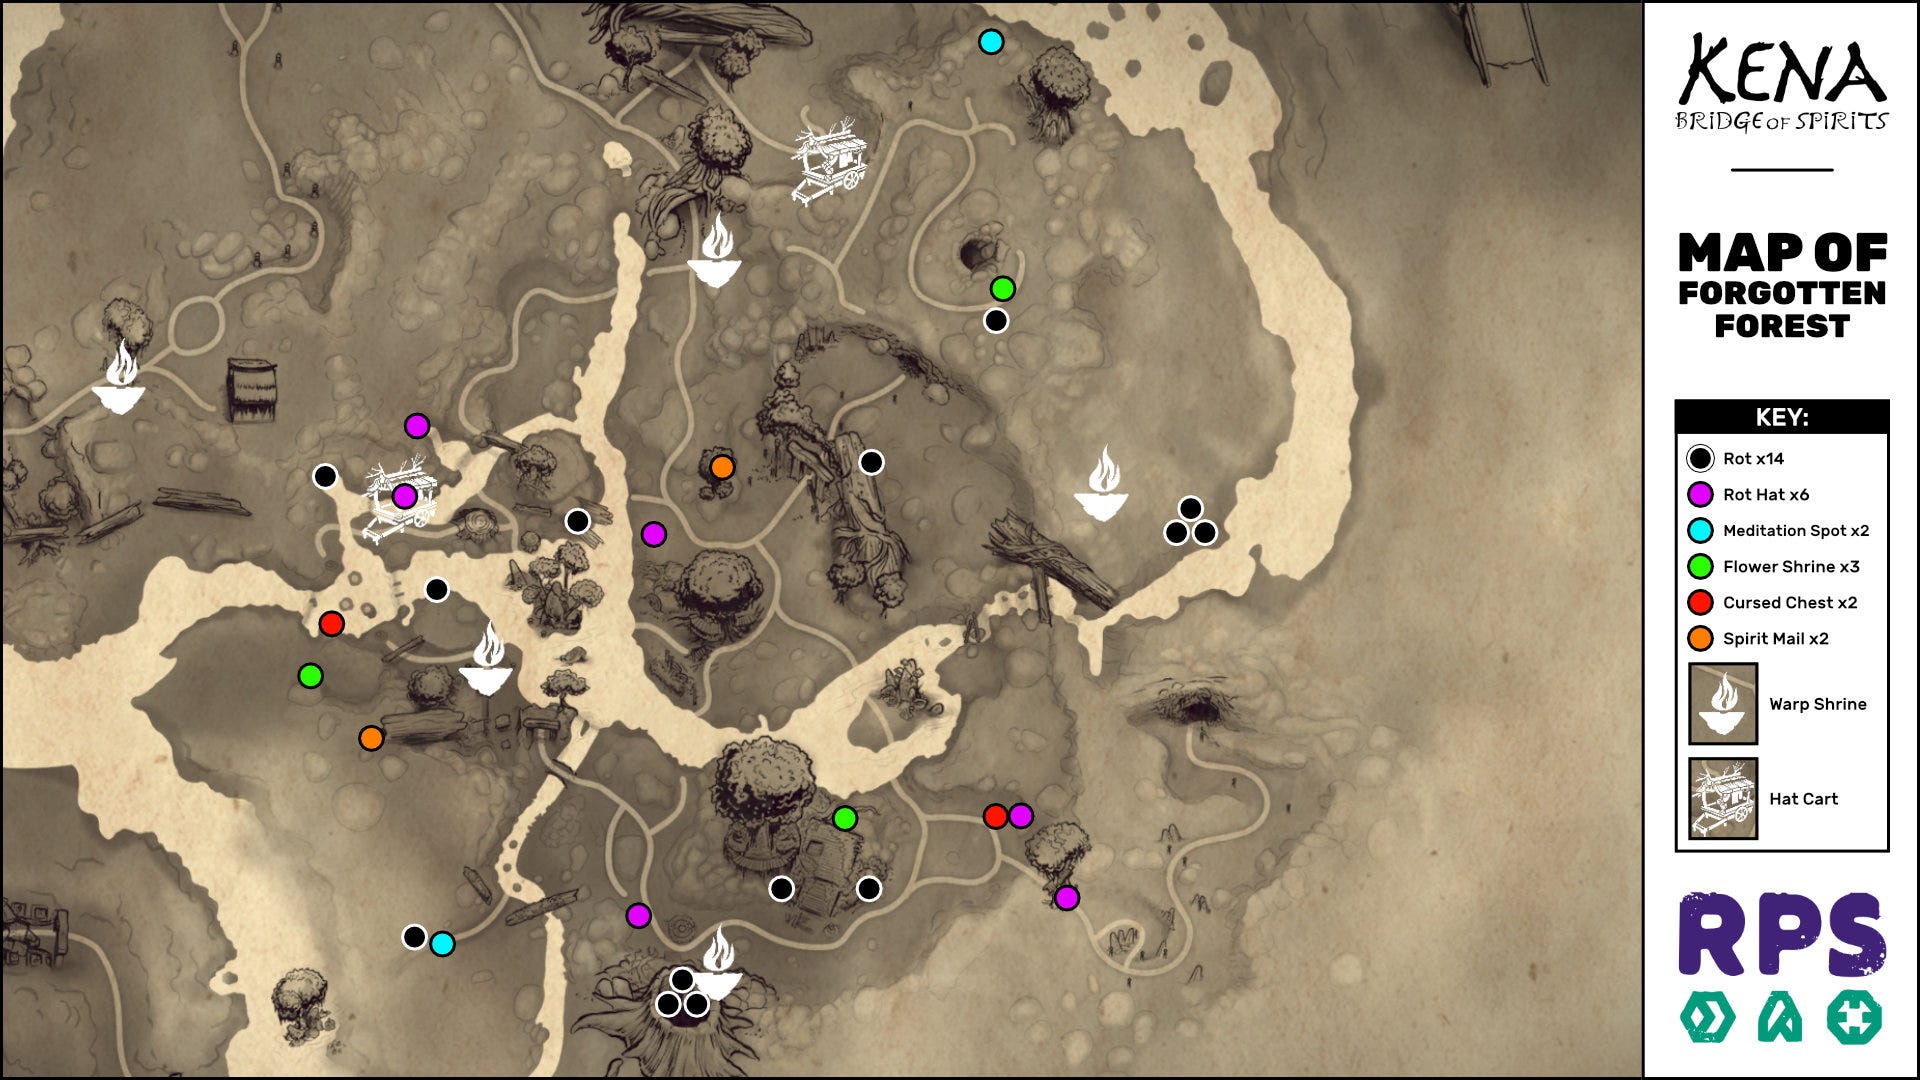
One of the trickest sections of the map, Forgotten Forest hides its collectibles both up high and down low, and often behind little puzzles that you must solve with the aid of the Rot. Pay particular attention to the long platforming section which eventually leads you to the God Tree Shrine as part of the main quest of this area, because there are various things hidden along this vertical journey.
I'll also mention this here because the Forgotten Forest has plenty of them: it's important to understand how to destroy Hay Piles in Kena: Bridge Of Spirits, because there will sometimes be Rot hiding inside them.
Map 6: Storehouse
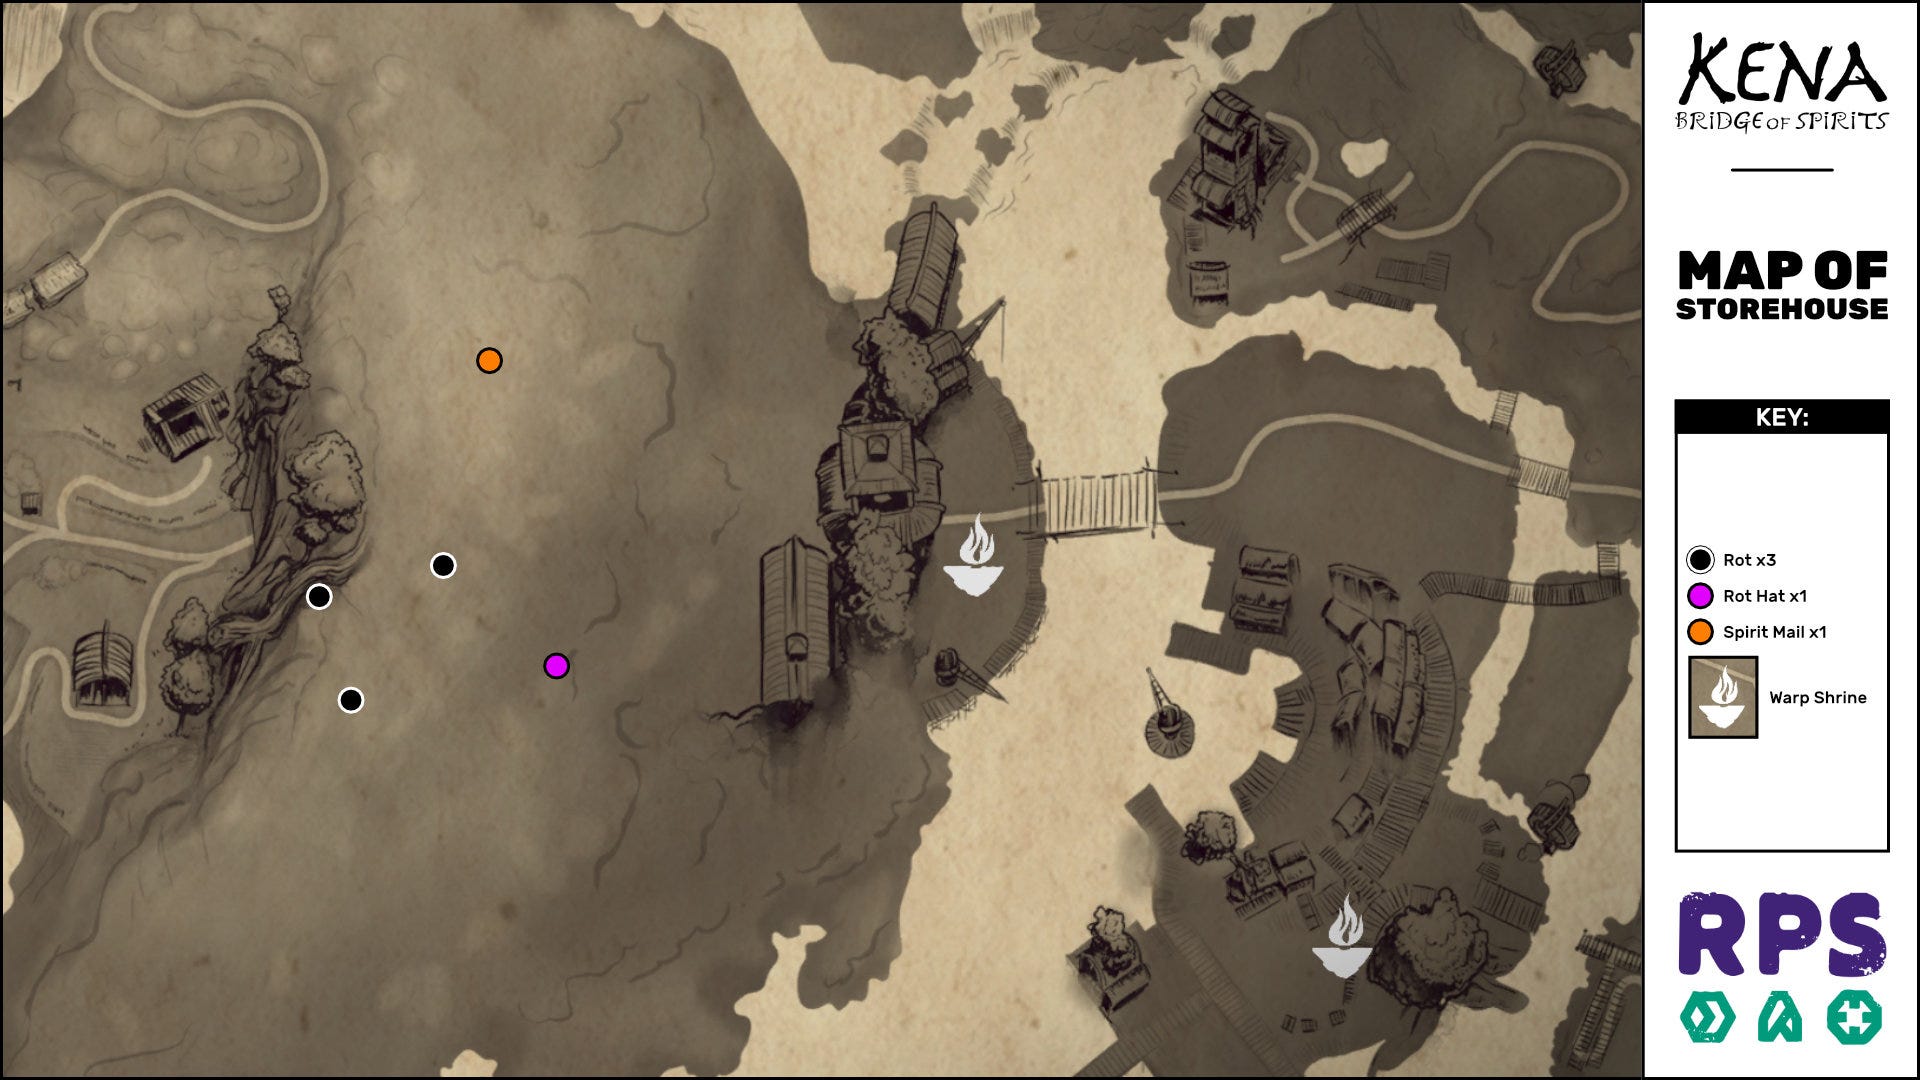
Storehouse is a tiny little area of the map which marks the beginning of the "second act" of Kena: Bridge Of Spirits. You won't spend long here, but make sure you use this map to scoop up all the collectibles inside before moving on!
Map 7: Fields

Fields is one of the largest areas of the map, packed with a whopping 25 Rot to collect and various collectibles besides. The two big buildings to the far left and the upper-right contain some very well-hidden collectibles, so pay extra care when exploring these structures. The upper-right building is also home to a dangerous miniboss (even more dangerous on the higher difficulty levels), so be prepared.
Map 8: Village Heart
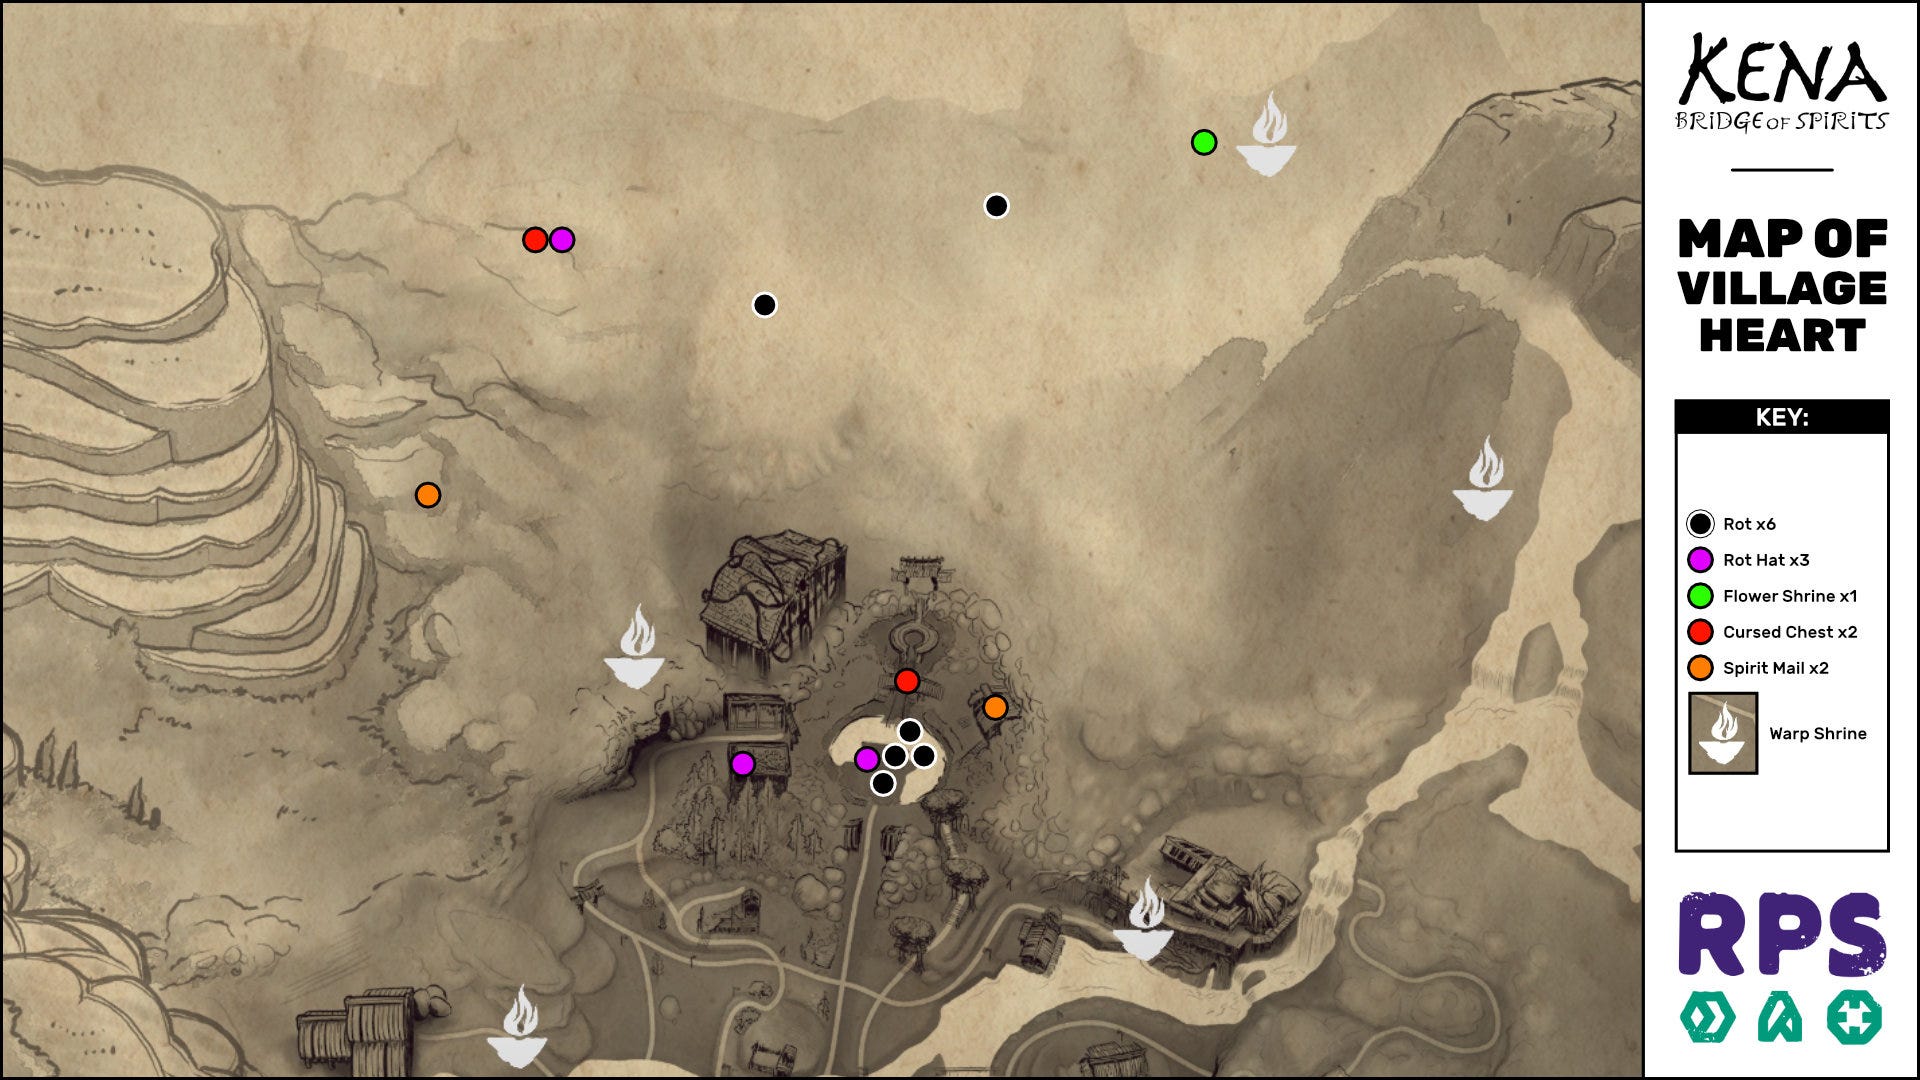
Village Heart is mostly underground, which makes life a bit difficult when it comes to finding the collectibles hidden inside. Thankfully there aren't too many to find, but you should still be careful to explore every nook and cranny in this place. I'll give you a hint: the four central Rot clustered together with that one Hat? They're all underground at the very end of the cave.
Map 9: Mountain Shrine
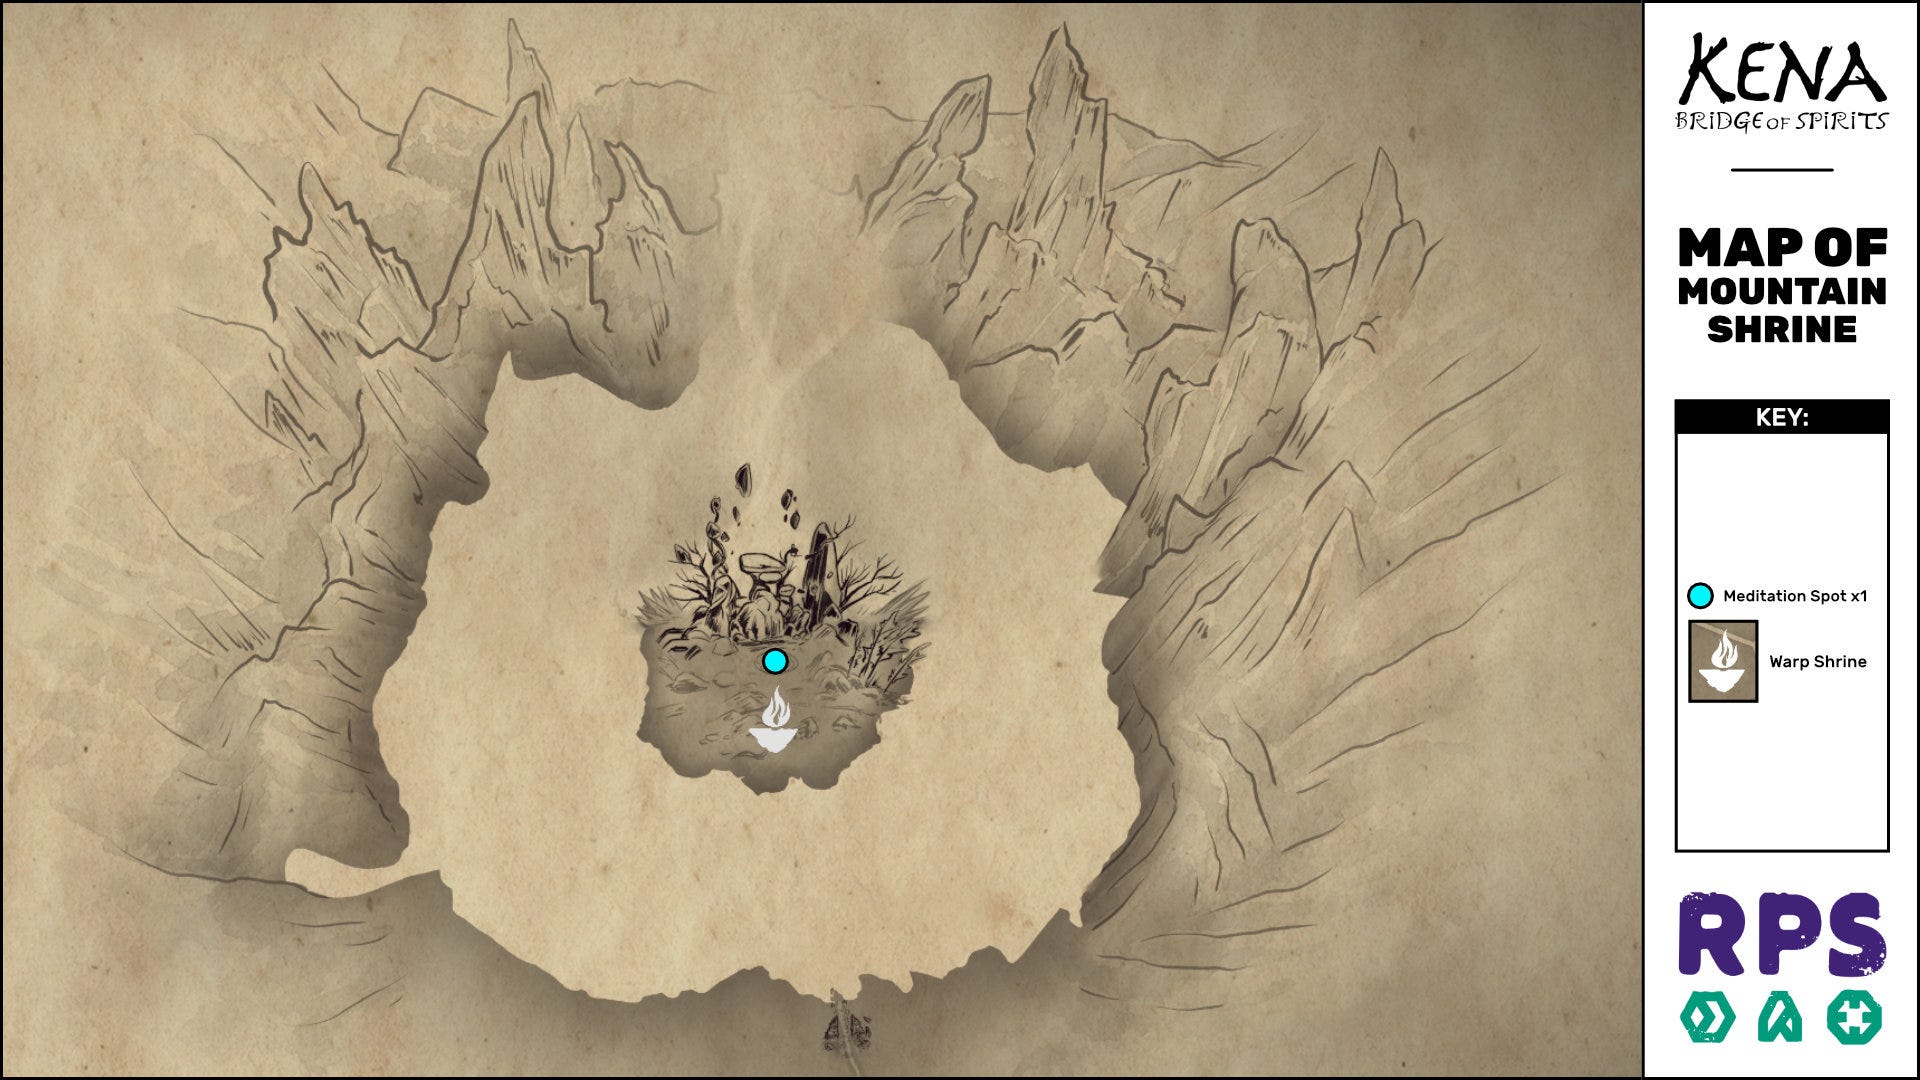
Mountain Shrine is the final area of the game, and I won't say much about it for the sake of avoiding story spoilers. I'm only including it here because it's useful to know that the final Meditation Spot resides here. So don't be like me and hunt fruitlessly for hours for that final Meditation Spot before embarking on the final quest. It's waiting for you at the end.
Hopefully you found the answers you sought thanks to these Kena: Bridge Of Spirits maps. If you're still confused about anything, let me know in the comments and I'll try my best to answer your questions. For more general information and advice on the game, be sure to check out our Kena: Bridge Of Spirits tips and tricks for beginners.