
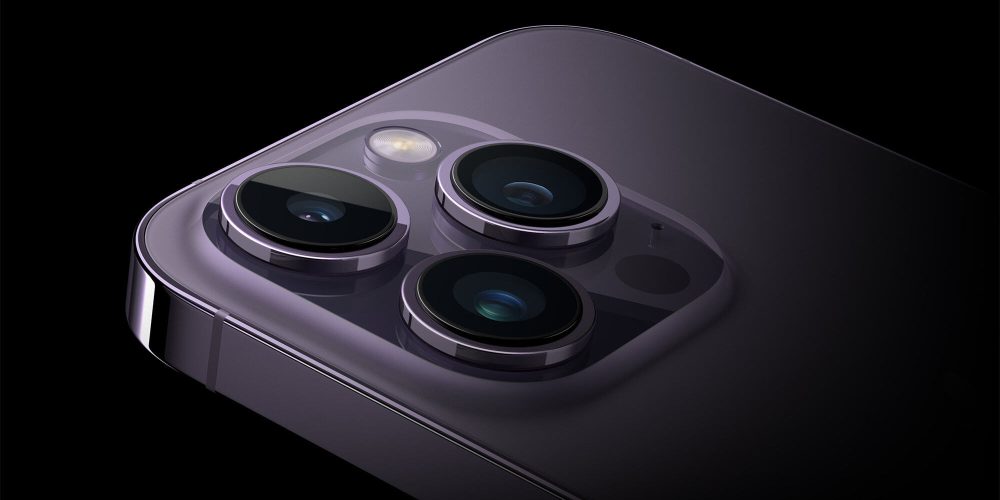
Continuity Camera is easily one of the best new features in macOS Ventura. Starting with macOS 13 and iOS 16, you can instantly turn your iPhone into a super high quality webcam for video calls and more. We’ll tell you how and why you should below.
Brought to you by Mosyle, the only Apple Unified Platform. Mosyle fully integrates five different applications on a single Apple-only platform. Businesses can automatically deploy, manage, and protect all their Apple devices. Request a FREE account to learn how to put your Apple fleet on auto-pilot at a price point that is hard to believe.
What is Continuity Camera?
Continuity Camera in macOS Ventura lets you use your iPhone’s back camera as your video camera for FaceTime, Zoom, and any other app that needs a webcam. The feature also works in apps that aren’t for video calls, like QuickTime and Photo Booth.
The benefit is huge; just compare the quality of your Mac’s webcam with the quality of your iPhone for video recording. Continuity Camera adds video features like Studio Lighting to enhance your environment and Center Stage to make you the focal point from anywhere in view.
Apple has previously included macOS features under the name Continuity Camera like using your iPhone camera to snap a photo to insert in a Keynote slide on your Mac. Going forward, I think using your iPhone as your webcam will be useful enough that it’s what people will mean when they say Continuity Camera.
How to use Continuity Camera
To start, be sure your Mac is running macOS 13 (Ventura) or later. You also need your iPhone to run iOS 16 or later. Both devices should use the same iCloud account to allow the connection.
Continuity Camera works wirelessly, so you are not required to connect your iPhone to your Mac with a cable. You can use a charging cable if your battery is low or you prefer a wired connection, but I’ve found the performance to be excellent without a cable.
If your devices are up-to-date, you’re almost finished with set up. For the best results, Apple highly recommends mounting your iPhone to your Mac’s display. Your iPhone needs to be locked with the back camera facing you – select your iPhone as the video source. How to do this varies by app, so you may need to dig into the app’s settings screen. Learn more about using Continuity Camera with FaceTime here.
QuickTime
QuickTime is the default video player for many file types on the Mac, and it can also be used for creating video. You can do this by launching QuickTime, selecting File from the menu bar, and choosing New Movie Recording.
If your Mac has a webcam, this will probably launch a live video preview from the built-in camera. Move your cursor and the recording/playback controls will appear. The big red circle initiates video recording, and a down-pointing arrow reveals input and quality options.
If your iPhone is mounted and properly positioned, you should be able to select your iPhone from the camera list. In almost all cases, this will make the quality of your video increase exponentially.
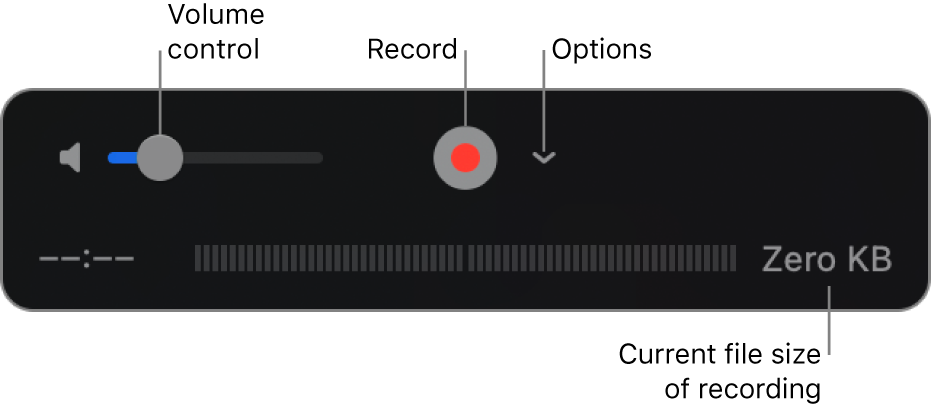
Speaking of quality, here you can also select between high and maximum quality for video capture. High is typically fine as it uses standard compression (H.264 video and 44100 Hz AAC audio) to control file size. Maximum created uncompressed files (Apple ProRes 422 video and Linear PCM audio) that are much larger in size.
Now you can click the red record button and start filming. The benefit of using QuickTime on your Mac with Continuity Camera from the iPhone is that you’re using your phone’s best video camera and you can see what you’re recording in real time. The short setup process is worth it compared to the lower video quality of the selfie cam or hoping you’re framed and in focus with the back cam without seeing yourself in real time.
After you stop recording, QuickTime will prompt you to save your video and choose the save location. Now you’ve created a video that’s quality far exceeds what you could do with the built-in webcam.
Photo Booth
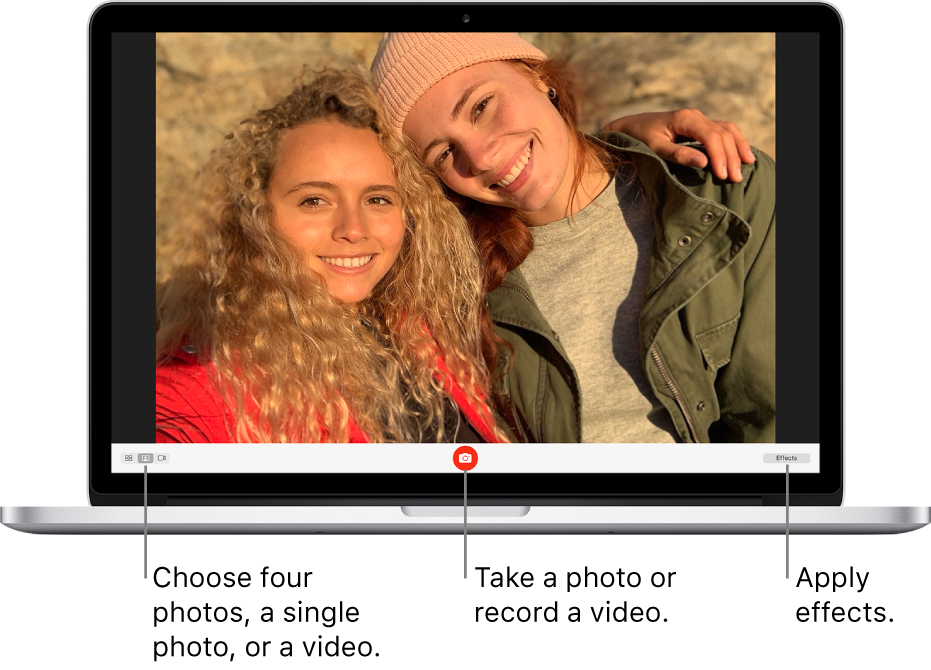
Want to use Continuity Camera on your Mac to take photos? Photo Booth on the Mac can do that. This can be especially useful if your have your Mac and iPhone handy when you’re trying to take group photos for the holidays or special occasions.
That’s because everyone can clearly see how they look before the photo is captured, and Photo Booth provides a countdown before the photo is snapped. Photo Booth also has a number of fun camera effects, and video capture supports these effects as well as Continuity Camera. You can also take four quick photos in succession to create a 4×4 grid of snapshots.
Photo Booth defaults to the built-in webcam. You can change the camera source for Photo Booth under the Camera section in the menu bar. You should see your iPhone as a camera option if it’s mounted or positioned correctly for Continuity Camera.
Once you select your iPhone as the camera source for Photo Booth, you’ll instantly see the quality for both photos and videos increase dramatically. Simply snap a photo or record a video in Photo Booth just like you would with the built-in webcam and it works.
Photo Booth images and videos are saved in the app (and in the Photo Booth library file in Finder). You can use the share sheet or drag-and-drop selected photos and videos to share them to your iCloud Photo Library or elsewhere.
Using Continuity Camera with Photo Booth also lets you add camera effects like Portrait and Studio Lighting for a different look than the built-in webcam can provide. Using your Mac display as the viewfinder without compromising on quality is fantastic.
What happens if you get a phone call?
Great question, thanks for asking. Fortunately, a spammer dialed me up during a FaceTime call while using Continuity Camera.
In every other instance including recording video, the call will take over and stop the camera. Continuity Camera anticipates this, and handles it gracefully. There are no interruptions to your video call, and your phone doesn’t vibrate or blast your ringtone. Instead, macOS plays a single alert tone and displays a notification for the phone call until the caller hangs up.

I will add one phone-related tip: If you find yourself searching for your iPhone and unable to ping it with Find My or the Apple Watch, check the top of your Mac display. Did this happen to me during a video call that involved me telling everyone to hold on while I search for my iPhone? Absolutely, and it could happen to you! That’s how natural using your iPhone as your webcam becomes.
This article is brought to you by Mosyle, the only Apple Unified Platform. Mosyle fully integrates five different applications on a single Apple-only platform, allowing Businesses to automatically deploy, manage, and protect all their Apple devices. Request a FREE account today and discover how you can put your Apple fleet on auto-pilot at a price point that is hard to believe.
FTC: We use income earning auto affiliate links. More.


Comments