
 Yahoo Movies
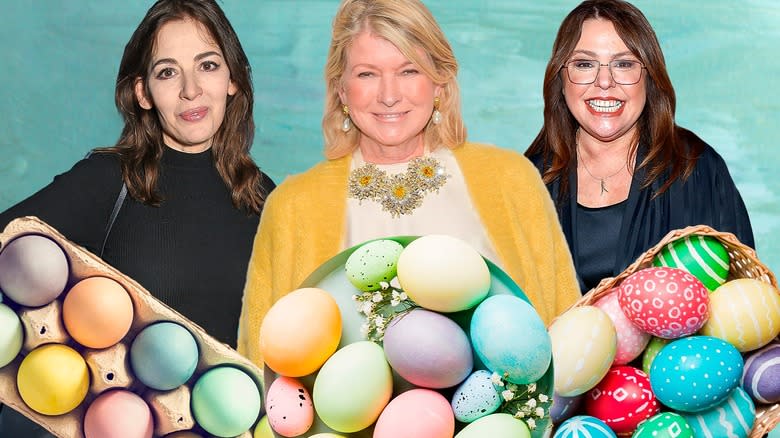
 11 Celebrity Chef Tips For Dyeing Hard-Boiled Eggs This Easter
With its blooming flowers, spring is a season of color. It also includes a colorful holiday, Easter, symbolizing rebirth and creation to people around the world. Along with spiritual rituals and delicious Easter recipes, egg dyeing is another big part of the celebration. In the U.S. alone, millions of egg-dyeing kits are sold for Easter each year, according to Pass.
Though the precise origin of dyeing Easter eggs is unknown, we know that decorated eggs were given as royal gifts since at least the Middle Ages. By the late 19th century, colorful Easter eggs became a highlight for kids as the springtime holiday shifted to become a more family-oriented occasion. This trend led to widespread acceptance of the Easter bunny from German folk customs, and the legendary egg hunts that enliven this colorful celebration.
Egg dyeing lets you express creativity in numerous ways. It's no wonder why this is an Easter tradition in countries around the world. Easter eggs are a blank canvas, a holiday treasure, and perfect leftovers all in one. Enhancing eggs with simple solid colors is just the start — we turned to the advice of varied celebrity chefs for creative tips that anyone can use when dyeing hard-boiled eggs.
Read more: 11 Cleaning Tips For Keeping Your Oven Spotless
Lidia Bastianich's Basic One-Color Easter Eggs
Famed chef and restaurateur Lidia Bastianich is an encyclopedia of culinary wisdom. While she can chef up deliciously elaborate meals with ease, her prowess also extends to simple pleasures like dyeing Easter eggs. In her cooking show, she demonstrates the most basic way to dye eggs with the help of her young granddaughter. Watching this duo dyeing eggs, the experience mirrors what many of us learned during our earliest Easters — that is, before we began evolving into egg-dyeing masters.
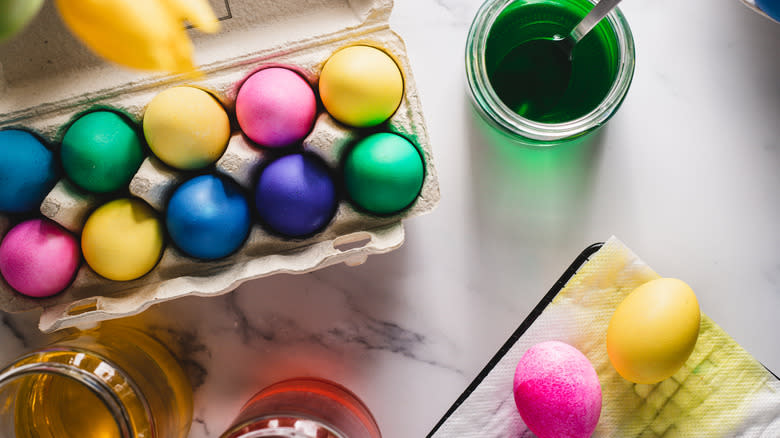
First, Bastianich prepares separate bowls filled with water and food colorings of varied hues. She grabs a hard-boiled egg from her batch and places it into one of the coloring liquids. Her granddaughter follows suit until each bowl contains two eggs, as Bastianich advises her progeny to handle the eggs with care when placing them into the bowls to avoid cracks and messy splashes. After using a spoon to move the eggs around until the dye completely covers them, the eggs are removed from the liquid and set on a rack to dry. To simply dye your eggs one color in this family-friendly technique recommended by Bastianich, you only need a half-and-half ratio of hot water and vinegar, a few drops of natural food coloring, and of course, hard-boiled eggs.
Martha Stewart's Splatter-Painted Easter Eggs
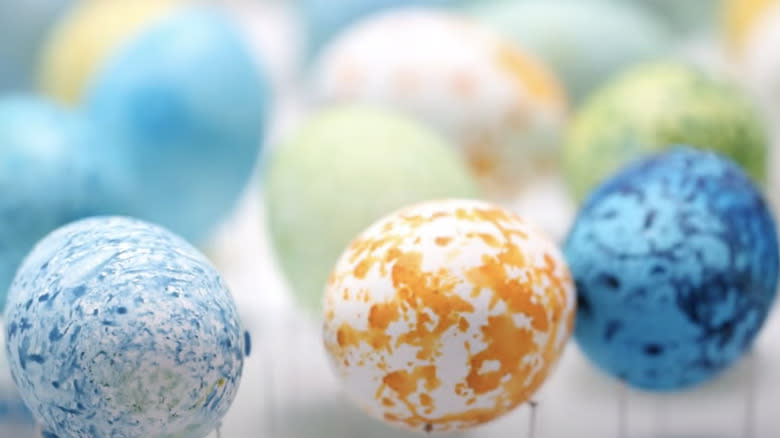
When it comes to elevating lifestyles, nobody is more ubiquitous than Martha Stewart. From easy recipes and beautiful home decor to cooking products and holiday tips, she is a one-stop shop for everyday living. Over the years, Stewart has shared many creative ways to decorate eggs for Easter. In a Martha Stewart YouTube video, the maven shares a splatter-paint dyeing technique to add a burst of color to your hard-boiled eggs. This method gives eggs a Pollock-style look that pops.
With this artsy hack, you have the option of splatter-painting plain eggs and leaving it at that, or dyeing eggs in a solid color first and later using this technique for an extra layer of vibrant fun. If choosing the latter option, after the eggs finish soaking in dye, set them aside to dry. Then place a shallow layer of solid loose ingredients (like dried grains, beans, or nuts) separately at the bottom of a few paper cups. Though it may seem like you're preparing to make an egg-infused trail mix, these cups of distinct ingredients provide varied splatter patterns.
Add up to 15 drops of food coloring to each cup, and swirl the cups around until the different ingredients are coated with the colorings. With your ingredients prepared, place a dry egg into each container before gently shaking the cup. The various textures of each ingredient will cause the food coloring to splatter the eggshell in randomly cool patterns.
Ree Drummond's Emoji-Dyed Easter Eggs

Ree Drummond is always creative and resourceful in the kitchen. The Pioneer Woman's toolkit is stocked with all sorts of useful tips, even ones for dyeing Easter eggs. Preparing for egg hunts can leave you shell-shocked, but with a tip borrowed from a popular online trend, you'll be shocked by how cool your shells are with emoji-dyed Easter eggs. With a little artistry, this technique is easy to pull off and sure to be a hit with kids — but remember that these eggs shouldn't be eaten afterward, as they will be decorated with craft paint and markers that are not considered safe for food.
The first part is easiest — simply paint the eggs bright yellow. You'll have to flex your artistic talent for the next step. There are many types of emojis that you can make; take inspiration from the plethora of options that pop up on social media.
For each egg's chosen emoji, outline the eyes, mouth, eyebrows, and nose with a black marker before applying colors for the finishing touches. If you'd like to make the face-with-heart-eyes emoji, you need white paint for the teeth and red paint for the hearts and tongue, while the legendary face-with-tears-of-joy emoji again requires white paint for the teeth but blue paint for the tears.
Carla Hall's Decoupage Easter Eggs
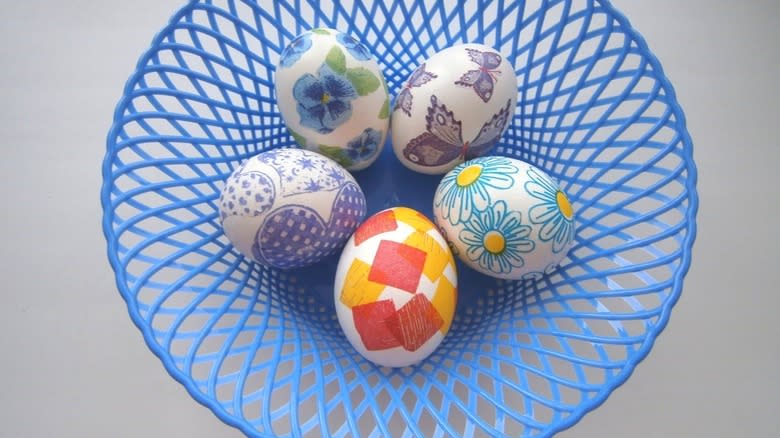
Carla Hall shared an egg-dyeing tip that's so easy, you'll wonder why you hadn't heard of it sooner. With only decorated paper napkins, Mod Podge glue, brushes, and food coloring, you can make eye-catching decoupage Easter eggs. The art of decoupage involves gluing cut-out items onto a surface, similar to creating a collage incorporating papers, fabrics, painting, ink, and other mediums. Paper napkins are available in countless colors, styles, and designs, so you'll find no shortage of exciting ways to decorate your Easter eggs with this technique.
To make decoupage Easter eggs, start by separating the layers of each napkin; only the printed layer is required. If you have colored napkins, Hall suggests cutting them into long strips that can be wrapped around the egg. Geometric and flower shapes can also be cut from napkins and used.
After applying a thin layer of Mod Podge to an egg, carefully attach the colorful napkin pieces, making sure that they overlap a little to cover the egg completely. Brush another thin layer of glue over the napkin for additional adhesion. Set the eggs to dry for a minimum of five hours, and they'll be ready to display. However, though Mod Podge offers water-based non-toxic products, it is not considered safe to eat hard-boiled eggs decorated in this manner.
Sunny Anderson's Tie-Dyed Easter Eggs

For a groovy spin on regular Easter eggs, try Sunny Anderson's tie-dye tip. It's the perfect activity to share with kids. No markers or random legumes are required either -- just gel food coloring, whipped topping, white vinegar, and hard-boiled eggs. With a few simple steps, you'll have the hippest Easter celebration on the block. The first is to hard-boil your eggs, then soak them in white vinegar for 2 to 3 minutes. To create the tie-dye effect, evenly fill ¾ of a shallow dish with whipped topping.
When using gel food coloring, Sunny recommends warm red, orange, and yellow or cool blue, green, and violet combos. She warns against combining warm and cool colors, as they tend to turn brown. Squeeze up to 10 droplets of each color onto the whipped topping, making sure to leave a few inches between. Next, swirl the colors together with a butter knife, but not so much that they emulsify. Now, you can remove the eggs from the vinegar, dry them, and place them into the whipped topping.
After you've submerged each egg, cover any exposed shell with whipped topping. That will ensure the tie-dye effect covers it completely. They only need to sit in the whipped topping for 30 minutes, then can be removed, rinsed in cold water, and dried before they're Easter-ready.
Rachael Ray's Chalkboard Easter Eggs
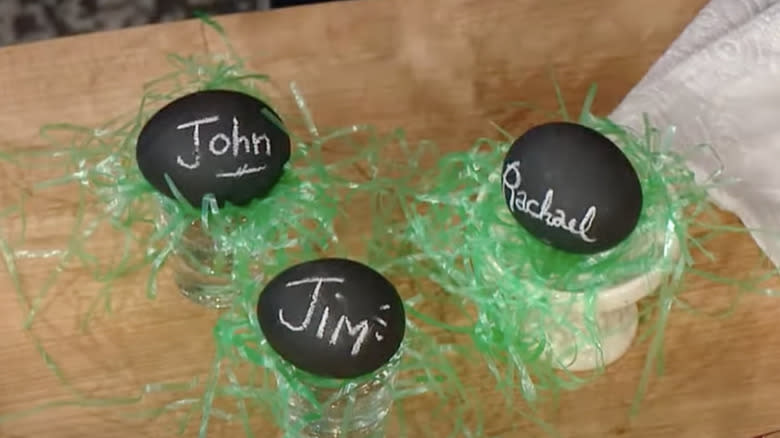
Rachael Ray has shared many crafty egg-dyeing tips over the years — it's clear she knows how to get into the Easter spirit. One tip she shared is for chalkboard Easter eggs, allowing the entire family to personalize eggs with words and fun doodles. Chalkboard paint, a brush, and chalk are all you need. To avoid getting messy fingers during the painting process, a makeshift egg holder can be made with a flat piece of styrofoam and pins arranged on it like a grid closely enough to securely place eggs on the pinheads, allowing you to easily paint the whole egg.
Chalkboard Easter eggs take only a few minutes to make, and even better, both brown and white eggs can work. You'll be good to go with two coats of chalkboard paint, but after it dries, be careful not to apply too much pressure with the chalk as you write.
These can be great additions to your holiday decorations. Place a few finished chalkboard eggs atop a colorful bed of Easter grass, or create a chalkboard-themed basket. You can also incorporate these into an in-depth Easter egg hunt by writing hints on them for competitive hunters. The only downside is that you won't be able to consume these eggs because chalkboard paint is not considered safe to eat.
Diane Kochilas' Onion-Dyed Easter Eggs
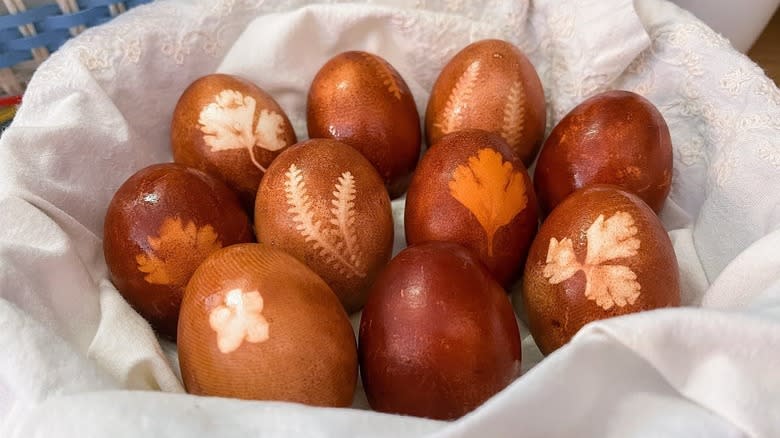
Using food coloring is a popular way to dye eggs, but you can also experiment with numerous plants to use for natural dye. Diane Kochilas decided to go the natural route for Easter by dyeing eggs with onion skins. Neighbors with chickens are abundant in her home base of Ikaria, Greece, so she never has a problem with finding fresh eggs. Luckily, you don't have to live by a chicken coop to enjoy onion-dyed Easter eggs.
Kochilas recommends using red onion skins, giving the eggs a nice crimson color. She uses 10 large red onions, 2 tablespoons of vinegar, and around 4 cups of water. Next, place the eggs into the pot and cover them with a layer of onion skins. The eggs must be at room temperature, not cold from the fridge. With water, vinegar, onion skins, and eggs in the pot, simmer for 30 minutes. You can remove the eggs and set them on a napkin to dry, while the onion-dye mixture can be reused to decorate additional eggs.
The biggest hurdle is deciding how to use the 10 peeled red onions. Kochilas said they work well in an ouzo-onion-pepper marmalade, but you can also use them for a sugar-free pickled red onions recipe.
Rachael Ray's Glittery Easter Eggs
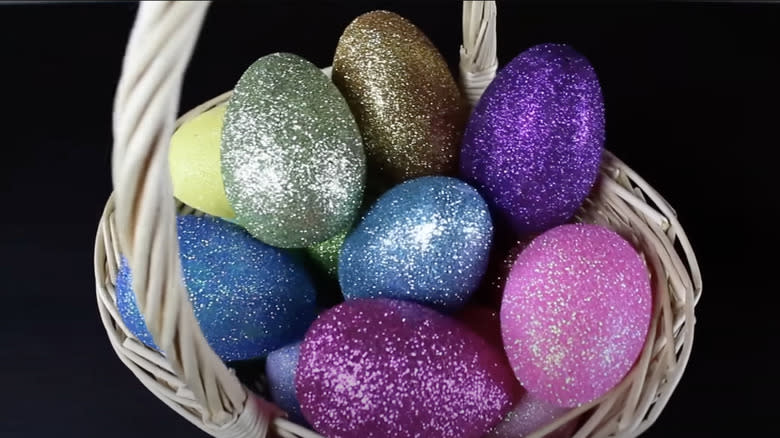
Is a celebration without glitter actually a celebration? Vibrant and shiny, glitter can turn a regular day into a special occasion in an instant. Another Rachael Ray Easter egg dyeing method is to make glittery eggs in moments. It's super easy, only requiring eggs, glue, and glitter — although these eggs should not be eaten afterward, due to the high likelihood of ingesting glitter.
Before you begin, set aside bowls containing your glitter, and for each bowl, have an additional empty one handy. You also need a bowl of water-diluted glue. Then take pre-dyed eggs and dip each into the watered-down glue. (While pre-dyeing the eggs isn't necessary, it adds an extra layer of color beneath the glitter.) Make sure to fully submerge the eggs in the glue so that all sides are coated with adhesive — a dye dipper or tongs are the best way to avoid getting your hands sticky.
Next, place the glue-coated eggs into glitter bowls and use the dipper to roll them around. To ensure that you cover them completely, transfer the eggs to their adjacent empty bowls, then pour the glitter from the other bowl on top. You can then remove them and place them on a paper towel to set for a few minutes. Glittery eggs are treats that should be in every Easter basket.
Martha Stewart's Silk-Dyed Easter Eggs
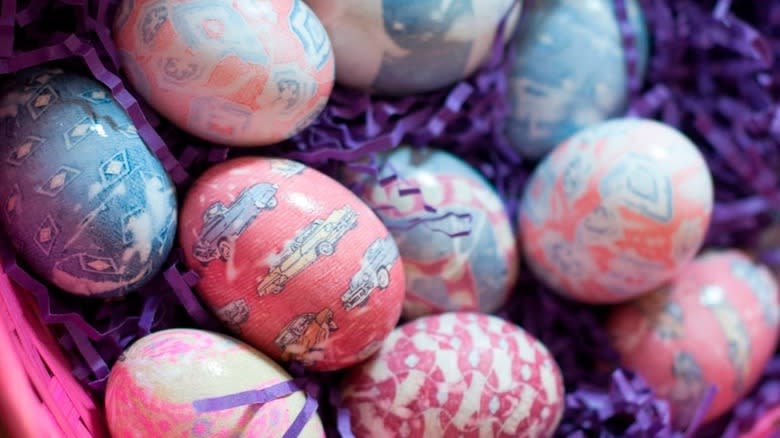
There are several nifty egg-dyeing tips in Martha Stewart's box of culinary tricks. In a Martha Stewart YouTube video, we learn that silk fabric can be used for dyeing Easter eggs. It's a great way to clear out pieces of silk fabric lying around. From flowers and constellations to paisley prints and fruits, this technique provides endless ways to liven up the look of your Easter eggs.
The process is easy, too. All you need is assorted silk fabric (a disused blouse or neckties can work), an equal number of disposable muslin fabric, twisty ties or rubber bands, water, and white vinegar. You start by cutting the silk fabric down to a square just big enough to wrap fully around a single egg. Wrapping the egg loosely will let some of the eggshell color shine through and add a nice effect, or you can wrap the eggs more tightly if you want the print to cover it fully.
After wrapping each egg in the silk and securing the top with a twisty tie or rubber band, wrap each bundle with a similarly sized square of muslin, to prevent the colors from the different silks from bleeding together. Now the double-wrapped eggs are ready to simmer in the pot with water and about 3 tablespoons of vinegar. It only takes 20 minutes to turn your Easter eggs into beautiful decorations.
Nigella Lawson's Marbled Easter Eggs
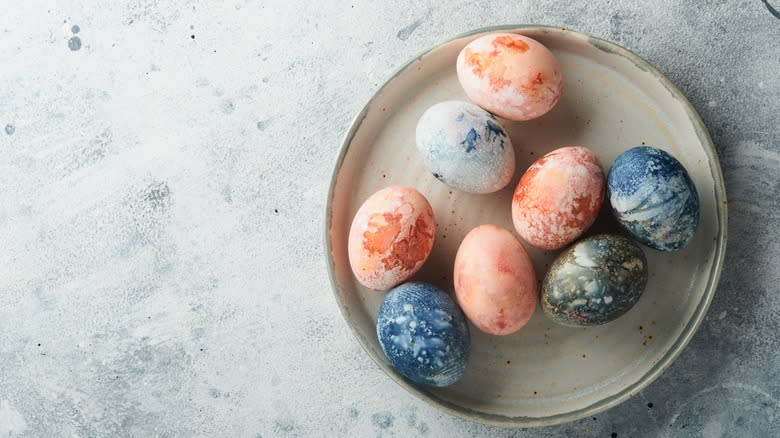
Adding unique patterns is an awesome way to elevate your Easter eggs-perience. On her website, food writer and television personality Nigella Lawson shares a technique for crafting elegant marble-patterned eggs, which results in unpredictably eye-catching designs that mimic geology's natural beauty.
After covering your work surface to protect it from dye spills, take several bowls and put a tablespoon of different food colorings into each one. Follow that up by adding a tablespoon of vinegar and a tablespoon of oil in each bowl, before pouring in about half a cup of water — but make sure there's still plenty of empty space in every bowl so that the dye doesn't overflow when the egg is added.
Stir the mixture in one bowl and dunk an egg into the dye as it swirls. After a moment, remove the egg and dry it. Next, stir one of the other bowls of dye, and dunk the same egg into the new color, again while the liquid is still swirling. You can repeat this process with each egg multiple times, switching up color combinations to see how each turns out differently — but no two will ever be the same.
Marcel Vigneron's Naturally Dyed Easter Eggs
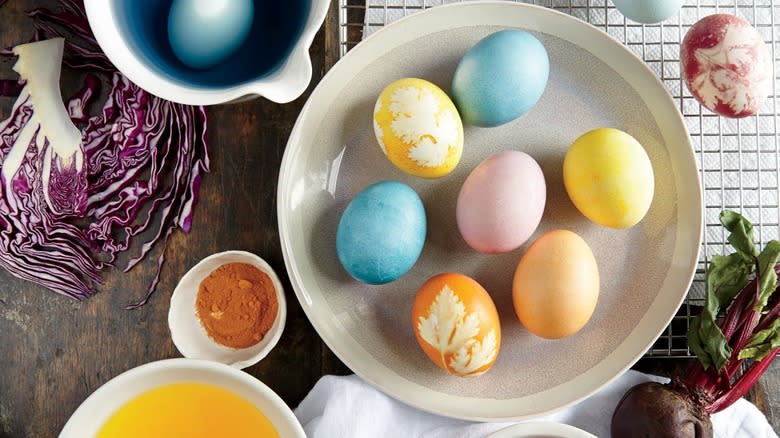
Egg dyeing for Easter goes back centuries, and before artificial food coloring was invented, natural ingredients were used. Foods like beets and berries or spices like turmeric and pomegranate powder can add color to eggs naturally. Unlike artificial food coloring, which is made from a synthetic chemical, natural coloring is often viewed as a healthier alternative. Potential benefits aside, natural dyeing requires a little more work than the artificial method. Artificial food colorings are also more potent, so less is required to achieve a vibrant color. Natural ingredients impart flavors and require experimentation to find the right pairings. Unintended chemical reactions are another downside, as natural ingredients can sometimes react to compounds in foods, resulting in unexpected colors.
"Top Chef" Season 2 runner-up Marcel Vigneron showed ABC News' Olivia Smith how to put an Easter twist on a deviled egg dish. He used beets and matcha as natural dyes and also incorporated turmeric and dried hibiscus food dyes. He began by de-shelling his hard-boiled eggs and placing them into bowls. The bowls are then filled with their respective ingredients and boiling water. It takes around 12 hours for the natural dyes to adhere to the eggs. The best part is that naturally dyed Easter eggs can be eaten like normal eggs and reused for all sorts of recipes.
Read the original article on Tasting Table.

