3D Printed Adapter Helps You Eat Chicken Nuggets On The Highway

So often, we see 3D printers used to create some nifty little tool for a tricky little job. Maybe it’s to lock cams together for a timing belt change, or to work as a jig for soldering some complex device. However, some hacks are even simpler than that. [maker_guy] realized that eating nuggets in the car could be easier than ever with a little printed adapter.

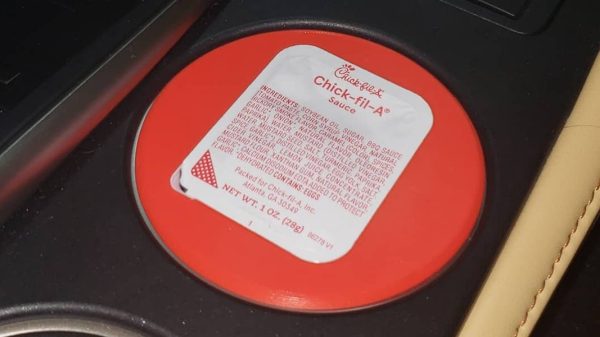
The print is simple. It’s a round caddy for the nugget sauces given out by Chick-fil-A restaurants. Why round? Because it lets the nugget sauce sit neatly in your car’s cupholder at an accessible height. Put the sauce tub in the adapter, peel it open, and you can dip to your heart’s content.

So simple, yet a game changer all the same.

No more delicately balancing Zesty Buffalo by the gearstick while you try and chow down. Nor will your seat covers be tainted with Honey Mustard!

“Not a hack!” you scream. “It’s frivolous nonsense!” To that I say, are you a nugget eater or not? I myself partake, and I can absolutely see the value in this. You see, us journalists work hard. We’re often stuck eating substandard food in our cars on the way from one thing to another, like so many others in busy professions. If a smart little 3D-printed adapter can make mealtime easier and save some mess, I’m calling that a win.

You should never be afraid to use your creativity to make tools to improve your life. Parts are on Thingiverse if you need to print your own. Mod it to suit McDonald’s product if you need. Heck, print in black and it’d look like a stock part of the car!

You don’t have to like this simple adapter, but you can’t deny its utility! Share your own nifty little adapter ideas in the comments.

Manual Supports For 3D Printing

[MakerSpace] wanted to 3D print an RFID card holder. On one side is a slot for a card and on the other side has recesses for the RFID antenna. They used these to control access to machines and were milling them out using a CNC machine. Since there were no flat surfaces, he had to turn on supports in the slicer, right? No. He does use supports, but not in the way you might imagine.

Inspired by creating cast iron using sand casting, he decided to first 3D print a reusable “core” using PETG. This core will support future prints that use PLA. When printing the actual item, the printer lays down the first few layers and pauses. This allows you to stick the core in and resume the print. After the print completes, you can remove the core, and the results look great, as you can see in the video below.

Continue reading “Manual Supports For 3D Printing”

FLOSS Weekly Episode 778: OctoPrint — People Are Amazing At Breaking Things

This week Jonathan Bennett and Katherine Druckman sit down with Gina Häußge to talk OctoPrint! It’s one of our favorite ways to babysit our 3D printers, and the project has come a long way in the last 12 years! It’s a labor of love, primarily led by Gina, who has managed to turn it into a full time job. Listen in to hear that story and more, including how to run an Open Source project without losing your sanity, why plugins are great, and how to avoid adding a special services employee as a co-maintainer!

Continue reading “FLOSS Weekly Episode 778: OctoPrint — People Are Amazing At Breaking Things”

3D Printer Hot Off The Griddle

If you look at [Proper Printing’s] latest video — see below — you’ll immediately get the idea behind his latest printer. There are two heads on two separate gantries, which, of course, opens up many possibilities. But when you think you’ve seen enough, you find out the heated bed is a kitchen griddle, and… well, for us, we had to keep watching.

The heated bed idea was interesting, although the flatness left something to be desired. While it is a simple idea, getting the two gantries to move reliably across the hotbed griddle took a lot of parts and a careful design. We wonder how evenly the griddle heats — ours definitely has hot spots when we cook with it.

Continue reading “3D Printer Hot Off The Griddle”

Wear Testing Different 3D Printer Filaments

Over the couple of decades or so since it started to be available at an affordable level, 3D printing has revolutionized the process of making custom objects. But as anyone with a 3D printer will know, sometimes the materials don’t quite live up to the application. There is a huge variety of available filaments to help make better prints, but which one really is the most hard-wearing? [My Tech Fun] set out to measure the resistance to wear of a variety of different 3D printed materials.

The test takes a standard print made across a variety of different materials, and several of each using different manufacturers’ offerings. These are then put on a test rig that moves backward and forward twice a second, with the test piece rubbing against a steel shaft under pressure from a 2.5 kg weight.

As might be expected, the common and cheap PLA performed the worst while PETG, PA, and TPU performed the best. But for us the interesting part comes in the variance between brands; the best PLA sample outperforms the worst ABS and nearly equals the worst of the PETG. Proof that maybe you do get what you pay for.

The whole test is well worth a watch, and if you 3D print anything that might be subjected to mechanical stress you should find it to be of interest. If comparing filaments is something you’d like to see more of, we’ve featured some tests before.

Continue reading “Wear Testing Different 3D Printer Filaments”

Thrift Store CD Rack Turns Into Small Parts Storage Playground

What in the world could an accessory for an obsolete audio medium possibly have to do with keeping all your unruly bits and pieces in order? First of all, we’re not sure the CD is quite dead yet; we’ve got about a thousand of them packed away somewhere, and we’re pretty sure they’ll be back in style again one of these days. Until then, though, the lowly CD rack might be just what you need to get your shop under control.

As [Chris Borge] relates the story, he stumbled over this CD rack at a thrift sale and quickly realized its potential. All it took was some quick design work and a bit of 3D printing. Okay, a lot of 3D printing, including some large, flat expanses for the drawer bottoms, which can be a problem to print reliably. His solution was simple but clever: pause the print and insert a piece of stiff card stock to act as the drawer bottom before continuing to print the sides. This worked well but presented an adhesion problem later when he tried to print some drawer dividers, so those were printed as a separate job and inserted later.

Sadly, [Chris] notes that the CD format is not quite Gridfinity compatible, but that’s not a deal breaker. He also doesn’t provide any build files, but none are really necessary. Once you’ve got the basic footprint, what you do with your drawers is largely dependent on what you’ve got to store. The video below has a lot of ideas for what’s possible, but honestly, we’re looking at all those little parts assortment kits from Bojack and Hilitchi piled up in a drawer and just dreaming about the possibilities here. Add a voice-activated, LED inventory locator, and you’d really have something. Off to the thrift store!

Continue reading “Thrift Store CD Rack Turns Into Small Parts Storage Playground”

Design Tips To Hide Layer Lines In 3D Printed Parts

[Slant 3D] knows a lot about optimizing 3D prints so that they can be cranked out reliably with minimal need for post-processing, and in this short video he uses a cube as a simple example of how a few design changes can not only optimize for production, but can even hide layer lines pretty effectively.

Just to be perfectly clear, layer lines cannot be eliminated entirely without some kind of post-processing. But [Slant 3D]’s tips sure goes a long way toward making a part lose that obvious 3D-printed “look”. They also dovetail nicely with advice on how to optimize cranking out high numbers of parts in a print farm.

Adding texture to the outer layer is especially effective when combined with non-traditional part orientations.

One simple way to avoid visible layer lines is to put some kind of texture onto the part. This can be modeled into the part’s surface, or the slicer software can be used to modify the exterior of the print to add a texture such as a geometric pattern or by applying a fuzzy skin modifier.

Printing a texture onto the exterior is great, but the outcome can be even further improved by also printing the object in a non-traditional orientation.

Using a cube as an example, printing the cube on a corner has the advantage of putting the layer lines in a different orientation as well as minimizing the contact area on the print bed. This applies the texture across more of the part, and looks less obviously 3D printed in the process. Minimizing bed adhesion also makes parts much easier to remove, which has obvious benefits for production. [Slant 3D] points out that performing these operations on a 3D-printed part is essentially free.

A few other optimizations for production involve rounding sharp corners to optimize tool travel paths, and putting a slight chamfer on the bottom of parts to avoid any elephant foot distortion (Elephant’s foot can be compensated for, but simply putting a slight chamfer on a part is a design change that helps avoid accounting for machine-to-machine variance.)

Even if one has no need to optimize for high production volume, the tips on hiding layer lines with design changes is great advice. Watch it all in action in the short video, embedded below.

Continue reading “Design Tips To Hide Layer Lines In 3D Printed Parts”