A Digital Landscape Photographer’s Introduction to Film

I am constantly asked questions about how I started and how to start shooting film. So, here we go! This guide is intended to be a story of my introduction to film as a landscape photographer, provide some tips, introductions, and guidance, but in no means is it intended to be a foolproof method of how to shoot film.
My introduction to film was very simple. About 7 years ago, I was fully immersed in the digital photography world, and nearly every image I shot was a stitched panorama. The reason I stitched was the drive for resolution – I wanted to print…and print HUGE. Sound familiar?
It was a single trip to the California coast, where I was attempting to stitch a panorama of the Golden Gate Bridge along the shoreline, where I began to become incredibly frustrated with stitching. Everything was moving, and when I got back to the computer, I just couldn’t get the images to stitch properly. Practically everything I had attempted to photograph was ruined. Thus, I began the search on how to create a large panorama in a single frame. The short answer was film.
The more I searched for a solution, the simplest answer was a panoramic camera – a film camera. I settled on a Linhof Technorama 617 SIII, a medium format roll film camera, due to its optical reviews, and the fact that it had a dark slide which allowed me to change lenses mid-roll. This was all Greek to me at the time, but it’s what the reviews said, so I went with it.
I purchased the camera, threw in a couple rolls of Fuji Velvia 50 (again…because the reviews said it was the best) and started rocking and rolling with the camera (or so I thought.) I sent the rolls out to be developed, and a couple weeks later, I was horrified by the results. Everything was drastically underexposed or overexposed and everything was basically ruined. I kept trying and trying, and after about three or four months, I finally nailed an exposure and the lightbulb came on. Thus, began the love affair with film. It was only the beginning.
Why Shoot Film? What’s the Point?
The Process
Film was the simple choice for me. It achieved the results I wanted to create at that time, shooting a high-resolution panorama in a single frame, but I quickly began to love the process. I have met so many people who began shooting film when they were young, transitioned to digital and have never looked back.
Digital is the height of their experience with photography and it’s exciting for them. For me, digital was an incredible method of learning photography. It provided instantaneous technical feedback, provided me with a skillset in Photoshop and gave me the foundation I needed to even begin to think about film. But, for me, digital photography lacked the soul I crave with film. Everything is too perfect and is quickly becoming more perfect than we had ever anticipated.
Film is a very unique, thoughtful, and tedious process that is not for everyone. For me, it’s meditation. It’s a separation from the anxiety of creating an image when the light is fantastic, knowing you may possibly fail, the film could be ruined, lost, or damaged, and requires the photographer to be calm. Prior to beginning to shoot film, I’d run around during a sunset, stressing about the light, creating multiple compositions, and attempting every shot I could think of. Now, my compositions are thoughtful, planned, and calculated – because they have to be! Film is inherently slow, but I have never viewed this as a crutch.
Having the time away from the exposure of an image to the time you develop it, and until you finally see it on a computer screen is incredibly beneficial to me. To those of you reading this who still photograph digitally, I encourage you to try to wait a week before you digitally process your images from a shoot. Instead of acting purely on the moment, allow time to pass so you can be more thoughtful in editing and processing your work.
Specifically, with large format, composing has now become a meditative process as well. Large format cameras are naturally cumbersome – they take time to set up, compose, and focus. Using this camera, you compose upside down and backward on a ground glass, which has taught me to be more thoughtful with compositions. You’re much more aware of shapes, compositional motion in your images, and patterns, when you are not seeing your composition as your eyes naturally see the world. During the exposure, unlike most SLR and rangefinder cameras, when you’re photographing large format, you are standing next to the camera. You become part of the exposure, timing everything precisely. Again, it’s meditative, thoughtful, and very involved.
The Prints
I am a huge advocate for learning photography through printing your work. I teach for Muench Workshops and it always shocks me how many people choose to never print their work. If you never see your photograph printed larger than what you can see on a computer screen, then why take the photo? In my opinion, a print is just the final process of creating a photograph, and by leaving that step undone, you’re limiting yourself as an artist.
Since I began shooting film, I’ve loved printing so much more. I’m not going to get into the film vs. digital wars here, because I am of the opinion that both have their advantages and disadvantages, especially in print. I will say that I feel prints from film have more character and life. Why? Firstly, there’s a certain way film renders color that I feel will always have an advantage over digital, specifically subtle color.
Secondly, grain! Grain is a bad word for most photographers these days, but with film, you must embrace it. It’s part of its character, and the smaller the format, the larger the grain appears in print. But this isn’t detrimental to the print in my opinion. With grain, the print feels more tangible and has more character.
I personally choose to not enlarge a shot from a 35mm camera to 60×90”, but if you did, you’d just see larger and larger grain. That’s the beauty of it! At a certain point, the prints from a digital camera begin to break down and you begin to see pixelated artifacts. With film, you just begin to see grain. (Note: naturally, unless you’re printing directly from film, you’ll be scanning, so your film image is truly a digital image, so at some point your grain will become pixels…but that would be grossly over-enlarged.)
The Technique
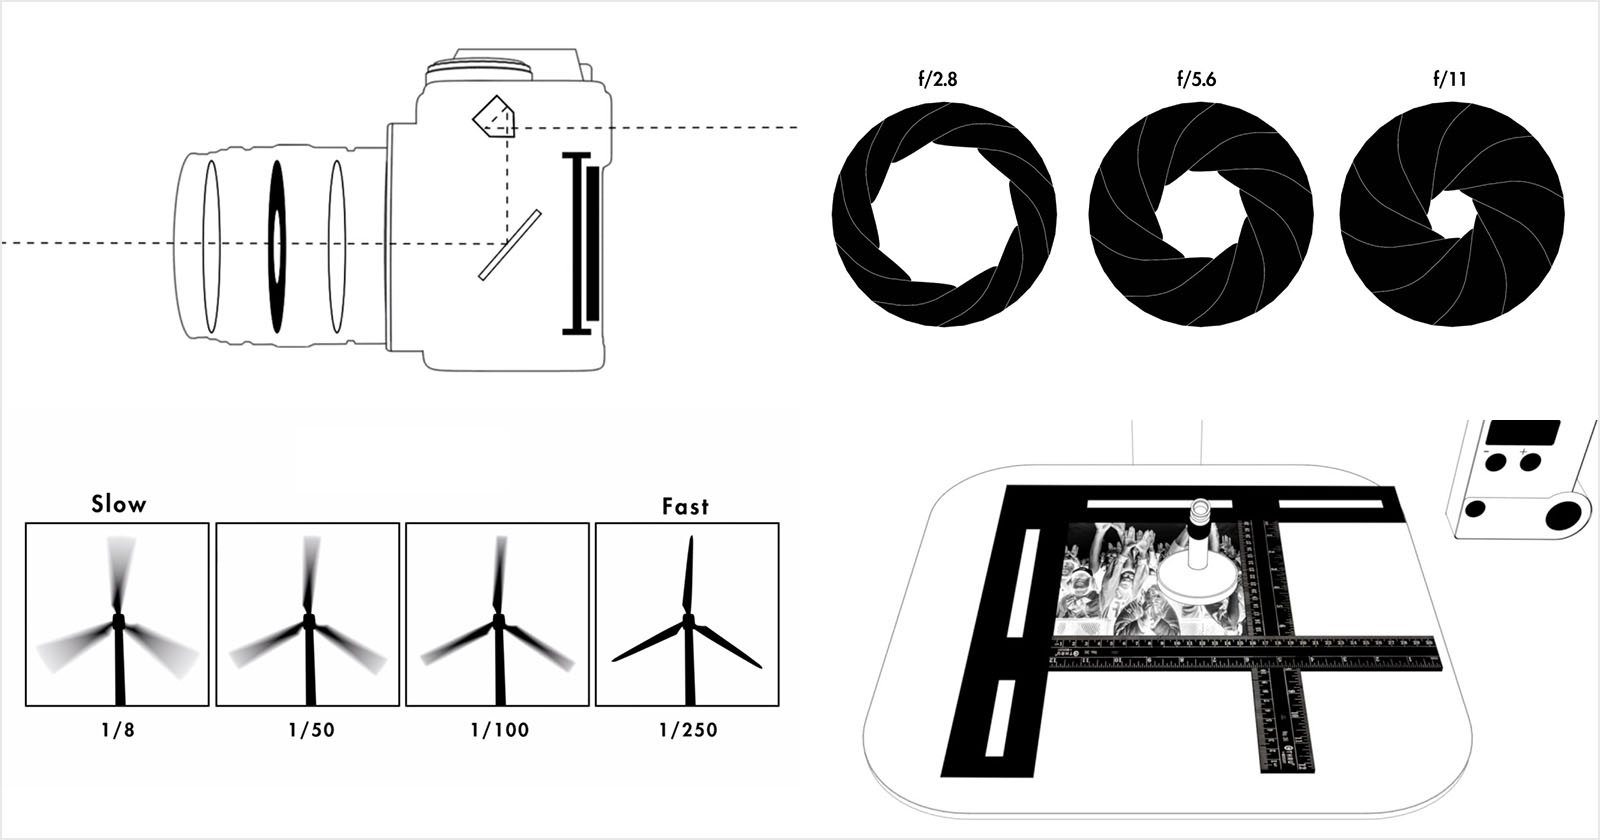
Metering for film is probably my most asked question and deserves its very own blog to come at a later date. What I can simply tell you is that with film, specifically transparency film, it forces you to truly understand the exposure triangle.
I want to note that with each particular film stock, you must meter precisely to achieve the best results with that film, but generally speaking, film can make you a more technical photographer. You must understand and choose your depth of field accurately based on the scene you are wishing to photograph, know how to set your hyperfocal distance, know how to tilt/swing/rise/fall, and then know how to meter and expose.
It takes some work and trial and error, but I guarantee that it will make you a better digital photographer. You will soon begin to slow down and think about what aperture and shutter speed to use, rather than blindly looking at the back of your LCD screen. I challenge every digital photographer to go out on a shoot, tape up the LCD screen, and see if they can make an accurate and proper exposure without using the crutch of instant feedback.
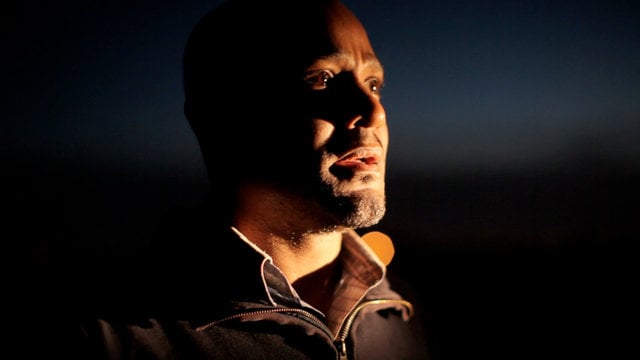
What film has taught me beyond anything else is how to see, understand, and photograph light. With digital photography, you somewhat have a scapegoat in your ability to resolve nearly every detail and tonality in a scene, and it’s getting worse (or better, depending on your platform) by the day. That fateful morning when I was photographing sunrise and captured my first piece of properly exposed film, mentioned above, was not necessarily due to me being technically proficient, as much as it was photographing in quality light.
You may think the term “quality light” is subjective, but as a matter of fact, I feel it is absolutely objective. Film, specifically transparency film (you’ll learn more about this below), has a very low exposure latitude, meaning it can only capture a small dynamic range of light. Within this range (about 5-7 stops of light) is where I truly believe quality light exists. This fatal “flaw” of transparency film has taught me to see within this range of light because I frankly had no other choice. But by limiting my options and only photographing within this boundary, I began to have more successful imagery than ever.
Before, with digital, I was very much in the vein of HDR. Not necessarily crunchy Trey Ratcliff (sorry Trey) HDR, but I would create images where I would have to blend multiple exposures to create a final image in Photoshop. At the time, I thought they looked great, but I was pointing my camera into the sun, making an exposure for the sky, and making an exposure for the incredibly dark, shadow-laden foreground and then blending so that everything was relatively the same exposure.
Film taught me to turn around and look for the good light, rather than attempt to create it in Photoshop. By looking 90 degrees or completely in the opposite direction of the sunset, I was able to capture light ON the subject in a single exposure, within 5-7 stops of dynamic range, and was thus photographing in “quality light.”
Film Sizes and Equipment
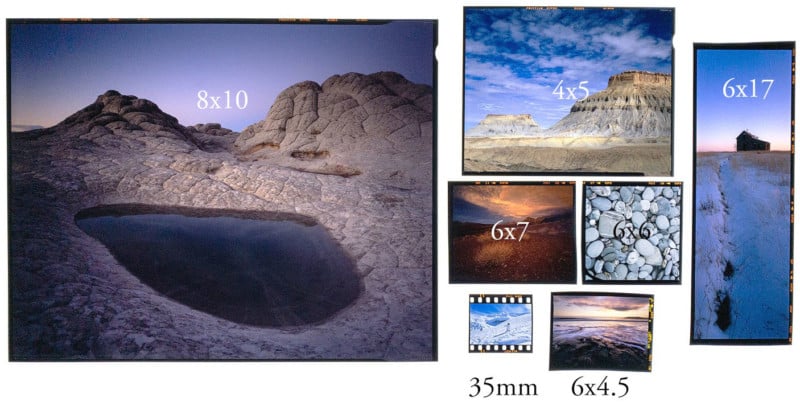
35mm
35mm is probably the easiest jump into shooting film. 35mm film is self-contained into little canisters that are pretty painless to use. In many cases, you’ll be able to use your current digital lenses with some film cameras. For instance, remember how I said I learned on digital? I’ve always been a Nikon shooter, and when I switched fully into film, I was able to use some of my old Nikon lenses on a Nikon F5, a late model fully automatic professional film body Nikon made before jumping fully into digital.
With the Nikon F5 (and many other Nikon film cameras) you’re able to use all your modern autofocus F-Mount lenses with the film camera. So with a minimal purchase ($300-$500) for the camera body, you’re ready to start shooting. Film is also incredibly easy to find in 35mm, with a huge array of choices, from B&W to color negative to transparency film, the options are all yours. I use 35mm for telephoto wildlife and landscape work, when I can’t use a tripod, which is very few and far between.
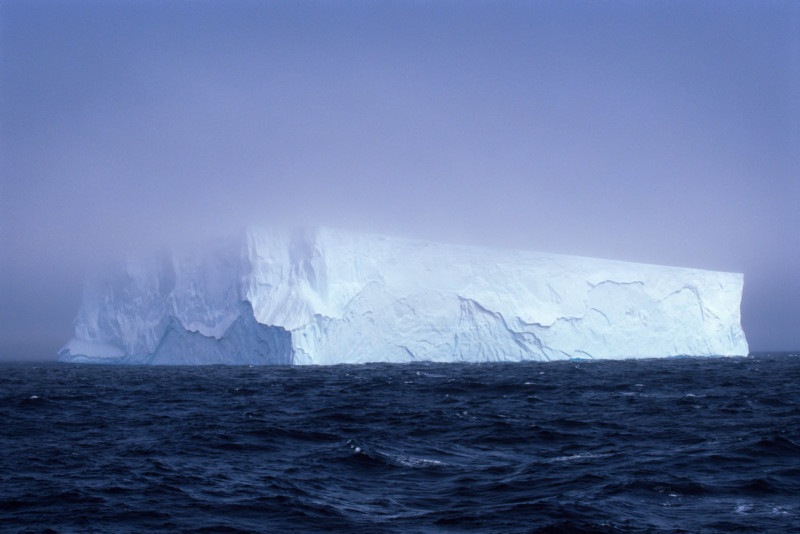
One debatable downside to shooting 35mm is your scans will be relatively small and if you decide to shoot a higher speed film, your shots will be much grainier than larger formats. I’ve had success with drum scans printing 24×36” from a 35mm low-speed transparency, but that’s pushing the limits of the film in my opinion. On a higher speed film, you’d just have to play it by ear. If your intent is to just post online, then maybe 35mm is for you! This past year in Antarctica is the first time I have been truly successful with 35mm paired with telephoto lenses, and I feel its uses for my personal work will be extremely limited.
Camera suggestions
- Fully Automatic Cameras
- Nikon F5
- Nikon F100
- Semi Automatic Cameras
- Leica M6
- Canon AE-1
- Fully Manual Cameras
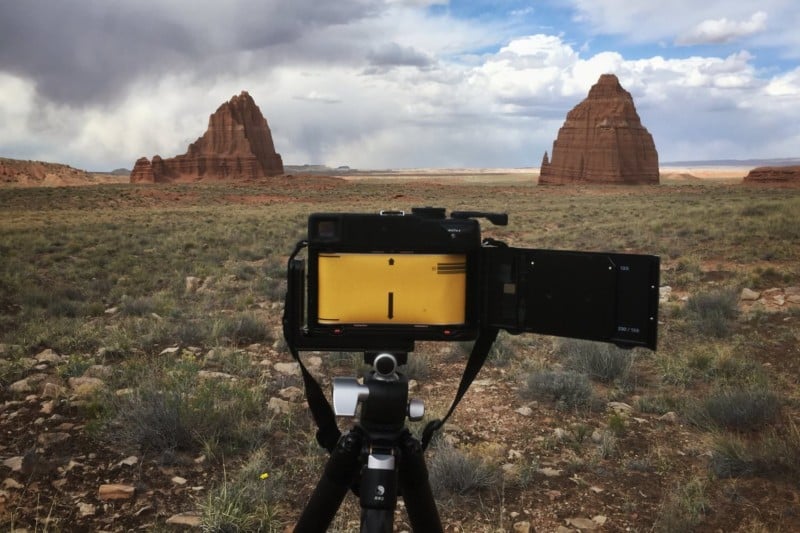
Medium Format
I would have to say that a medium format camera is probably the best bang for your buck if you think you’ll end up wanting to take film fairly seriously. For those seeking the “film look,” or to those wishing to have an overall film camera for portraits, landscape, etc., I think you’ll be most happy with a medium format camera.
Medium format is a camera that uses either 120 or 220 (no longer made) roll film. There are many different formats available that are considered “medium format” and include 6×4.5(cm), 6×6, 6×7, 6×8, 6×9, 6×12 and 6×17. Within each of these formats, there are seemingly endless different kinds of cameras that can fit inside of every budget. With that being said, film has been on the rise in the last few years, and some cameras have absolutely skyrocketed.
You’ll find your more compact and mostly automatic cameras with the smaller formats such as the 6×4.5 (or just 645) cameras. These are very popular with portrait and wedding photographers, but I also think that some of the 645 SLR cameras can be great for landscape photography, specifically if you are backpacking or just want a fully automatic, autofocusing, autowinding camera, and auto metering camera. These cameras also usually have faster optics, so you’ll be able to handhold them in lower light more easily (hence the reason portrait and wedding photographers generally use them.)
So…where to start? I suggest starting simple with a 645 camera. A Pentax 645 N is a great, hardy camera that is well built and has fine optics. As is the Mamiya 645, both AF and earlier models. There are plenty of rangefinder cameras in this format as well that are incredibly small, lightweight, and have amazing optical performance, but have become very expensive in the past few years and can be difficult to use since you can’t see through the lens.
If you’re still itching for a slightly bigger aspect ratio, my favorite is 6×7. I personally use a Mamiya 7ii, which is a rangefinder but is small, lightweight and perfect for the backcountry and air travel. It’s been a magnificent camera for me, and the optical performance is some of the best I have ever used in a medium format camera. If you aren’t as concerned about weight, the Pentax 67 MLU (mirror lockup) is a fine choice and set the standard for landscape photographers in its heyday.
Camera Suggestions
- 6×4.5
- Mamiya 645
- Pentax 645 N
- Bronica RF645
- 6×6
- Hasselblad 500 c/m
- Mamiya 6
- 6×7
- Pentax 67 MLU
- Mamiya 7 (7ii)
- Mamiya RZ67
Large Format
Large format film ranges from 4×5 (inches) to 8×10, with a few less popular formats in between, such as 5×7. This film comes in sheets, usually in boxes of 10, 20 and 50, and have to be manually loaded into film holders by the photographer in complete darkness. Resolution goes through the roof with 4×5 and continues up with the larger film you begin to use. It’s truly remarkable to see how detailed these sheets of film can be. Large format cameras allow the photographer ultimate control over the image, from focus to perspective control, by the use of camera movements (tilt, swing, rise/fall) to achieve the desired results.
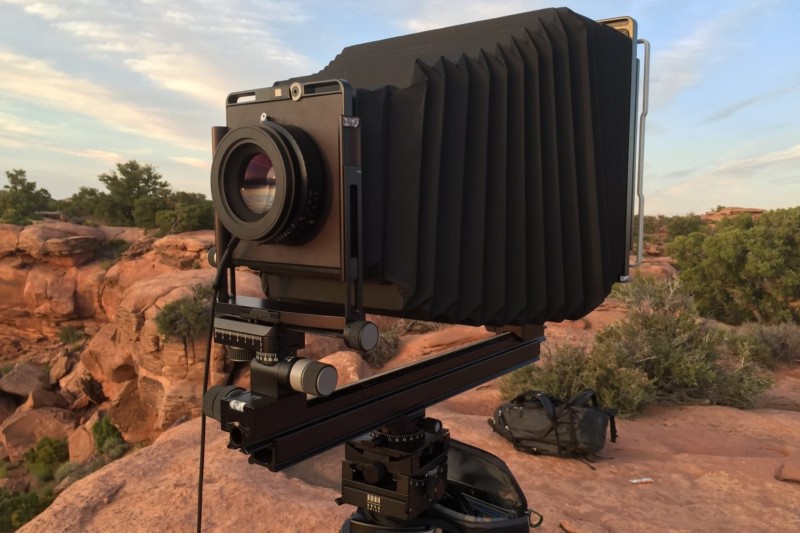
Naturally, of this added control comes with a much steeper learning curve. If you are just getting into film and have never worked with a fully manual camera of any kind, then my biggest piece of advice is to steer clear of large format for a spell. Buy a medium format camera and see if you like the process of shooting film, wrap your head around metering, exposing, and processing your film before you make the jump into large format. For me, large format is the most rewarding of all the film cameras, as they are at the height of resolution and I feel the cameras are a joy to work with, but they are naturally cumbersome…all of them.
With that being said, if you feel you’re ready for large format, then, by all means, go for it! That’s an amazing step to take.
Light Meter
Spot meter: As a landscape photographer, you will full control over your film. Because of that, you’ll want to have the ability to spot meter the scene. With a “1-degree spot meter” you’ll be able to meter the shadows, highlights, and everywhere else in between as you point the meter throughout the scene. This will let you build an array of different exposures in your head and decide how you want to expose the scene. This is extremely crucial with transparency film, and not quite as much, but still useful, with negative film.
Incident Meter: As you peruse the internet, you’ll probably hear something about incident meters. As a landscape photographer, I don’t find incident meters all that useful. The meter exists within a white plastic dome and essentially measures the diffused light your subject is in. So, in other words, you need to have the ability to place your meter in the same light your subject is in, which isn’t always possible with landscape photography.
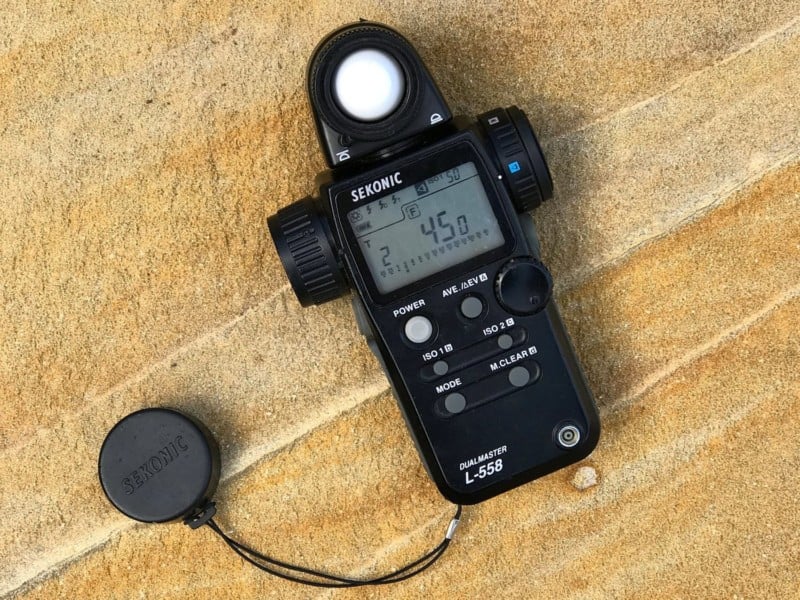
(I now use a Sekonic L-778 and my backup is a Sekonic L-558 (pictured above), which includes both an incident meter, and a spot meter.)
The Polaroid Method: Back in film’s heyday, Polaroid film (instant film) could be used to check correct exposure. With traditional light metering techniques, you essentially have to blindly guess and trust your exposure based on what you’ve metered, but having the ability to fire off that exposure on a piece of instant film, you were able to check exposures. Well, now that it’s 2019 and Polaroid film in larger formats is essentially dead and gone, we’re stuck in the dark (pun intended.)
But all hope is not lost! You’re a digital photographer, right? Well, you have your light meter in your current camera case – your digital camera, AKA digital Polaroid. If you have a zoom lens from around 18-55 (in full frame), this is a perfect range for both composition and checking your exposure. You’ll be able to meter, dial in your settings, and fire off frames with instant feedback, which you can then translate to your film camera. Cheating? I don’t think so, but it’s definitely extra weight and hassle to carry, and generally I do not generally opt for this method myself. I know a few professional photographers, such as my good friend Alex Burke, who have used this method extremely successfully for quite some time. But it’s a great method to achieving fast results and to learn to expose film properly without as much trial and error.
Film For Landscape Photography
Transparency Film
Transparency film is probably the most rewarding of all film stocks to receive back from your processing lab. Seeing those perfectly exposed transparencies on a light table for the first time is one of the more nerve-wracking and exciting experiences even to this day. There’s really nothing like it. Below is the breakdown of my favorite transparency film stocks that are still available to purchase fresh. Exposing these stocks can be tricky, but ensure that the film IS NOT overexposed. Overexposed transparency film is essentially useless, so if you’re unsure, bracket and meter carefully.
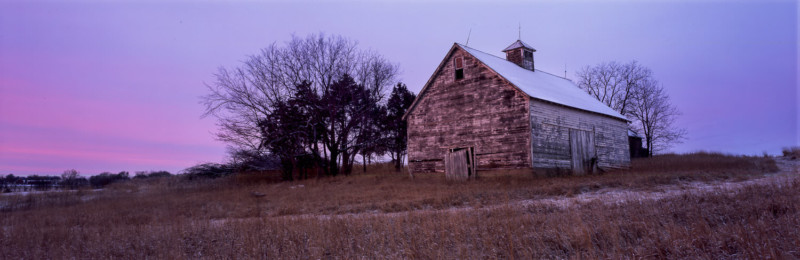
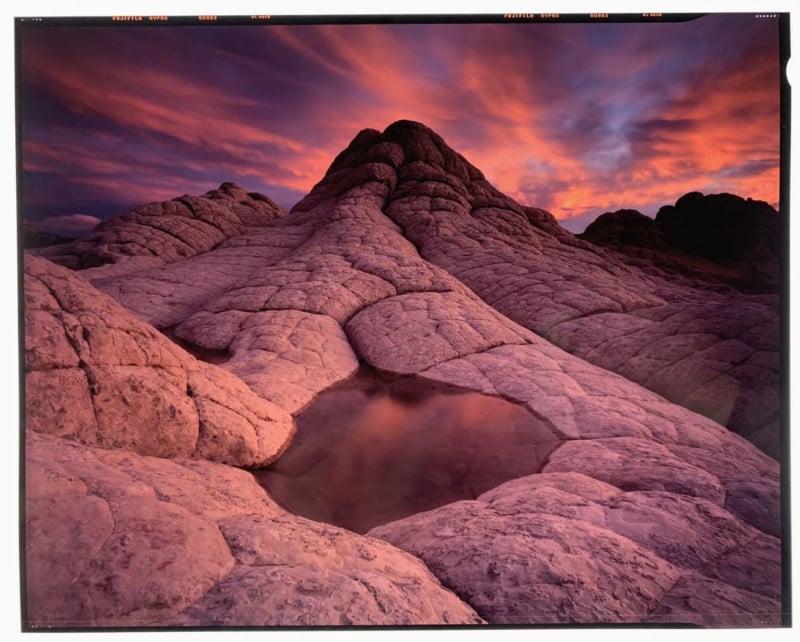
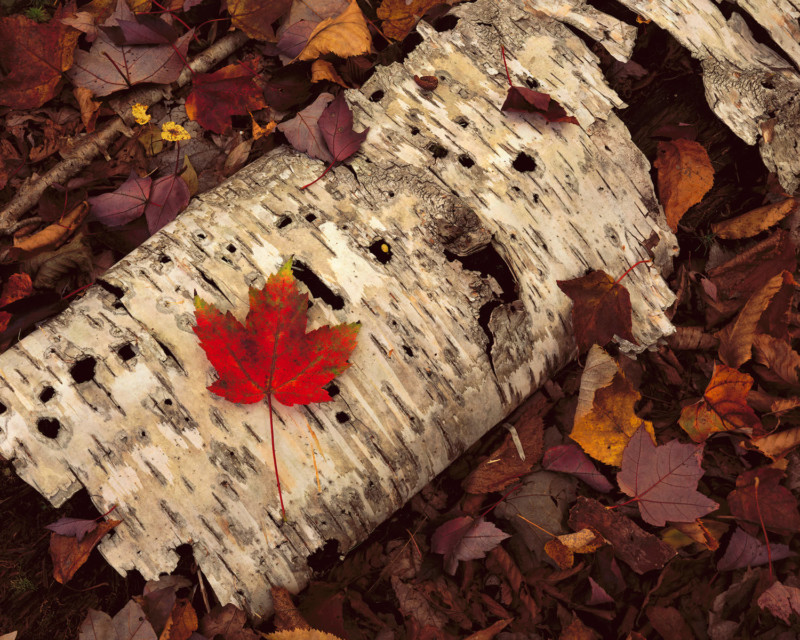
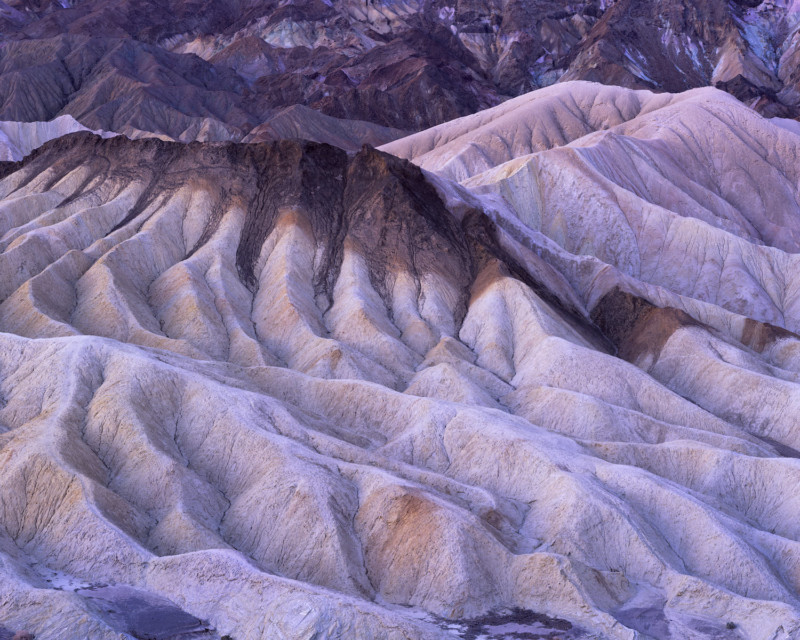
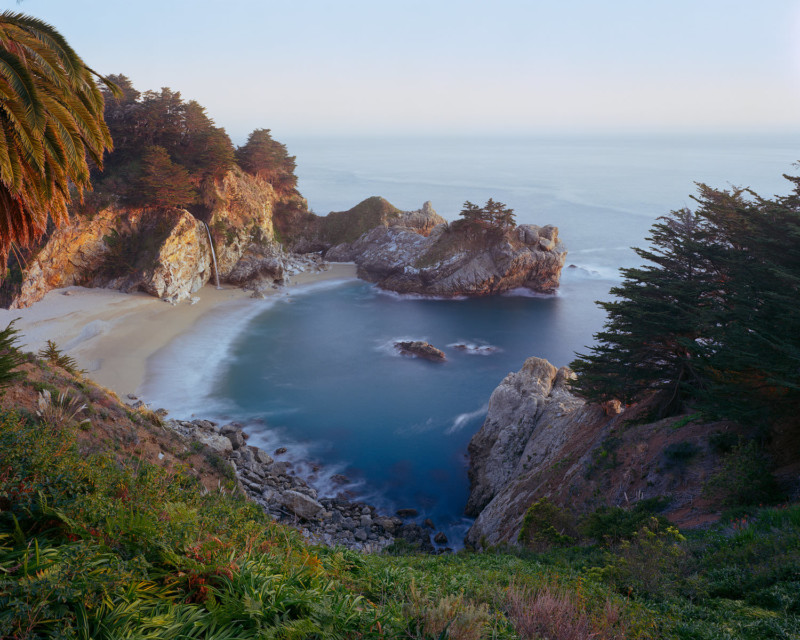
Fuji Velvia 50: My favorite film, hands down. The way Velvia 50 renders soft, subtle color is out of this world. I’ve never been able to capture such subtleties in any other photographic medium and it is, and will remain, my film of choice for 90% of my subject matter. Velvia 50 is very contrasty and can be difficult to use in challenging light. Be careful when you are metering and be wary of a dynamic range beyond 6 or so stops of light. Velvia 50 is best used in soft, reflected light, such as the scene above.
Fuji Velvia 100: Velvia 100 is, in my opinion, more difficult to use than its slower sister (Velvia 50). It’s a very contrasty film and doesn’t render big landscapes very well. Generally, images also have a bit of a magenta cast. With that being said, I think it’s an excellent film for intimate scenes, specifically those with greens, and I use it almost exclusively for my work in the prairie.
Fuji Provia 100F: Provia is probably my second most used transparency film with a very fine, even grain that’s very wonderful to scan. It’s much less contrasty than either of the Velvia film stocks and isn’t quite as warm. At times, it can have a blue cast, so be careful with the quality of light you use this film in. Having less contrast than other transparency films, Provia is a wonderful choice for very intense sunsets. Where the Velvia film stocks tend to saturate reds and oranges beyond the point of realism, Provia tones them down a bit and makes them more usable for scanning and printing. Overall, Provia is the most usable slide film for this reason.
Kodak E100: Until recently, Fujifilm had been the only manufacturer of transparency film stocks. In 2018, Kodak announced its new E100, modeled after its old Ektachrome film stock. It is one of the finer grained films I’ve ever used and can produce very sharp images. It has a very neutral color palette and would be a fine choice for any situation. Currently, it’s only available in 35mm.
Color Negative Film
If you are completely new to film, negative film may be your best choice to start shooting with. Negative film has an incredibly wide exposure latitude and makes it very easy to expose – basically, it’s nearly impossible to overexpose. My tip with negative film is if you’re in doubt about your exposure, meter for the shadows and shoot!
Kodak Ektar 100: Ektar is an amazing negative film that was designed for scanning. It has more contrast and saturation than a typical negative film, which somewhat makes it the “Velvia 50 of the negative world.” It’s very sharp, fine-grained, and produces fantastic results. Ektar can be substituted for transparency film in situations where the dynamic range exceeds the exposure latitude of transparency film, but you want to attain the same level of saturation. It’s generally fairly simple to meter, as it can rarely be overexposed.
Kodak Portra 160: Recently, I’ve been shooting a lot more Portra 160, specifically in 120 and 4×5. As you may have deduced by the name, it was designed as a very low contrast, low saturation film for portraits, but it has absolutely found its way into my kit for landscapes. Because of its low contrast and high exposure latitude, you’re able to capture every detail in a scene with a very muted color palette. It’s definitely not a film for every situation but it has a very appealing aesthetic that I’ll be using more and more over the years to come.
Kodak Portra 400: Essentially, everything I wrote for Portra 160 applies to 400, but just in a faster speed. It definitely has larger grain, but it’s very appealing and allows you to be a bit freer compositionally because the higher speed will allow you to generally be free of a tripod. I’ll typically not use this film in sheets, but use it regularly in medium format.
Processing
Home Developing
Home developing is generally reserved for those shooting mostly black and white film, which I haven’t discussed here. I have never been much of a black and white photographer, and don’t claim to be an expert with black and white photography, but developing your own black and white film is incredibly easy at home, without very much need for temperature control.
Color negative film (C-41) is a bit more of an issue because it requires more precise and accurate temperature control. I’ve seen methods where people use recirculating water baths designed for cooking to develop their film with, but the easiest method is a Jobo. They are roller processors that are relatively easy to find these days and run anywhere from $750 to $1,000. While developing at home is relatively easy, it can be expensive to invest in the equipment, and dust control also becomes a bit of an issue. If you’re just starting out, I recommend using a professional developing lab.
Developing Lab
Chances are, because you’re just starting out, that you’ll want to use a photographic lab to process your film. This, in my opinion, is the best way to start and the best way to achieve the fastest good results. If you’re just learning to expose film correctly, the last thing you want to be doing is developing it incorrectly, thusly getting skewed results. A few good labs that I use currently and have used in the past are:
AgX Imaging: Mike Lussier owns/operates this lab and is an outstanding person to deal with. He treats every order with precision and care, just as if it were his own film. I now use him exclusively for my E-6 developing. AgX ONLY develops E-6, for C-41 and B&W, you must go elsewhere.
North Coast Photo: This is a great lab on the west coast, and one I’ve used extensively for my C-41 and B&W developing. They achieve consistently good results and have been great to work with.
Scanning
Scanning is an art form within itself. Just like developing, a quality scan can make or break a film image. Improper handling and care of the negatives, a poor quality scanner, or just an inexperienced operator can be very detrimental to the outcome of your work. If you are just beginning to shoot film, pay the extra bit to get your film scanned by the lab you are processing with. This way, you know you’ll be achieving quality results from a trained operator. When you want to begin scanning your own work, generally the first step is investing in a flatbed scanner.
Flatbed Scanning
Flatbed scans are generally what most people gravitate towards when first scanning their work, and even some professionals never scan any other way. Good quality flatbed scanners offer good quality scans, once you learn to operate them. Generally speaking, today Epson is making the best consumer flatbed scanner on the market, the V800 or V850. These scanners provide the end user a quick and easy way to get decent scans from their film, while not breaking the bank. They run about $700-$800 usually and a software package is included with the camera. I highly suggest not skimping and buying a used scanner, as if they are improperly cared for, they can become full of dust and you’ll be cleaning dust out of your images for years to come.
Pros of flatbed scans:
- Very easy to use
- Relatively inexpensive
- Produce decent quality scans for photographers who don’t do a lot of printing
Cons of flatbed scans:
- Non-optimal film flatness, which can cause out of focus ares on the scans
- Difficult to grain focus, which makes the end result not very sharp
- Limited dust control
- Not optimal for printing – the sharpness is generally lacking from most flatbed scans
For the most part, flatbed scans will accomplish 90% of your needs as a film photographer. They’re inexpensive, easy to set up and use, and it requires little effort put forth to get decent quality digital images from your film. For those who are doing a lot of printing or need ultimate color duplication, sharpness, and clarity, a drum scan may be in order.
Drum Scanning
Drum scanning is a relatively complicated process that involves a very skilled operator, specialized equipment, and a high level of dust control and precision. Generally, you won’t be going out and buying yourself a drum scanner. There are commercial labs across the country that provide drum scanning services for those photographers wishing to have the most accurate digital replication of your original film possible. This process can be expensive, but the results are absolutely worth it if you are needing that level of scan. In 2016, I purchased a drum scanner for my own use, built a dust-controlled studio, and began commercially offering my drum scans for photographers.
In Conclusion
So, you must now ask yourself, “Why?” Why do you want to shoot film? Is it a particular look you’re going for in your images? Is it because you want to be a better photographer? Or do you just want a challenge? Or do you just want to be cool on Instagram?
P.S. If you’re interested in further instruction, feel free to contact me, as I offer many private and group photography workshops throughout the year.
About the author: Michael Strickland is a large format landscape and nature photographer based out of Kansas. The opinions expressed in this article are solely those of the author. You can find more of his work on his website, Facebook, Twitter, and Instagram. This article was also published here.