Heading out the door? Read this article on the new Outside+ app available now on iOS devices for members! Download the app.
My interest in fascia began in 2006, when I received myofascial release from a physical therapist after injuring my rotator cuff in a yoga class. After the hands-on treatment, which involved applying gentle pressure to connective tissue, my discomfort was ameliorated in less than 30 minutes. Although it wasn’t a complete cure, right away I could move my shoulder again without pain.
Soon after my shoulder recovery, I began practicing self-myofascial release, using a foam roller, ball, or other device in conjunction with my body weight for targeted, therapeutic pressure that helps create more tissue mobility.
My quads had been tight from daily cycling. Foam rolling along the fronts of my thighs before yoga helped eliminate the compressive knee pain that I’d often felt in poses like Bhekasana (Frog Pose)—in which you bend your knees to bring your heels toward your hips.
Get to Know Your Fascia
Your fascial network is like scaffolding throughout your entire body. It’s even part of the extracellular matrix (the goo between your cells) that helps bind your cells together. Myo refers to muscle; and fascia is the network of connective tissue that surrounds and includes your muscles. This webbing is involved in musculoskeletal well-being and proprioceptive capacity (body sense, or knowing where you are in space), and it influences how signals of sensation (like pain) travel from your body to your brain.
See also What You Need to Know About Fascia
The fibers of your body are designed to slide and glide over one another during movement. However, whether due to injury or repetitive actions like cycling, running, or repeating yoga poses, areas of tissue can become thickened and inflamed and tug on the fascial network further up the chain. (Think of it like a soft net. Pulling on one piece tugs on the whole net, affecting other areas.) The result is that the fascial sheaths that encase the muscles no longer have as much give and can become wound up like a wrung-out dishrag, contributing to restrictions, strain, and eventually pain. Fascial release improves the slide and glide of your tissues and also hydrates them through the act of compressing and releasing, like a sponge.
The Benefits of Fascial Release
Research on fascial release is still preliminary and emerging, but a 2015 review in the International Journal of Sports Physical Therapy supports what I experienced. The review of 14 scientific papers suggests that fascial release with a foam roller increases short-term range of motion during exercise without negatively affecting muscle performance. Gently rolling, draping, or oscillating different muscle regions over balls (think tennis, lacrosse, or grippy myofascial release balls like RAD Roller or Yoga Tune Up balls) or a foam roller pushes on fascia between your bones, muscles, organs, and nerve fibers—freeing up more mobility than is achievable with passive stretching alone. Perhaps most interestingly, research shows that myofascial release influences your nervous system, which largely governs the baseline tone (tautness) of muscles. Your fascial network is rich in sensory nerve endings, and gentle pressure on your fascia may help communicate to your nervous system that there is no longer any need for increased tension in that area.
See also Fascia: The Flexibility Factor You’re Probably Missing on the Mat
Even less than five minutes of self-myofascial release a day will be a great complement to your yoga practice (and can be squeezed into the time between rolling out your mat and the start of class). One of the best places to begin is at your feet, which serve as your body’s front line of defense in fighting general joint wear and tear. The plantar fascia, a dense fibrous fan of connective tissue on the underside of your feet, plays a role in absorbing and distributing the impact of each and every step you take. It also plays a role in distributing weight when you’re stationary. The plantar fascia has fibrous connections to your Achilles tendons (which anchor your calves to your heels), and then to the fascial sheath of your calf muscles, hamstrings, gluteal fibers, lower back, and skull. It is no exaggeration that addressing the fascial workings of your feet and legs has the potential to relieve aches and pains as high up as your neck.
After your feet and legs, your hips are another great place to target for fascial release, because gentle pressure here—an area compressed for much of the day due to sitting—can renew blood flow to restricted areas, improving circulation and muscular health.
Promote the fitness of your fascia with the lower-body fascial-release exercises on the next pages for feet, legs, and hips. Then pair each exercise with a yoga pose. Each myofascial release has the potential to improve mobility efficiently and safely, so you can experience more ease throughout your yoga practice—and off the mat.
If you experience increased range of motion or comfort in a pose after a fascial-release move, this may be a spot that deserves more regular attention. Give it a try and see what you uncover.
See also Free Your Back Body Like Never Before: A Flow for Your Fascia
Roll With It
To help you feel the effects of self-myofascial release (SMFR) and identify trouble spots, the following practice targets one side of your body at a time. For example, you will often do a pose on the right side, followed by SMFR exercises on that side, and practice the pose again. After you are done on the right, notice any differences in range of motion, comfort, and overall ease when you repeat the pose. Then move on to the other side.
You’ll need a small, firm ball (it should have just a little give to it), a medium-size ball that’s about six inches in diameter (or just sub in a tennis or lacrosse ball here), and a foam roller.
1. Adho Mukha Svanasana (Downward-Facing Dog Pose)
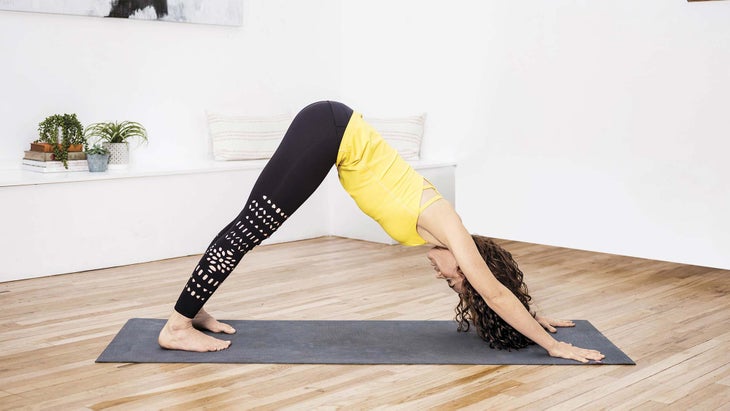
Start on your hands and knees. Lift your hips high; activate your arms by pressing the floor away from you, and push your knees back toward the wall behind you to come into Downward-Facing Dog Pose. Spend a few breaths here scanning your body. Notice how close your heels are to the floor, and identify whether or not you can pick up your toes off the ground. Pay attention to any sensation at the backs of your knees or in your hips. See if it feels good to let your head hang freely, and check for tension anywhere in your spine or legs. Then come to standing.
See also Loosen Up Your Calves in 2 Minutes with Self-Myofascial Release
1A. SMFR to soles of feet
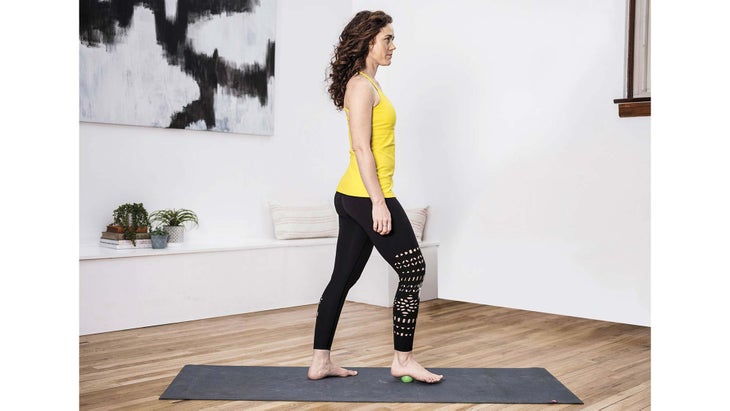
Grab a firm tennis-size ball. Place it underneath the center of your right foot, directly in front of your heel pad. Spend about 30 seconds draping your body weight (as much as you can tolerate while maintaining steady breath and avoiding pain) over that spot with minimal movement and steady breath (shown this page, far left). This is a form of sustained compression—like a hyper-focused stretch.
As you begin to target other spots within the lateral arches of your foot, avoid both the heel pad and the ball of your foot because those areas typically have more fat than the arch (you most likely don’t need more mobility in those regions). Move the ball to the outer part of your sole, about halfway between your heel and pinky toe (shown this page, left). Lean into the ball again for 30 seconds. Your heel may or may not touch the floor, depending on the size of the ball and your pressure tolerance.
Move the ball across your foot so that it’s between the first and second long bones of your foot (the metatarsals), and drape here for 30 seconds.
See also How the Teres Major Can Make or Break Healthy Shoulders in Inversions
1B. SMFR to calves
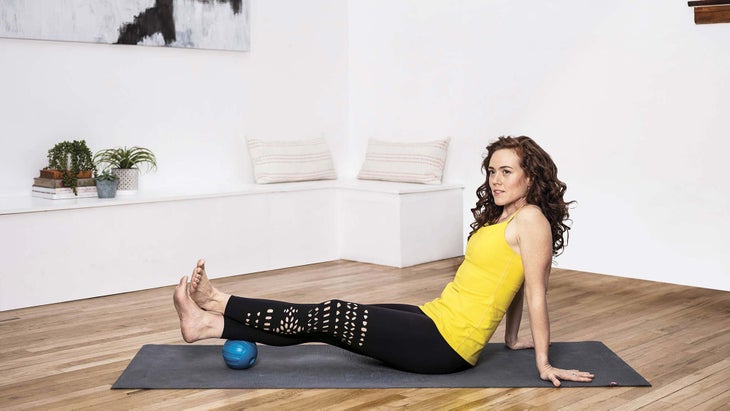
Transition to the floor with your legs out in front of you, as if coming into Dandasana (Staff Pose). Still working the same side, drape your right calf over a medium-size ball—about 1–2 inches higher than your Achilles tendon. Stay here, or cross your left ankle over your right. (If you want even more pressure, press down into your arms to lift your hips up slightly.) Breathe slowly. Point your toes, then flex your ankle 5–10 times at a slow pace—this will glide the tissues underneath the pinned skin. You may also try oscillating your fascia by turning your right leg in and out. After about 15 seconds, inch the ball up the center of your calf slowly, pausing for 15 seconds or more at 4 or 5 different spots. Then, find a parallel line made up of 4 or 5 spots in the inner, meatier part of the calf, and spend at least 15 seconds putting pressure on each location.
See also Try This Yoga Trick to Realign Your SI Joint & Relieve Lower Back Pain
1C. SMFR to buttocks
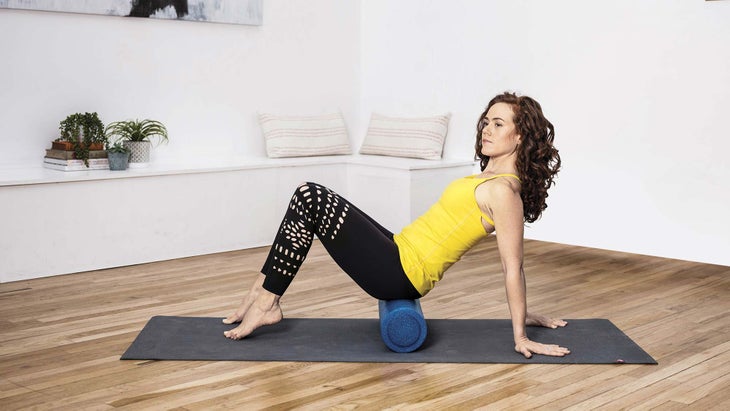
Take a seat on a foam roller (or you can use the ball, if preferred). Bend your knees, and put your feet flat on the floor. Walk your arms behind you about 15 inches (think of a crab walk–like position), so you can move the ball or foam roller to the fleshiest part of your buttocks. Lean to the right side, and roll back and forth over this area slowly for at least 1 minute. Tilt your pelvis backward slightly to reach the upper fibers close to your low back, then move along the central fibers down toward your sacrum.
Repeat Pose
Move into Downward-Facing Dog Pose again. Notice the difference between your right and left legs. Is your right heel any closer to the floor? Do you feel like there is less effort in your arms? Can you keep your right heel farther down and pick up your toes from the floor? Does the tension down your spine feel different when you let your head hang? Repeat the fascial-release sequence on your left foot and leg, then repeat Downward-Facing Dog again, noticing changes.
See also Got Lower Back Pain? Relieve SI Joint Discomfort with Tree Frog Pose
2. Vajrasana (Thunderbolt Pose)
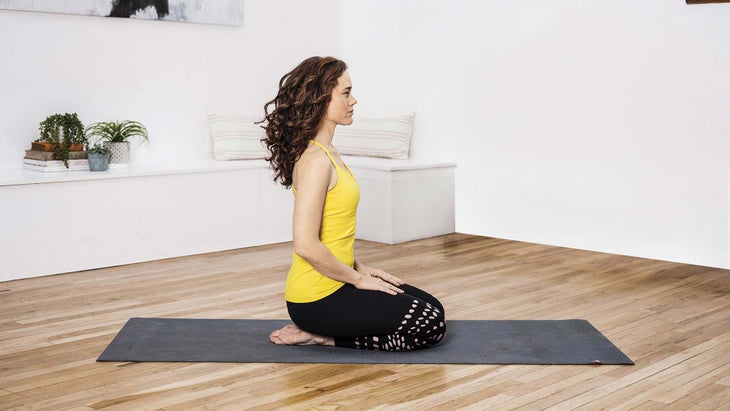
From Downward-Facing Dog Pose, lower your knees to the ground, flip to the tops of your feet, and sit down on your heels. (If you feel pain in your knees, place a block or two between your heels to prop up your pelvis.) Point your toes straight back by hugging your heels in toward one another (or a block). Rest your hands on your thighs. Notice any stretching or pulling sensations across the fronts of your ankles and knees.
See also 6 Yoga Warm-Ups for Wrist Pain and Carpal Tunnel Syndrome
2A. SMFR to shin
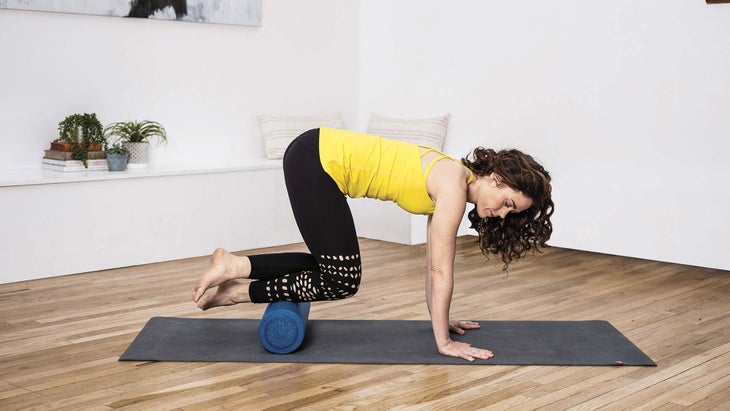
Bring your hands to the ground and move into Tabletop, fingers wide. If you’re using blocks, set them off to the side. Grab a foam roller and place it under your shins, so that your knees and feet are off the ground. Cross your left shin on top of your right, so that it rests on the middle of your right calf. This area can be surprisingly sensitive, so don’t push it if you feel a strong sensation. Much more of your weight will be in your arms now. Use your arms to slowly roll up and down the length of your shin on the outer (lateral) side of your shinbone (which can be a source of shin splints). Your core will kick in as you pull your knees closer to your wrists and then press farther away. Roll for at least 1 minute. (If you experience discomfort in your arms or wrists, uncross your legs to distribute some of the weight from your upper body).
Repeat Pose
Come into Vajrasana again. Notice any differences in the intensity of the stretch across the front of your right ankle and knee. Has your comfort level changed in the pose? Can you point your toes straight back with less effort on the right side? Do the fascial release on the left side, and repeat Vajrasana.
See also 3 Restorative Poses to Optimize Organ Function
3. Ardha Bhekasana (Half Frog Pose)
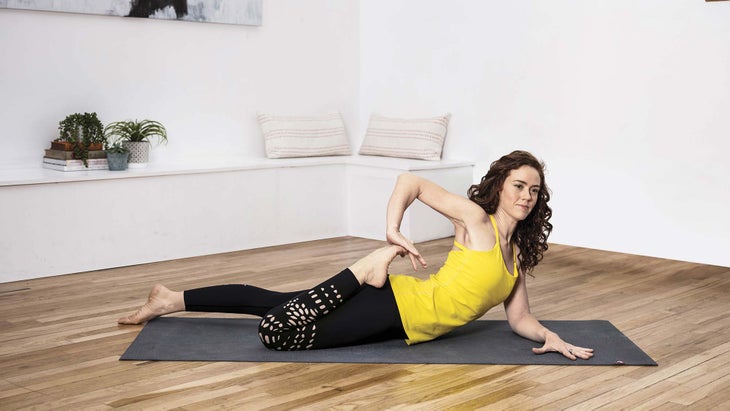
Lie face down on your mat. Bring your elbows beneath your shoulders, and prop yourself up on your forearms. Bend your right knee, and reach your right hand for the top of your right foot as you position your left hand to the right of your mat. Use a strap to lasso your foot if it is out of arm’s reach. Draw your heel in as close to your right buttock as possible without forcing it. Notice the stretch’s natural endpoint and any sensations of tightness across the front of your right knee or thigh. Contract your buttocks to press your pelvis into the mat, and notice if the front of your right hip feels tight. Release your foot and lie back down on your mat.
See also Why Your Diaphragm Could Be the Core Strength Game Changer You’ve Overlooked
3A. SMFR to front thighs
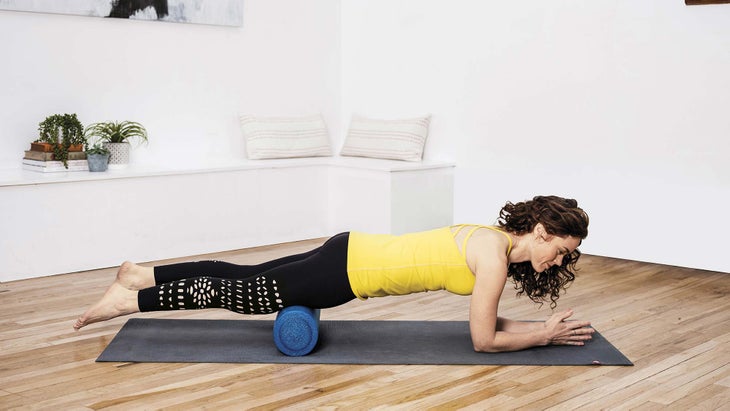
Move to your hands and knees, and slide the foam roller in front of your knees. Lower down onto your forearms into a Forearm Plank with your thighs resting on the foam roller. Slowly begin to walk your elbows forward and back, rolling up and down the length of your thighs in a lifted military crawl for 1 minute, avoiding your kneecaps. This technique plows through the quadriceps’ myofascia. To increase the intensity, lift your left thigh, crossing your left ankle over your right and continuing to roll for 1 minute (if this feels too intense on your arms, uncross your legs and continue rolling both legs together for an additional minute).
Repeat Pose
Repeat Ardha Bhekasana again on the right side. Does your heel come closer to your hip? Does your pelvis stay down on the ground while you draw your heel in? Pay attention to the sensations in your knee and front thigh. Does it feel any different from the first time you practiced this pose? Repeat Ardha Bhekasana and fascial release on the other side.
See also 12 Yoga Poses to Boost Breast Health
4. Ardha Matsyendrasana, variation (Half Lord of the Fishes Pose)
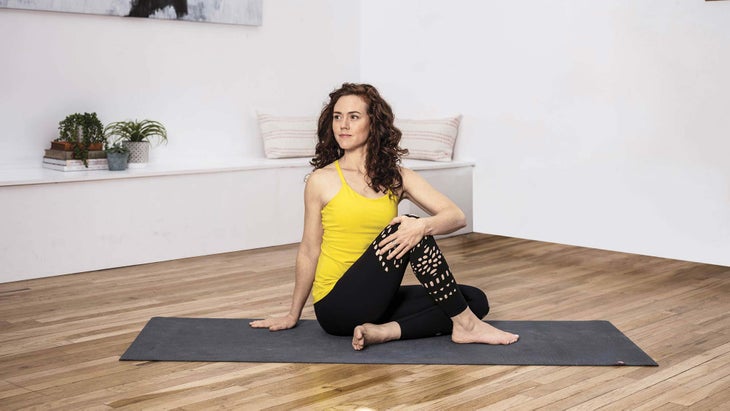
Take a seat with your right leg bent, knee pointing upward with your right foot on the floor. Bring your left foot under your right leg (toward your right buttock on the mat) so that the side of your left calf rests on the mat. Bring your right hand behind you, and take a simple seated twist. Turn toward your right knee with light pressure from your left hand on your right knee. One of the limiting factors in twists may be restrictions in your outer hip muscles or fascia. Pay attention to how easily, and how far, your right knee moves toward (or past) the midline of your body. Is there a feeling of tightness from your right hip as you enter the twist?
See also Iyengar 201: The Strap Trick You Need to Try to Release Your Neck Tension
4A. SMFR to outer hip
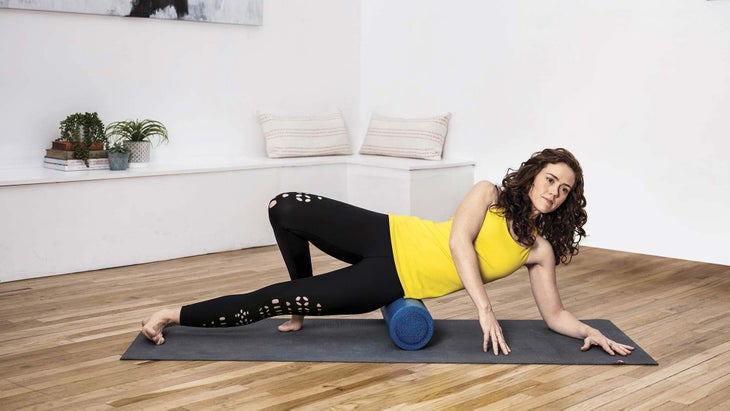
Lie on your right side, and place a foam roller (or ball) on the side of your hip. Place the roller in a fleshy area that has some give, not on the bone. With tiny oscillations and wiggles, explore the muscles and fascial network here for about one minute. Move slightly higher or more laterally, finding the spot that feels most intense on your outer buttocks and lateral hip—avoiding any bony areas.
Repeat Pose
Repeat your twist, turning toward your right knee. Notice if your right knee moves more freely across your body, or if your hip bends up easier. Repeat the pose and fascial release on the other side.
See also What You Need to Know About Your IT Band
5. Siddhasana (Adept’s Pose)
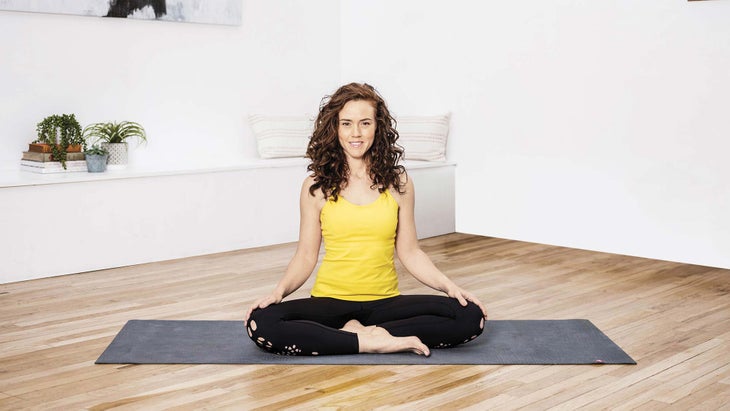
Sit crosslegged with your right ankle in front of your left. Evenly distribute your weight between your two sitting bones. Notice the distance between your knees and the floor, plus any pulling sensations in your inner thighs. Is there a difference in sensation or height in your right and left legs? This shape comes easily to some, but others struggle to get their knees anywhere close to the floor. If this pose feels easy for you and your knees are low to the ground, bring the soles of your feet together for Baddha Konasana (Bound Angle Pose).
See also The Future of Yoga: 3 Things Modern Postural Yoga Could Do Better
5A. SMFR to inner thigh
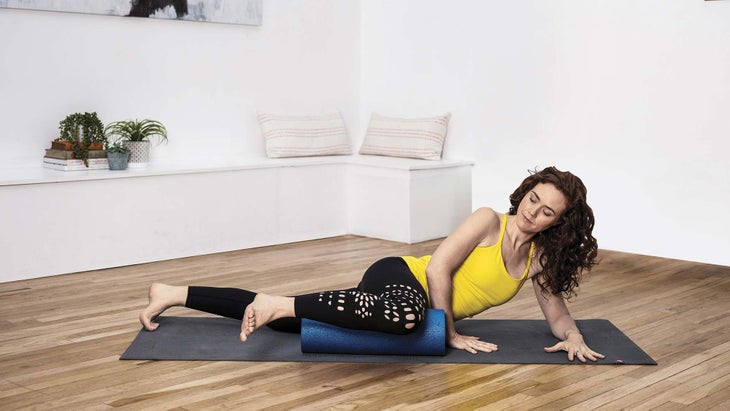
Lie on your left side with a foam roller in front of you, parallel to the length of your body. (You can also use a firm ball at least 4 inches in diameter.) Place your right leg as close to perpendicular with your left as possible, and bend it to create a 90-degree angle at your knee. Drape your inner thigh over the foam roller. Slowly lean forward and back, rolling out your inner thigh from knee to groin. Often, the most intense sensation will show up close to the knee and hip. You may also play with internal and external rotation of your hip. Move the foam roller across the fibers of your inner thigh for about 1 minute.
Repeat Pose
Come back into Siddhasana and notice any changes in sensation. Does your right knee come closer to the floor? Is your right hip or low back more comfortable? Repeat Siddhasana, switching the cross of your legs, and do fascial release on the left side. Take several deep breaths, and reflect on changes in sensation or mobility that you’ve experienced during this practice.
See also Give Tired Wrists Some Much-Needed TLC with Self-Myofascial Release
About Our Pro
Teacher and model Ariele Foster, PT, DPT, is a yoga teacher, an anatomy teacher for yoga teacher trainings, and founder of yogaanatomyacademy.com.