

With the help of Samba, it is possible to set up your Linux server as a Domain Controller. Before you get too excited, I’m not talking about an Active Directory Primary Domain Controller (PDC). On the other hand, it can act as a Windows NT4-style domain controller. One major advantage of this configuration is that it offers the ability to centralize user and machine credentials.
In other words, if you don’t need a full blown PDC, and are looking to simply centralize credential storage, the Ubuntu Server/Samba setup will be far easier to work with and save you considerable budget.
With that said, let’s get to work. I want to show you one piece of this rather complex puzzle. That piece is an interactive Samba tool that helps you configure your /etc/smb.conf file for its role in serving as a Domain Controller.
Installation
The first thing you must do is install Samba and winbind. Open up a terminal window and issue the following command:
sudo apt install samba libpam-winbind
A number of dependencies might be picked up for this installation; allow them to be installed and you’re ready to start the configuration.
Preparation
Before running samba-tool, you must make sure your /etc/hosts file correctly maps to a fully qualified domain name and the IP address of the DC, such as:
127.0.0.1 localhost.localdomain
âIP_ADDRESS_OF_SERVER localhost
âIP_ADDRESS_OF_SERVER SAMBADOM.EXAMPLE.NET SAMBADOM
Where IP_ADDRESS_OF_SERVER is the actual address of your Samba server. Make sure the above is edited to fit the needs of your network.
Next you need to set the hostname of your server. According to our /etc/hosts file above, our hostname for this setup would be SAMBADOM. To set this, open up the /etc/hostname file and change it accordingly. Once you’ve done that, restart your server.
Once the server has rebooted, you need to remove the current smb.conf file as well as any Samba database file (*.tdb and *.ldb files). To locate the directories housing these files, issue the following two commands:
smbd -b | grep "CONFIGFILE"
smbd -b | egrep “LOCKDIR|STATEDIR|CACHEDIR|PRIVATE_DIR”
Using the output from the commands (Figure A), you should now be able to look into those directories and remove the necessary files. If those files don’t exist, you’re good to go.
Figure A

Using samba-tool
Now it’s time to fire up the samba-tool command. We’ll be running this in interactive mode by issuing the following command:
sudo samba-tool domain provision --use-rfc2307 --interactive
By running the command with –use-rfc2307 we enable the NIS extensions. At this point, samba-tool will ask you to configure the following options:
- Realm. This is also used as the AD DNS domain and is configured in your hosts file. For example: SAMBADOM.EXAMPLE.NET
- Domain. Your Samba server NetBIOS domain name. NOTE: It is recommended to use the first part of the AD DNS domain. For example SAMBADOM
- Server Role. This defines the role for the server. You’ll want to go with the default, dc
- DNS backend. Sets the DNS backend. You’ll want to go with the default, SAMBA_INTERNAL
- DNS forwarder IP address. If you don’t need to use forwarding, enter none, otherwise enter the IP address of the DNS forwarder (for more information on DNS forwarding, check out this Samba Wiki page)
- Administrator password. This sets the domain administrator password
Once you’ve verified your administrator password, samba-tool will do its thing and configure Samba as a DC. You can then check out the /etc/samba/smb.conf file to make any necessary changes. You’ll be surprised at how minimal the smb.conf file is at this point.
At this point, you should now be able to add users/user password to samba. This step is necessary, otherwise users will not be able to authenticate against Samba. To do this, use the following commands:
smbpasswd -a USERNAME
âsmbpasswd -e USERNAME
Where USERNAME is the name of the existing user to be added to Samba. You will only be prompted to create a Samba password for the first command (the second command enables the user).
Removing upstream DNS
We have to make sure that the DNS on the Domain Controller points back to itself. To do this, we must edit the /etc/network/interfaces file to reflect the following (which will also ensure the network interface uses a static IP address):
auto INTERFACE_NAME
âiface INTERFACE_NAME inet static
âaddress IP_ADDRESS_FOR_SERVER
ânetmask NETMASK
âgateway GATEWAY
âdns-nameservers IP_ADDRESS_FOR_SERVER
NOTE: Everything in ALL CAPS above must be configured to meet your needs.
Save this file and restart networking with the following command:
sudo service networking restart
You should also edit the /etc/resolv.conf file to reflect the same change as above. In this file, you will enter:
nameserver IP_ADDRESS_FOR_SERVER
Where IP_ADDRESS_FOR_SERVER is the same address you used in dns-nameservers above.
Setting up Kerberos
Out of the box, Kerberos has its own configuration file that must be replaced with the krb5.conf file generated by the Samba provisioning. To do that, issue the following commands:
sudo mv /etc/krb5.conf /etc/krb5.conf.orig
âsudo ln -sf /var/lib/samba/private/krb5.conf /etc/krb5.conf
NOTE: You may find the original /etc/krb5.conf file doesn’t exist. If that’s the case, simply issue the second command from above.
Ready to test and connect
You now have everything you need to start testing and connecting to your Samba Domain Controller. However, the most challenging aspect of getting your DC is done. A quick test to ensure everything is up and running is to issue the command:
smbclient -L localhost -U%
After entering the user Samba password, you should see a successful connection appear (Figure B).
Figure B
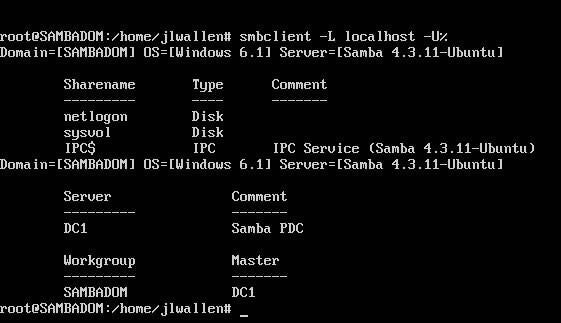
As you can see, the smbclient test lists out both netlogon and sysvol as shares. These are created by default and must exist on the DC in order to be used. Also, you must place in /var/lib/samba/sysvol/REALM/scripts any/all login scripts you will need for all of your clients (Where REALM is the REALM you configured when running the samba-tool command).
At this point your Samba Domain Controller is ready for connection. You might find yourself having to open up the /etc/samba/smb.conf and fine tuning the configuration to better meet your needs, as the file generated by samba-tool is fairly minimal. It will, however, set you out on the right path.
