

The world of Metro Exodus is one filled with countless hazards capable of killing you in mere seconds, from bloodthirsty mutants to the irradiated air on the Earth’s charred surface. If you approach the game like a traditional first-person shooter, you’ll quickly find yourself six feet underground (and not in the subway system) but with some helpful tips, you can master nuclear winter and become a legendary survivor.
Beginner’s guide to surviving in Metro Exodus
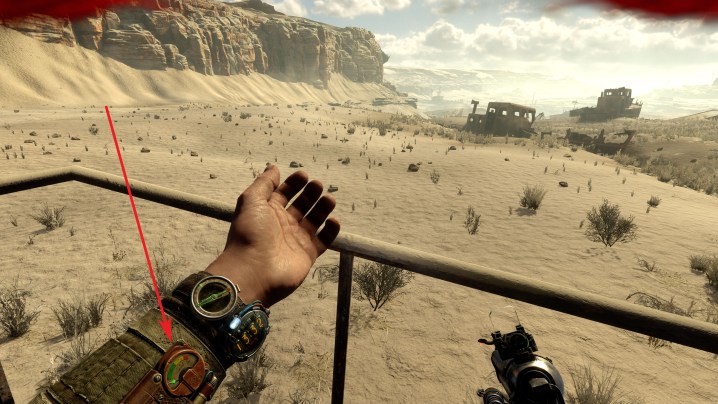
The first step to survival in Metro Exodus is understanding the interface. Most of the information you need is available as a piece of gear or item that the protagonist Artyom holds. Making sure you keep up with this information is crucial to survival as your air filter timer, Geiger counter, map, and battery are all only viewable this way.
Air filter
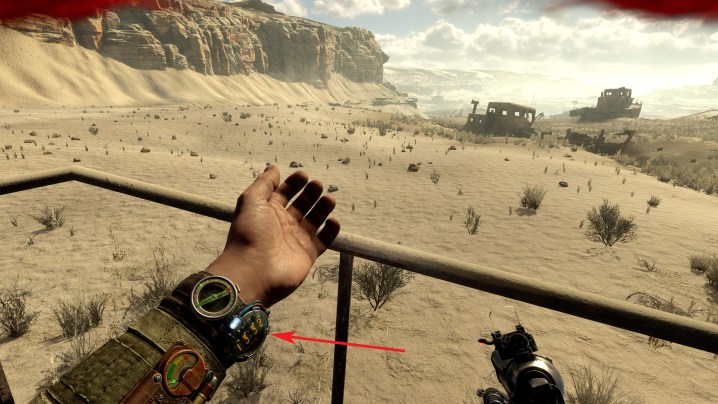
Your air filter timer is the most important piece of information visible on Artyom’s gear. You can see it visible on his left arm, and the timer will count down only when you’re in an area with toxic air. If the timer is not going down, this means you can take your gas mask off by holding down on the directional pad.
If you hear a high-pitched beep and see a notification to change your filter, it means you have less than one minute remaining before it will be completely worn out. You can craft more whenever you want, and certain key areas will also occasionally offer air filters are loot.
Compass

Early in Metro Exodus, you’ll also gain access to a compass, visible on Artyom’s left arm, that points you in the direction of your main objective. If you don’t have time to pull out the map and want to instead follow the main storyline only, you can use it and keep up the pace. Later on, you’ll get the option to replace it with a small radar device that will beep and point out the location of nearby lifeforms.
Geiger counter
The Geiger counter will turn from green to red whenever you’re in an area with high levels of radiation. Aside from a few story-specific areas with one clear path, there are no times in Exodus when you should be going into areas that spike the counter. If you are, you should turn around and go back the way you came.
Battery indicator
Your manually-charged battery is used to power your flashlight as well as the night vision goggles you’ll discover later on. If it is running low, you’ll get an alert to charge it, but you can check it at any point by holding down left on the directional button. This will pull up your charger, and you can mash the right trigger to bring it up to full power.
Map and journal

Pressing the “view” button on the Xbox One controller or touchpad on the PlayStation 4 controller will pull up your in-universe map. The map shows your current location, as well as a large circle with an X to indicate your main objective. Smaller side objectives and points of interest will be visible as smaller circles, which will disappear when completed. However, not all of these can immediately be done instead of the main objective. If a location seems out of reach, it will probably open up as you progress the story.
With the map out, you can flip it to the other side to view Artyom’s journal. Along with story information, the journal will also include a note Artyom leaves for himself regarding his current objective. If you’re stuck in an area trying to figure out how to open a door or proceed, he likely left a hint already in his notes.
Scavenging

Learning to efficiently scavenge for resources is at the heart of Metro Exodus, as you need two different types of materials in order to craft anything from medical kits to incendiary ammunition. These can be found by searching dead bodies you come across, looting the environment, and occasionally by visiting a workbench controlled by your allies. Scavenging from the environment is what you’ll be doing most frequently.
How do you scavenge effectively? Look in every corner you come across. Look underneath stairwells and in burned-out trucks. If you see a closed lockbox-type container, a wicker box, or a container with a medical symbol on the front, you can look it. Blue lockers that are already closed can be opened to search for resources, and the green mushrooms you’ll come across can be looted for a few liquid-type resources each.
When you kill a human enemy, don’t stop at just looting his body when you see the small backpack symbol. Find his dropped weapon, as well, and hold B or Circle to scrap it for parts. This will give you access to any attachments, more resources, and occasionally even extra ammunition.
Crafting
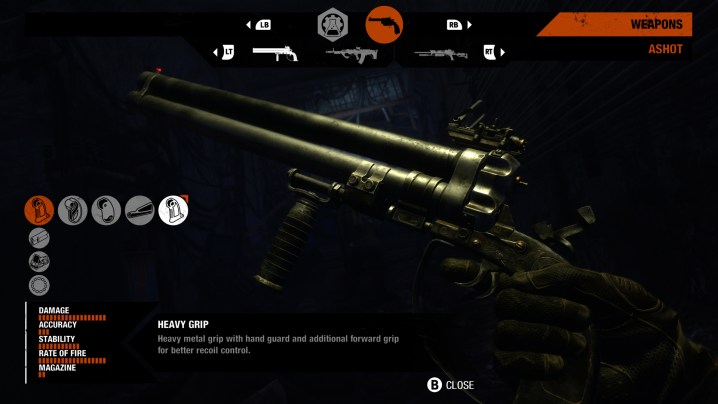
Metro Exodus gives you access to a limited number of crafting options when you aren’t at a workbench. To access the crafting kit in your backpack, hold L1 or LB and then A or X. You’ll still be acting in real-time, but the crafting kit allows you to make more medical kits and air filters with the resources you’ve been collecting.
Whenever possible, aim to have at least four medical kits and 10 minutes of air filter time on Artyom, just in case you run into trouble. You can also use the backpack’s crafting kit to make additional steel balls for the Tikhar air rifle. This rifle will be your main weapon when moving stealthily, and in case of emergencies, you can also turn to it in general combat.
Combat

Eventually, you’re going to need to take out some bad guys, and Metro Exodus gives you a large number of options for how to approach a given situation.
Without question, playing with stealth in mind is the easiest way to take down enemies in Metro Exodus, but you have to be careful about how you do it. Most human enemies can be elimination by sneaking up behind them and pressing a button – it will change depending on if you are going to knock them out or kill them with a knife.
With the Tikhar rifle or the Helsing crossbow, you can also place headshots to quietly eliminate humans and mutants alike, but if one of their friends sees it happen, you’ll be in trouble. To stay hidden for as long as possible, keep your flashlight off during these encounters. It’s a dead giveaway that there’s an intruder present.
When things go south, don’t panic. Enemies have a tendency to run toward you during combat, and you can exploit this by putting your back to the wall in a hallway or narrow passage. Equip an assault rifle or shotgun and you can take out several targets from that position. Eventually, other enemies can lose track of your location, allowing you to go into stealth mode all over again.
Quick saving

Metro Exodus has multiple forms of saving. The game automatically lets you resume your game at the beginning of a chapter, there is a generous checkpoint system, and there are quick saves. The last is the only one in your control, and making good use of it will make your experience much less frustrating.
If you’ve located a safe area with a workshop and resources, quick save your game. If you are about to go into hostile territory, quick save your game. If you finally managed to resupply on healing items, quick save your game. Oftentimes, the checkpoint system will let you off the hook if you die quickly, but we’ve had occasions where we’ve gotten stuck and the game happened to automatically save immediately. If we hadn’t quick saved, that would have potentially meant an hour of progress lost.
Editors' Recommendations
- Embracer Group just sold Saber Interactive. Here’s who still owns what
- Hogwarts Legacy Ghosts of Our Love guide: how to find the floating candles
- Learn to scavenge like a pro with our Far Cry New Dawn crafting guide
- Assassin’s Creed Odyssey: Power through the grind with our leveling guide
- God of War: Niflheim and Ivaldi’s Workshop guide


