Picking the best resin (SLA) printer is not an easy task. Every large and small 3D printer manufacturer offers a range of models covering many features that are backed by an equally extensive range of customer support. Although review sites and user feedback on forums can help with making a decision, especially for beginners it can feel like just a wild guess. Even for advanced users, it is a chore to stay on top of all the goings-on within the world of resin printers. This is why [VOG] (VOGMan, formerly VegOilGuy) has started a resin printer review site that asks for feedback from the community.
In the video, [VOG] explains the goal behind the data gathering, how to use the form to submit experiences with a specific resin printer, as well as any communications with the customer support behind these printers. Ultimately this should result in a pretty solid, community-sourced data set that can be used to figure out trends, pin-point issues with specific printers and make statements about which printer manufacturer offers the best customer support.
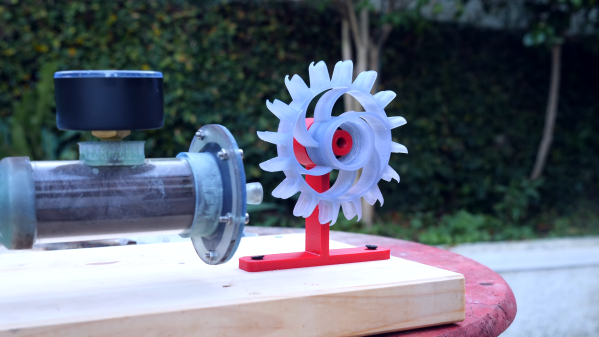
Steam turbines are at the heart of all manner of industrial machinery, particularly that used for power generation. [Integza] decided he needed to better understand this technology, and decided to build one himself – using 3D printing, at that.
First, a steam source was needed, with a pressure cooker on an electric stove pressed into service. The steam was passed out via a nozzle printed in resin, which better resists heat than most FDM-printed parts. Similarly, a turbine wheel was printed in resin as well, with the steam outlet pointed directly at its vanes.
To really stress test the parts, more steam was required. To achieve this, hydrogen peroxide was pumped through a manganese dioxide catalyst impregnated into steel wool to create steam. This made an absolute mess, but the printed parts nevertheless survived.
The steam turbine didn’t do any useful work, but was able to survive the high temperatures at play. We’d love to see such a device actually used to bear some load, perhaps in some sort of 3D printed power generating turbine design.
Alternatively, if you prefer your steam turbines more classically driven, consider this build. Video after the break.
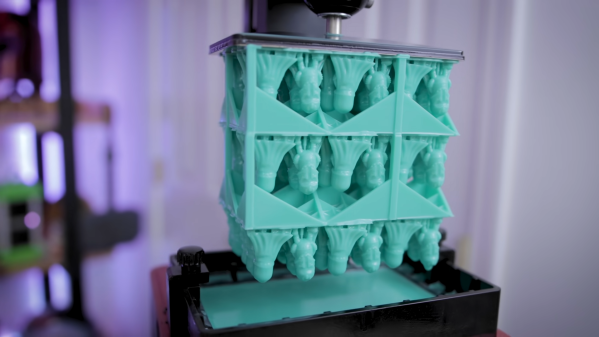
3D printers are typically the tool you use when you want a one-off quick prototype. However, more and more, they’re being used to produce things in quantity. [Uncle Jessy] decided to try out the resin stacking technique in order to quickly produce many figurines on his resin printer. However, not everything went exactly to plan.
The technique is simple. The idea is to produce many copies of an object in a single continuous print on a resin 3D printer. To achieve this, the object is cloned many times, and scaffolding is created to allow the stacking of multiple objects on top of each other. This must be done carefully to avoid ruining the geometry of the object, and similarly to support material, uses more resin in the process.
[Uncle Jessy] experimented several times, but ran into multiple issues with the process when trying to print out some small Magneto figurines. An initial experiment using a raft failed when the print fell off the build plate. With the raft removed, the second print failed as the scaffolding didn’t print quite right. Further tweaks and beefing up the scaffold improved things, and [Jessy] managed to print 93 figurines in a single operation.
It’s a useful technique if you want to print a ton of models on a resin printer in as short a time as possible. However, expect to spend plenty of resin as you refine the technique. You’ll also need a big wash tank to clean the prints during post-processing. Video after the break.
While there are still plenty of folks out there tinkering with custom 3D printers, it’s safe to say that most people these days are using a commercially-available machine. The prices are just so low now, even on the resin printers, that unless you have some application that requires exacting specifications, it just doesn’t make a whole lot of sense to fiddle around with a homebrew machine.
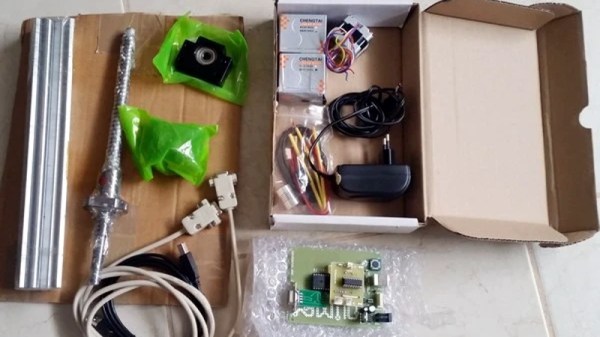
As it so happens, [Nicolas Tranchant] actually does have such an application. He needs ultra-high resolution 3D prints for his jewelry company, but even expensive printers designed for doing dental work weren’t giving him the results he was looking for. Rather than spend five-figures on a machine that may or may not get the job done, he decided to check out what was available in kit form. That’s when he found the work of [Frédéric Lautré].
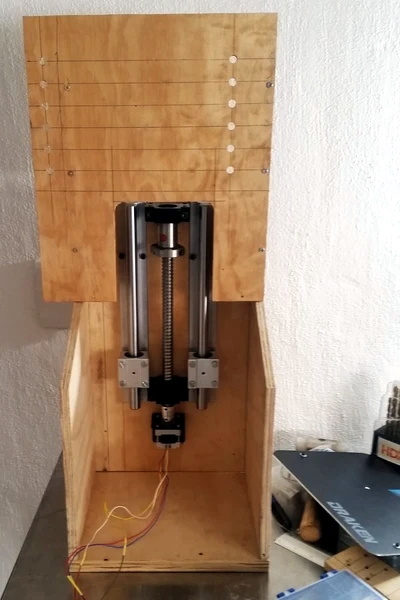
A look at the heavy-duty Z axis.
He purchased the unique “Top-Down” SLA kit from him back in 2017, and now after four years of working with the machine, [Nicolas] decided he would share his experiences with the rest of the class. The basic idea with this printer is that the light source is above the resin vat, rather than below. So instead of the print bed being pulled farther away from the resin on each new layer, it actually sinks deeper into it.
Compared to the “Bottom-Up” style of resin printers that are more common for hobbyists, this approach does away with the need for a non-stick layer of film at the bottom of the tank. Printing is therefore made faster and more reliable, as the part doesn’t need to be peeled off the film for each new layer.
[Nicolas] goes into quite a bit of detail about building and using the $700 USD kit, including the occasional modifications he made. It sounds like the kit later went through a few revisions, but the core concepts are largely the same. It’s worth noting that the kit did not come with the actual projector though, so in his case the total cost was closer to $1,400. We were also surprised to see that [Frédéric] apparently developed the software for this printer himself, so the tips on how to wrangle its unfamiliar interface for slicing and support generation may be particularly helpful.
Unfortunately, it sounds like [Frédéric] has dropped off the radar. The website for the kit is gone, and [Nicolas] has been unable to get in touch with him. Which is a shame, as this looks to be a fascinating project. Perhaps the Hackaday community can help track down this mysterious SLA maestro?
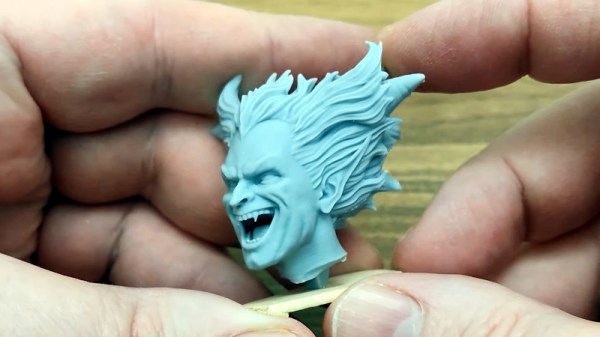
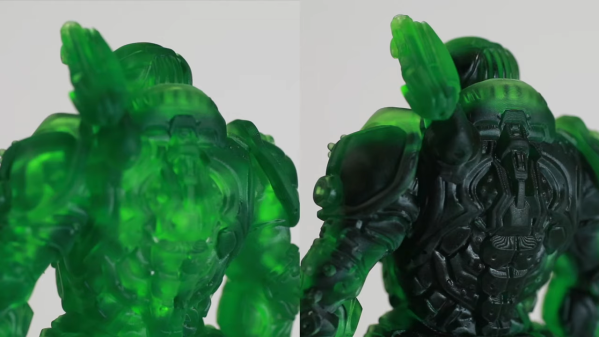
As cool as resin-based 3D printers are, they’re not without their shortcomings. One sore point, especially for those looking to document their prints, is that the translucent resins often favored for stereolithography can make the finest details difficult to see. Injecting paint into the model is how [Andrew Sink] decided to attack this problem, and the results are pretty striking.
For sure, this isn’t a problem that everyone making resin prints is going to face. Some resins are nicely opaque, and the fine details of a print show up just fine. But transparent resins lend a nice look to some projects, and might benefit from [Andrew]’s technique. It’s pretty much as simple as it sounds: choose a hollow model — or modify an existing one — print it up in the usual way, and clean thoroughly inside and out with isopropanol before curing under UV. Using a curing station that can get UV light up into the voids is probably a smart idea.
To finish off, the cured model is injected with acrylic paint. Nothing special here, just craft store acrylic in a syringe. [Andrew] seemed to prefer a thicker paint; we don’t want to second guess, but intuitively a thinner paint would seem to have some advantages. In any case, be sure to provide adequate vent holes for the displaced air. The video below has a few before and after shots, and the technique really works well to show off surface detail. Plus it just plain looks cool.
This seems like a good technique to keep in mind, and might even work well for hollow FDM prints done with transparent filaments. Still on the fence about FDM vs. SLA? We can help with that.
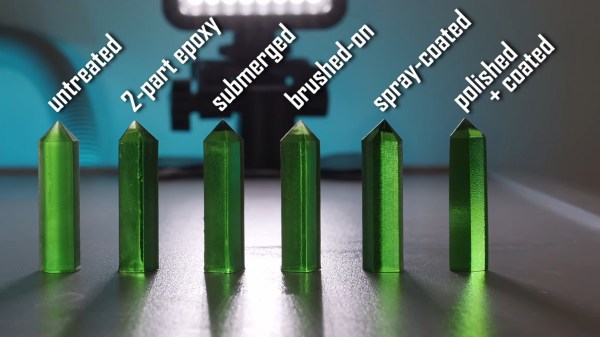
[Matou] has always been entranced by the beauty of natural crystal formations [and has long wished for a glowing crystal pendant]. Once he got a resin-based 3D printer, he was majorly disappointed to find out that although transparent resin prints look like delicious candy when they’re still wet, they turn cloudy and dull after being washed in an isopropyl bath and cured with UV light. There must be a way to either polish pieces back to clear, or keep them clear in the first place, [Matou] thought, and set about experimenting with some test crystals (video, embedded below).
As [Matou] found out, the dullness is caused by surface imperfections. Resin prints have layer lines, too, and although they may be super fine and invisible to the naked eye, they will still scatter light. The choices seem obvious — either polish the proud parts down with many grits of sandpaper, or fill the valleys with something to smooth everything out. As you’ll see in the video after the break, [Matou] tried it all, including a coat of the same resin that made the print. It’s an interesting look at the different ways to smooth out resin prints, though you may not be surprised to find that the one with the most work put into it looks the best.
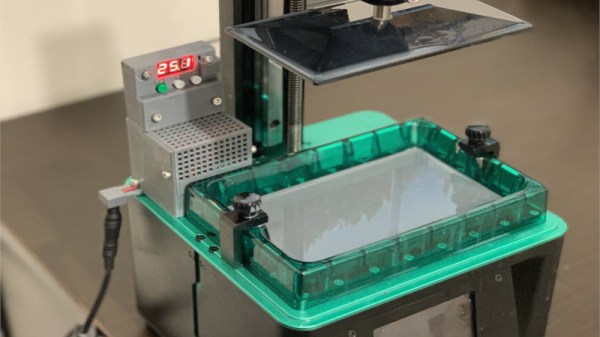
Resin printers can offer excellent surface finish and higher detail than other 3D printing technologies, but they come with their own set of drawbacks. One is that they’re quite sensitive to temperature, generally requiring the resin chamber to be heated to 25-30 degrees Celsius for good performance. To help maintain a stable temperature without a lot of mucking around, [Grant] put together a simple chamber heater for his printer at home.
Rather than go for a custom build from scratch with a microcontroller, [Grant] was well aware that off-the-shelf solutions could easily do the job. Thus, a W1209 temperature control board was selected, available for under $5 online. Hooked up to a thermocouple, it can switch heating elements via its onboard relay to maintain the set temperature desired. In this case, [Grant] chose a set of positive-temperature coefficient heating elements to do the job, installing them around the resin chamber for efficiency.
The heater can preheat the chamber in under fifteen minutes, much quicker than other solutions using space heaters or heat mats. The time savings will be much appreciated by [Grant], we’re sure, along with the attendant increase in print quality. If you’re still not sure if resin printing is for you, have a read of our primer. And, if you’ve got your own workflow improvements for resin printing, drop us a line!