How to Install a Porch Light
Learn how to safely install a porch light to make your home safer while boosting its curb appeal.

Jacob Fox
Installing a porch light (or two) will up the safety and security of your home while giving the exterior a serious glow-up. Stylish porch lights are like jewelry for your home’s exterior; the right ones can totally transform the look. Give your home a modern makeover, opt for something with a farmhouse twist, or go for something traditional and timeless. We’ll walk you through the ins and outs of porch light installation, from cutting a hole for an exterior light box to safely supplying power to the box to finally mounting your fixture. Get started with our steps below.
:
When to Call an Electrician
While basic wiring is suitable for many DIYers, it can be dangerous and calls for extreme caution. If you’re uncertain of your ability to safely and properly wire a porch light, call an electrician or handyman to wire the fixture before placing yourself and others at risk.
Installing vs. Replacing a Porch Light
If you already have a porch light but are looking to upgrade, the process is similar to the steps below, only easier. Once you’ve turned the power off and removed your current fixture, skip to step five to install your new porch light. In most cases, the existing wires will work, but you might have to replace the mounting hardware with your new light’s included hardware.
How to Install a Porch Light
What You Need
Exterior light fixture with mounting hardware
Measuring tape
Level
Drill
Drill bits
Pencil
Jigsaw
Jigsaw blades
Wire coat hanger
Voltage tester
Wire strippers
Lineman’s pliers
Utility knife
Flathead screwdriver
Phillips screwdriver
Step ladder
Fish tape
Old-work light box
12-gauge wire
Wire nuts
Caulking gun (optional)
Silicone exterior caulk (optional)
Step 1: Drill Pilot Hole
Once you’ve determined where your light will go, drill a pilot hole using a 1/4-inch drill bit. Slide a bent wire hanger through the hole and spin the end in a circle to ensure no studs are too close to install the light box. Adjust the hole placement as needed.
Step 2: Cut Hole
Use the bent wire to ensure no pipes or wires are in the way, then trace the back of the light box on the wall and cut around the line using a jigsaw.
Step 3: Run Wire
Use fish tape to run a wire through the hole in the siding to your switchbox inside but refrain from connecting the wire to the electrical box until the end. If mounting two lights, run a wire from light to light. Slide the end of the wire through the light box’s integrated clamps, leaving 8 to 10 inches exposed.
:
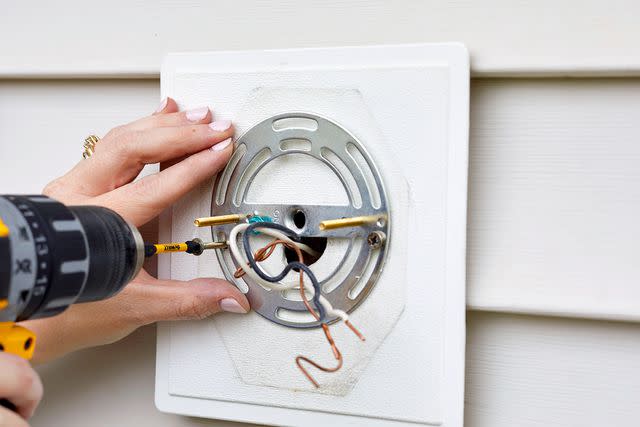
Step 4: Install Box
Slide the old-work light box into the hole and tighten the screws until the box is secured tightly in the wall.
Better Homes & Gardens
Step 5: Install Light Hardware
Use the provided screws to fasten the mounting straps to the light box. Use a level to ensure the mounting strap is level.
Step 6: Wire Fixture
Use a utility knife to strip back the wire’s sheathing, exposing the three individual wires underneath. Use wire strippers to strip 3/4-inch from each wire. Using wire nuts or the provided wiring hardware, connect white to white (common), black to black (hot), and green to green (ground). To free your hands up for wiring, use the bent coat hanger to hold the fixture close to the light box.
Better Homes & Gardens
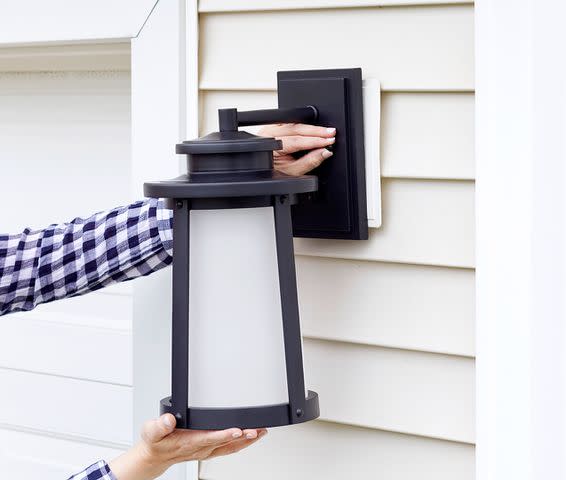
Step 7: Install Fixture
Bend the wires and push them into the light box, then mount the fixture to the mounting strap using the provided hardware. Turn the power off at the electrical box and connect the supply line and the switch leg, then restore the power. Install a bulb and check the function of the light. If everything is working as it should, caulk around the light fixture if necessary to prevent water from entering around the fixture.
Warning: When working with electricity, always turn the power off at the source (electrical box), rather than just the switch. Confirm the power is off with a voltage tester after turning off the main breaker.
Porch Light Tips and Tricks
Now that your porch light is installed, here are a couple of ways to maximize its efficiency and effectiveness. To save energy and increase your home’s security, consider installing a programmable switch to control your porch light. These switches allow you to set the lights to come on and turn off at certain intervals and feature an override switch for manual control. For more savings, opt for an LED bulb that uses less energy and lasts longer than traditional incandescent light bulbs.

