A man riding a motorized wooden sled up a snowy hill

Never Walk Uphill Again With This Motorized Sled

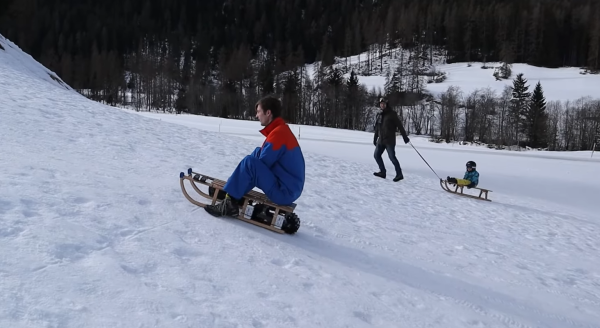
If you grew up in a snowy climate, chances are you’ve ridden a sled or toboggan when you were young. The downhill part of sledding is great fun, but dragging the thing back up gets boring quickly. [Luis Marx] had been dreaming of sledding uphill since he was a child, and decided to make his dream come true by building himself a motorized sled (video, in German, embedded below).

A wooden sled with an electric drive system installed
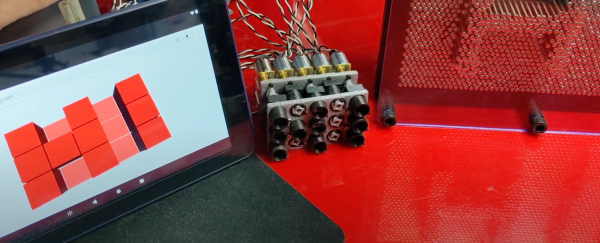
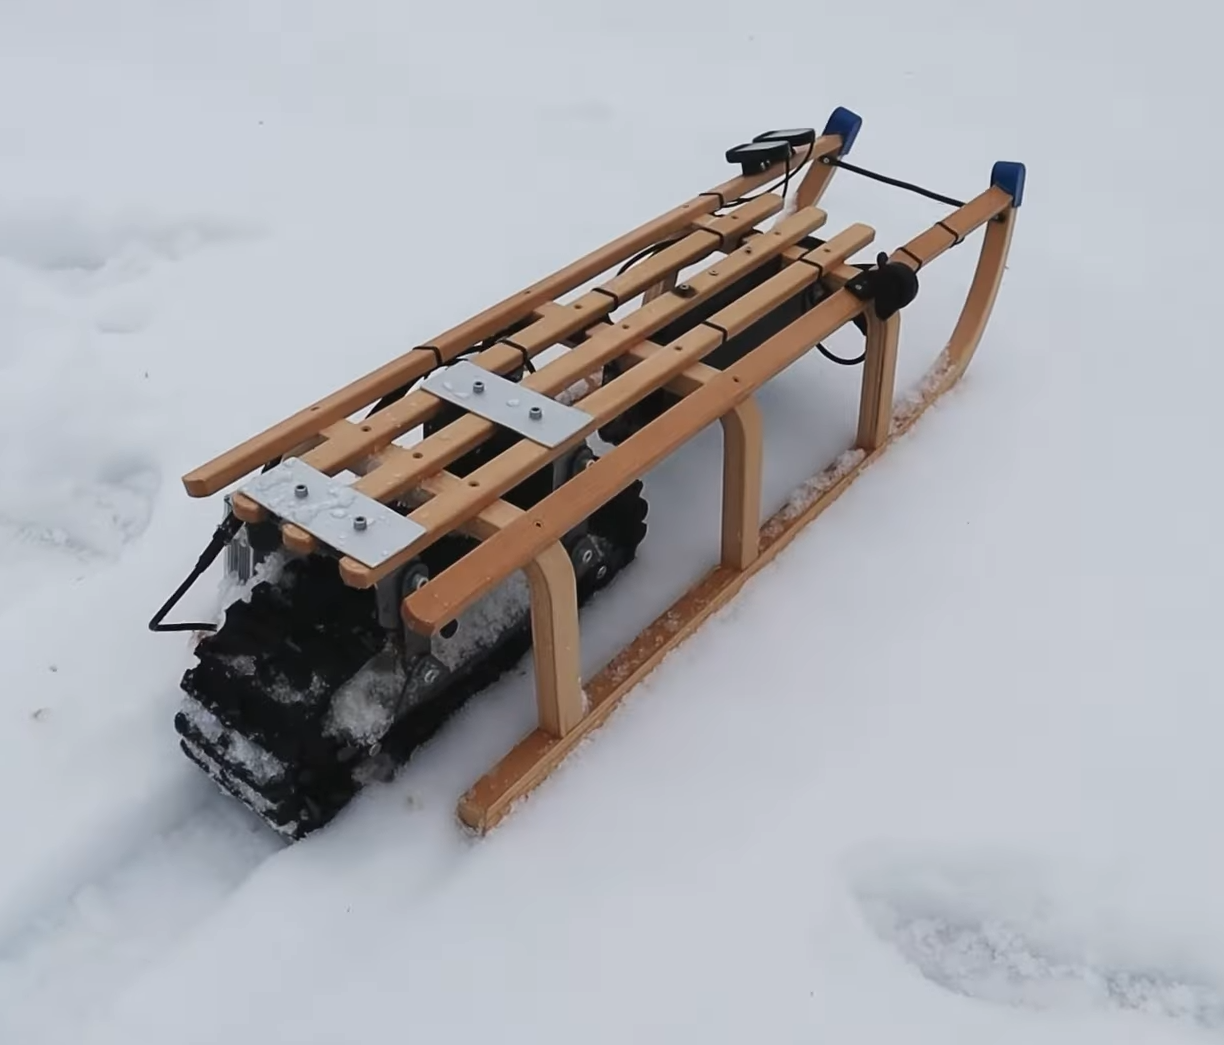
The sled is powered by two DC electric motors driving a continuous track, like a rudimentary snowmobile. The motors were originally designed for electric bikes, and can develop 30 newton-meters of torque each. [Luis] designed and 3D-printed a custom set of drive wheels to link the track to the bike motors. Two motor controllers enable basic speed control, while a beefy battery carries enough juice for multiple trips up and down a slope.

The motorized track is mounted on a clever frame that can swing up or down and is held in place by two spring-loaded pins. This way, you can simply lift the system off the snow when you’re ready to slide downhil, and swing it down again when you want the sled to do the pulling.

With winter nearing its end, the snow near [Luis]’s home in southern Germany was too soft to get much traction, but subsequent tests in a ski resort up in the Alps showed the system working perfectly. It even had enough traction to pull a second sled behind it. Perhaps some proper suspension could make it go faster on the downhill run, too.

Continue reading “Never Walk Uphill Again With This Motorized Sled”

This Is The Future Of Waste Management

Many of us have been asking for some time now “where are our robot servants?” We were promised this dream life of leisure and luxury, but we’re still waiting. Modern life is a very wasteful one, with items delivered to our doors with the click of a mouse, but the disposal of the packaging is still a manual affair. Wouldn’t it be great to be able to summon a robot to take the rubbish to the recycling, ideally have it fetch a beer at the same time? [James Bruton] shares this dream, and with his extensive robotics skillset, came up with the perfect solution; behold the Binbot 9000. (Video, embedded below the break)

Continue reading “This Is The Future Of Waste Management”

Super Simple Camera Slider With A Neat Twist

When you get into making videos of products or your own cool hacks, at some point you’re going to start wondering how those neat panning and rotating shots are achieved. The answer is quite often some kind of mechanical slider which sends the camera along a predefined path. Buying one can be an expensive outlay, so many people opt to build one. [Rahel zahir Ali] was no different, and designed and built a very simple slide, but with a neat twist.

This design uses a geared DC motor, taken from a car windscreen wiper. That’s a cost effective way to get your hands on a nice high-torque motor with an integral reduction gearbox. The added twist is that the camera mount is pivoted and slides on a third, central smooth rod. The ends of this guide rod can be offset at either end, allowing the camera to rotate up to thirty degrees as the slide progresses from one end to the other. With a few tweaks, the slider can be vertically mounted, to give those up-and-over shots. Super simple, low tech and not an Arduino in sight.

The CAD modelling was done with Fusion 360, with all the models downloadable with source, in case someone needs to adapt the design further. We were just expecting a pile of STLs, so seeing the full source was a nice surprise, given how many open source projects like this (especially on Thingiverse) do often seem to neglect this.

Electronics consist of a simple DC motor controller (although [Rahel] doesn’t mention a specific product, it should not be hard to source) which deals with the speed control, and a DPDT latching rocker switch handles the motor direction. A pair of microswitches are used to stop the motor at the end of its travel. Other than a 3D printer, there is nothing at all special needed to make yourself quite a useful little slider!

We’ve seen a few slider designs, since this is a common problem for content creators. Here’s a more complicated one, and another one.

Continue reading “Super Simple Camera Slider With A Neat Twist”

Teaching A DC Servo Motor To Act Like A Stepper

[Frank Herrmann] had an interesting idea to turn a geared DC motor into a servo motor assembly, but with a stepper motor-like interface. By stacking some small PCBs behind the motor body, it was possible to squeeze a DRV8837 DC motor driver and a pair of hall effect sensors on the first PCB layer, with the magnetic encoder nestled tightly behind it. Pin headers at the edge of the PCB connect to a second PCB bearing the microcontroller, which is based on the cheap STM32L432. The second PCB also holds an associated LDO and debug LED. Together, this handful of parts provide all that is needed to read the encoder, control the motor rotation and listen on the ‘stepper motor driver’ interface pins hooked up to the motion controller upstream. The Arduino source for this can be found on the project GitHub.

Whilst [Frank] mentions that this assembly has a weight and torque advantage over a NEMA 17 sized stepper motor, but we see no hard data on accuracy and repeatability which would be important for precise operations like 3D printing.

This project is part of a larger goal to make a complete 3D printer based around these ‘DC motor stepper motors’ which we will watch with interest.

While we’re on the subject of closed-loop control of DC motors, here’s another attempt to do the same, without the integration. If these are too small for you, then you always repurpose some windscreen washer motors.

Continue reading “Teaching A DC Servo Motor To Act Like A Stepper”

Electric “Radial” RC Aircraft Motor

For a long time radial aircraft engines, with their distinctive cylinder housings arranged in a circle, were a common sight on aircraft. As an experiment, [KendinYap], wanted to see if he could combine 3 small DC motors into a usable RC aircraft motor, effectively creating an electric radial engine.

The assembly consists of three “180” type brushed DC motors, mounted radially in a 3D printed casing. A 3D printed conical gear is attached to each motor shaft, which drives a single output gear and shaft mounted in the center with two bearings. The gear ratio is 3:1. A variety of propellers can be mounted using 3D printed adaptors. As a baseline, [KendinYap] tested a single motor on a scale with a 4.25-inch propeller on a scale, which produced 170 g of thrust at 21500 RPM. Once integrated into the engine housing, the three motors produced 490 g of thrust at 5700 RPM, with a larger propeller. Three independent motors and propellers should theoretically provide 510 g of thrust, so there are some mechanical losses when combining 3 of them in a single assembly. However, it should still be capable of powering a small RC plane. It’s also not impossible that a different propeller could yield better results.

While there is no doubt that it’s no match for a brushless RC motor, testing random ideas just to see if it’s possible is usually fun and an excellent learning experience. We’ve seen some crazy flyable RC power plants, including a cordless drill, a squirrel-cage blower, and a leaf blower.

Continue reading “Electric “Radial” RC Aircraft Motor”

Revolving Plant Tower Is Solar-Powered

Do you live in a small or yard-less space, but want to grow things anyway? You’re not totally out of luck — you’ll just have to get creative and probably vertical with your planting scheme. And since apartments and other smallish dwellings often have a limited amount of exposure, it would really help a lot if you could somehow rotate the plants so that they receive even sunlight.

[JT_Makes_It]’s rotating strawberry tower ticks all these boxes and more. The 12 V solar cell powers a small DC motor that spins at the gentle speed of 0.6 RPM. The tube is hanging from a swiveling carabiner that acts like a clutch — if a strong wind comes along or something bumps into it, the motor will continue to spin the carabiner.

[JT_Makes_It] already had a tube with holes, though they did cut several more into it. As built, this is not exactly apartment dweller-friendly, unless you have off-site access to things like plasma cutters and welding equipment. But as they point out, you could theoretically use PVC and a hole saw and make it shorter and therefore lighter. We think this looks great, although we’re a bit concerned about the weight. Not so much on the mechanism itself; that looks strong. We’re just wondering how long that carport frame will support it. Judge the build quality for yourself from the video after the break.

Did you know that strawberries can do tricks? Fasciation makes fanned-out berries, and vivipary makes them hairy.

Continue reading “Revolving Plant Tower Is Solar-Powered”

PinThing Mechanizes Pin Art

Pin art is one of those things that simply cannot be left alone if it’s within arms reach, and inevitably end up with a hand or face imprint. [hugs] is also fascinated by them, so he designed the PinThing, a mechanized pin art display.

The PinThing pin diameters are much larger than standard pin art, but this is to fit small geared DC motors. Each pin is a short 3D-printed lead screw mechanism. The motors are driven with a stack of motor driver shields on top of an Arduino Uno, which uses Firmata to receive instructions over serial from a Node.js app using the Johnny-Five library. This may be a simple 3×5 proof of concept, but then it could be used for everything from displays to interactive table surfaces.

One of the challenges with pixelated mechanical displays like this, the inFORM from MIT, or even flip dot displays, are the costs in actuators and driver electronics. A small 10×10 array requires 100 motors and drivers, which quickly adds up as you expand, even if individual components are quite cheap.

If you are willing to sacrifice instantaneous response from each pixel, you can use a mechanical multiplexer. It consists of some sort of moving carriage behind the display with mounted actuators, so you’ll only need an actuator per row, not for every pin. This also means the pins can be closer together since the actuators can be staggered on the carriage.

PinThing project was an entry to the Rethink Displays Challenge of the 2021 Hackaday Prize, for which the finalists were just announced.

Continue reading “PinThing Mechanizes Pin Art”