UV Phone Sanitizer Shows The Power Of Modern DIY

Editor’s Update: According to the schematic for this project, SST-10-UV-A130-F405-00 (PDF) LEDs are used which produce 405nm UV-A light. The manufacturer, Luminus, does not recommend that part for disinfection or sterilization. Luminus sells UV-C LEDs for that purpose, generating 275-285nm. After publication the part number used was changed to and American Opto L933-UV265-2-20 which is a UV-C LED producing 265-278nm.

The global COVID-19 pandemic has had a serious impact on the hacking and making scene, though it hasn’t been all bad. Sure, shipping on average is taking a lot longer than we’d like when ordering parts, but otherwise being stuck at home has given many people far more time to work on their projects than they would have had otherwise. In some cases, it’s also been a reminder of just how far we’ve come in terms of what the dedicated individual is capable of producing within the confines of their own home.

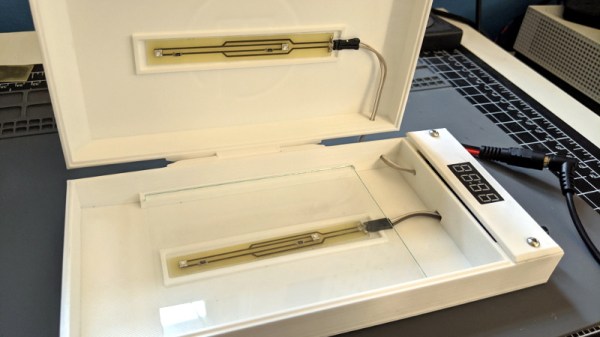
As a perfect example, take a look at this UV sanitizer box built by [Md Raz]. Looking for a way to quickly and easily kill germs on smartphones and other small devices, he used the considerable capabilities afforded to the modern hacker to produce a professional-looking device in far less time than it would have if he had to outsource things like PCB manufacturing or injection molding.

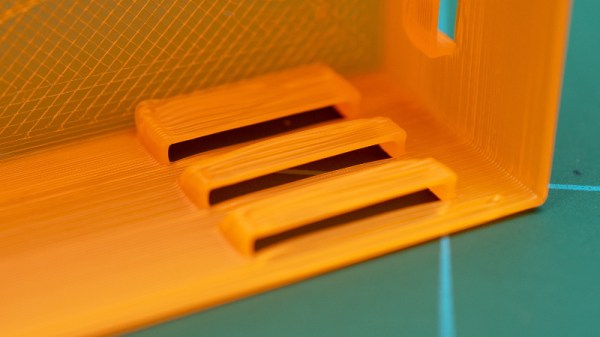
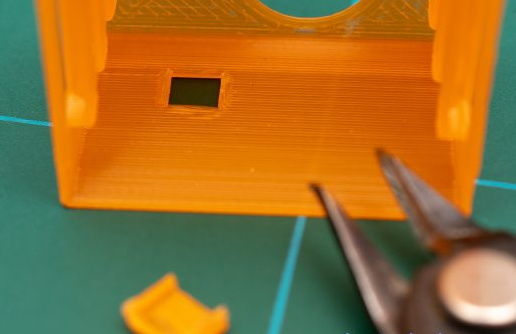
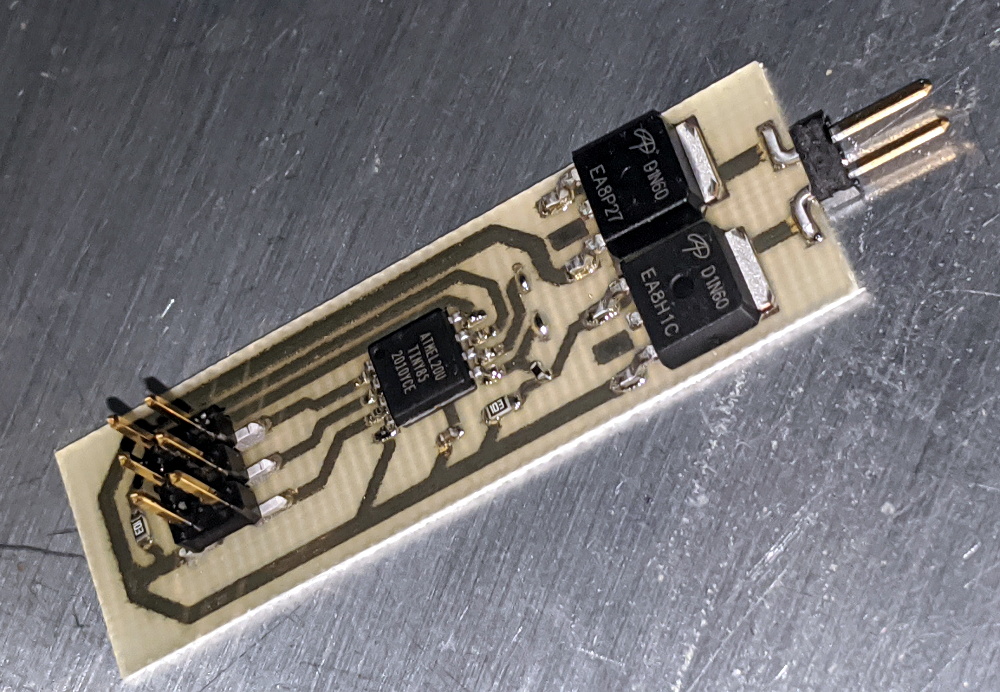
Inside the 3D printed enclosure is an array of SMD UV-C LEDs that, according to the manufacturer’s specs, will destroy viruses and bacteria in 5 minutes. To make sure the LEDs are given enough time to do their job, [Md] is using an ATtiny85 to control the countdown and a seven segment display to let the user know how much longer they have to wait. All the electronics are held on PCBs produced with a BotFactory SV2 desktop PCB printer, but for those of us with somewhat more limited budgets, a mill or even a modified laser engraver could be used to produce similar boards.

With everything going on, there’s understandably been increased demand for germicidal lights. But unfortunately, some unscrupulous manufacturers are trying to take advantage of the situation. Being able to select the LEDs for this device based on their specifications is arguably just as important as how quickly it was produced. Though we’d still advise a position of “trust, but verify” when it comes to UV-C.

Join The Movement With This Mini Cyberdeck

The global pandemic has given many people a lot more time at home, which has undoubtedly pushed an untold number of projects over the finish line. Unfortunately, it’s also disrupted global commerce and shipping to the point that getting parts can be a lot harder than we’d like. Which is why [facelesstech] decided to put together this exceptionally mobile cyberdeck out of things he already had laying around.

Now to be fair, his parts bin is perhaps a bit better stocked for this kind of thing than most. He’s built a couple of Raspberry Pi portables already, so the Pi Zero W, display, and battery management board were already kicking around. He just had to come up with a new 3D printed enclosure that holds it all together with a little bit of cyberpunk flair.

To that end, he’s done an excellent job of documenting the build and has released the STL files for the 3D printed components. All things considered, we’d say this is probably the most approachable cyberdeck design currently available; if you’ve been wondering what all the fuss is about with these bespoke little computers, this is an ideal project to get started with.

Keep in mind that the idea of a cyberdeck is to build something custom for yourself, so there’s no need to copy this build exactly. If you’re short on parts, you could forgo the battery powered aspect and just keep it tethered. The superfluous (but very cool) GX12 connectors could certainly be deleted as well, although at serious stylistic cost. You’ll probably need to order the specific keyboard that [facelesstech] designed the lower half of the device around, but it’s common enough that it shouldn’t be hard to track down. No matter which way you take it, this design is a great base to start from.

If you’re looking for something a bit more substantial and have the filament to burn, you might take a look at the VirtuScope to fulfill your offset screen needs.

Continue reading “Join The Movement With This Mini Cyberdeck”

Queue Up Your Tracks With A Well Placed Hexagon

Besides a few stalwart holdouts, most of us have have switched over listening to music in digital form, often via an online stream. As long as no data caps stand in your way, it’s a quick and easy way to listen to your favorite artists or discover new ones. But there’s something visceral about act of loading a piece of physical media into a player that can’t be replicated by just clicking or tapping on a screen.

Which is why [InfiniteVideo] put together this RFID playlist launcher peripheral. There’s an important distinction to be made here, as this device isn’t actually playing or even storing audio. A nearby Raspberry running Volumio handles the actual playback. This device is just an RFID reader with some clever tokens that the listener can use to select their favorite artists and albums with physical tokens. It’s certainly not a new concept, but we think the nuances of this particular build warrant a closer look.

The “player” consists of a ESP8266 with a MFRC522 RFID reader wired directly to the GPIO pins. The pair are housed in a rather large 3D printed enclosure, which at first might seem a bit excessive. But it turns out that [InfiniteVideo] is actually trying to replicate a crowd sourced project called Qleek which is based around a similarly chunky reader.

Likewise, the hexagon tiles are also lifted from the Qleek concept. But rather than being made out of wood as in the original, [InfiniteVideo] is printing those as well. Halfway during the process, the print is paused and an RFID sticker is placed in the middle of the hexagon. Once resumed, the RFID tag becomes permanently embedded in the tile with no visible seams to reveal how the trick was pulled off. With the addition of a suitable label, each printed hexagon gets associated with the desired album or artist in software.

This project is notable for its convenience and visual flair, but using RFID tags for media identification can also be a practical choice. It can be used as an assistive technology, or as a way for young children to easily interact with devices.

3D Print Your Way To A Bartop Arcade Cabinet

Custom arcade machines have always been a fairly common project in the hacker and maker circles, but they’ve really taken off with the advent of the Raspberry Pi and turn-key controller kits. With all the internals neatly sorted, the only thing you need to figure out is the cabinet itself. Unfortunately, that’s often the trickiest part. Without proper woodworking tools, or ideally a CNC router, it can be tough going to build a decent looking cabinet out of the traditional MDF panels.

But if you’re willing to leave wood behind, [Gerrit Gazic] might have a solution for you. This bartop arcade, which he calls the simplyRetro D8, uses a fully 3D printed cabinet. He’s gone through the trouble of designing it so there are no visible screw holes, so it looks like the whole thing was hewn from a chunk of pure synthwave ore. He notes that this can make the assembly somewhat tricky in a few spots, but we think it’s a worthy compromise.

Given the squat profile of the simplyRetro, the internals are packed in a bit tighter than we’re accustomed to seeing in a arcade build. But there’s still more than enough room for the Raspberry Pi, eight inch touch screen HDMI panel, and all the controls. To keep things as neat as possible, [Gerrit] even added integrated zip tie mount points; a worthwhile CAD tip that’s certainly not limited to arcade cabinets.

[Gerrit] has included not only the STL files for this design, but also the Fusion 360 Archive should you want to make any modifications. There’s also a complete Bill of Materials, as well as detailed instructions on how to pull it all together. If you’ve ever wanted your own arcade machine but felt a bit overwhelmed about figuring out all the nuances on your own, the simplyRetro could be the project you’ve been waiting for.

Of course if you do have access to a CNC or laser cutter, then there are some designs you could produce quite a bit faster.

Heavyweight Cyberdeck Is In A Class Of Its Own

Inspired by other builds he’d seen online, [BlastoSupreme] decided to build his very own cyberdeck. There was only one problem: he’d never designed and assembled anything like this before. Wanting to avoid any problems down the line, he reasoned that the safest approach would be to make it so big that he wouldn’t struggle to fit everything inside. Some may say the resulting NX-Yamato, named for the most massive battleship ever constructed, ended up being too large. But that’s only because they are afraid.

A finish like the Yamato’s doesn’t come easy.

In his write-up on The Cyberdeck Cafe, a site dedicated to the community sprouting up around these futuristic personal computers, [BlastoSupreme] describes building this cyberdeck as something of a transformative experience. Looking at the incredible effort that went into this project, we can believe it. From the intricate CAD work to the absolutely phenomenal finish on the Yamato’s 3D printed frame, there’s not a cut corner in sight.

That’s right, nearly every component of this cyberdeck was conjured into existence by squirting out hot plastic. About two kilograms of it, to be precise. It was printed in vertical chunks which were then assembled with adhesive and screws. This modular construction technique allowed [BlastoSupreme] to build what he believes to be the largest cyberdeck ever made. Sounds a lot like a challenge to us.

Admittedly, the massive internal volume of the Yamato is largely unused; all that’s inside it right now is a Raspberry Pi 4 and a X705 power management board that allows the deck to run off of 18650 cells. Of course, all that space could easily be put to use with additional gear or even a larger and more powerful Single Board Computer (SBC) such as the Atomic Pi. There’s even a dedicated compartment in the side for snacks, so no worries there. As [BlastoSupreme] puts it, all that empty space inside is a feature, not a bug.

Plenty of room inside for whatever hardware you want to take with you into the Sprawl.

In the nearly two years that have passed since we first came across one of these Neuromancer inspired builds, we’ve been absolutely blown away by the increasing scale and complexity of these extremely personal computers. Since it seems there’s only a fairly loose idea of what a “proper” cyberdeck should look like in the canonical sense, these builds have been free to fill in the blanks with some pretty outlandish designs. Some of which have earned William Gibson’s personal seal of approval.

3D Printed Speakers With Many Lessons Learned

Although we all wish that our projects would turn out perfect with no hiccups, the lessons learned from a frustrating project can sometimes be more valuable than the project itself. [Thomas Sanladerer] found this to be the case while trying to build the five satellite speakers for a 5.1 surround sound system, and fortunately shared the entire process with us in all its messy glory.

[Thomas] wanted something a little more attractive than simple rectangular boxes, so he settled on a very nice curved design with few flat faces and no sharp corners, 3D printed in PLA. Inside each is an affordable broadband speaker driver and tweeter, with a crossover circuit to improve the sound quality and protect the drivers. The manufacturer of the drivers, Visatron, provides very nice speaker simulation software to select the appropriate drivers and design the crossover circuit. The front of each speaker consisted of a 3D printed frame, covered with material from a cut-up T-shirt. These covers attach to the main body using magnets and really look the part.

After printing, [Thomas] soaked all the parts in water to clean of the PVA support structures but discovered too late that the outer surfaces are not watertight and a lot of water had seeped into the parts. In an attempt to dry them he left them in the sun for a while which ended up warping some parts, so he had to reprint them anyway. The main bodies were printed in two parts and then glued together. This required a lot of sanding to smooth out the glue joints, and many cycles of paint and sanding to get rid of the layer lines. When assembling the different pieces, he found that many parts did not fit together, which he suspects was caused by incorrect calibration on the delta-bot printer he was using.

In the end, the build took almost two years, as [Thomas] needed breaks between all the frustration, and eventually only used one of the speakers. We’re glad he shared the messy parts of the project, which will hopefully spare someone else a bit of trouble in a project.

Listening to a high-quality audio setup is always a pleasure, and we’ve covered several projects from audiophiles, including affordable DML speakers, and 3D printed speaker drivers.

Continue reading “3D Printed Speakers With Many Lessons Learned”

Using Spiral Mode To Rapidly Print Enclosures

We’ve often said that one of the best applications of desktop 3D printing is the production of custom enclosures. A bespoke case adds a touch of professionalism to any project, and considering the materials needed to print one will cost less than even the cheapest generic project box, it’s a no-brainer. There’s only one problem: it can take hours to print even a simple case.

To try and speed things up, [Electrobob] has been experimenting with running off enclosures using spiral or “vase” mode on his 3D printer. Unlike the normal layer-by-layer approach, in this mode, the printer’s hotend continually rises at a steady rate during the entire print. Think of it as akin to printing out a Slinky and you should get the idea.

Spiral printed boxes may need manual retouching

As you might expect, there are some trade-offs here. For one, the walls of the box can’t be very thick since the printer is only making one pass. The nozzle on most printers is 0.4 mm, but in his experiments, [Electrobob] has found he’s able to reliably double that to a wall thickness of 0.8 mm by adjusting the extrusion rate.

You also need to approach the design a bit differently during the CAD phase. Printing holes in the side of the enclosure, which would be easy enough to do normally, doesn’t really work when running in spiral mode. For those situations, [Electrobob] recommends designing a “pocket” into the side that you can come back and cut out with a knife. It will add a little time to the post-processing stage, but the time saved during the print will more than make up for it.

So how much faster are we talking about? In the example [Electrobob] shows in his write-up, the print time went from nearly two hours to just 18 minutes. The resulting enclosure obviously looks a bit different than the traditionally printed version, and isn’t as strong, but the concept still clearly holds promise for some applications. If you’re building a sensor network that needs a bunch of enclosures, those time savings will really add up.