5 Tips & Tricks To Shoot Cinematic Quality Videos With Your iPhone
We may receive a commission on purchases made from links.
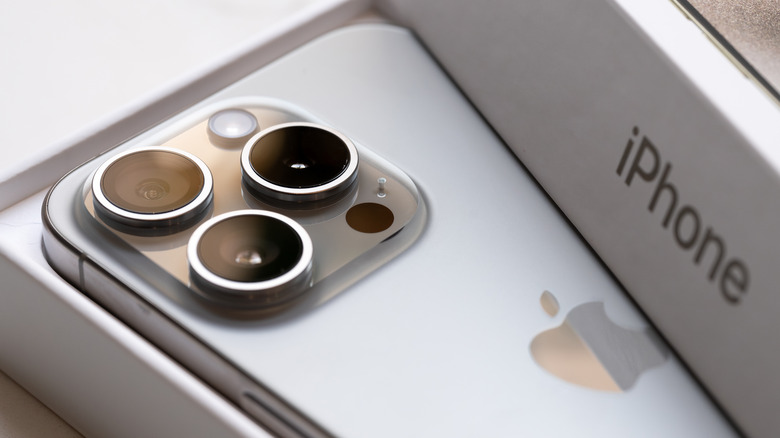
When it comes to shooting videos with a smartphone, creators and film-making enthusiasts often rely on iPhones. This is because iPhones are consistent with color and can easily handle high dynamic range. In his review of the iPhone 15 Pro, SlashGear's Adam Doud also praises the stabilization. The combination of the hardware and software used on the iPhone is capable enough to record high-quality 4K videos at 24, 30, or 60 fps, giving you the flexibility to make your video look and feel a certain way.
However, a few tips and tricks can help you capture cinematic videos right from your iPhone. These involve optimizing the camera settings, taking manual control over focus and exposure, selecting the correct aperture in Cinematic Mode, and ensuring you're using the right lens in the right situation. Last but not least, investing in the right gear can add a lot of character to your videos, allowing you to infuse your style and creativity into them. Without any further ado, let's start with the simplest yet most effective tip – optimizing the camera settings.
Optimize the camera settings
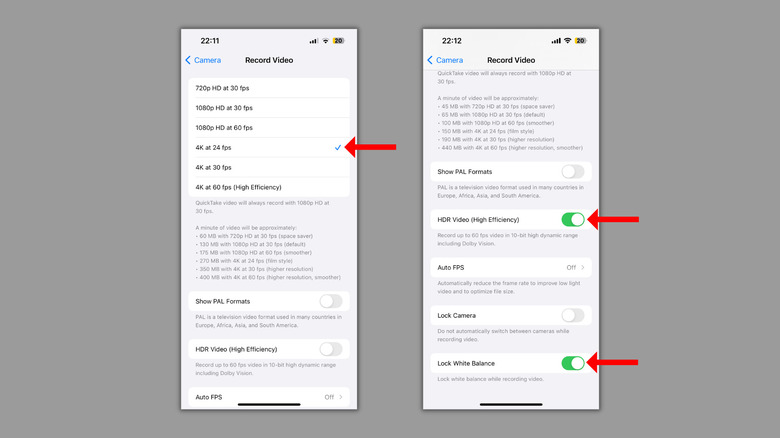
Our first tip is to explore the iPhone's camera settings menu and familiarize yourself with the options. Often, iPhone users start shooting videos without optimizing these settings according to their requirements. However, to shoot cinematic-quality videos, you must tweak them. For instance, setting the video resolution and frame rate to 4K at 24 fps adds the classic cinema feel to your shots, primarily because most Hollywood movies are shot at 24 fps.
Most modern movies also have a high contrast ratio, creating a dramatic difference between the well-lit and dark parts of the video. While it's common for commercial equipment to have excellent dynamic range, smartphones can't match those with their tiny little image sensors. However, on iPhone 12 and later models, Apple allows users to record videos in Dolby Vision HDR for "true-to-life color and contrast." This gives your videos a punchy and vibrant look that stands out from others on platforms like Instagram and YouTube.
Here's a trick that will make your videos look even better. The Lock White Balance feature in the camera settings menu turns off automatic white balance, which results in consistent colors throughout the video. This is helpful, especially if you're shooting indoors (or in a controlled environment) with mixed lighting.
Take manual control over autofocus and exposure
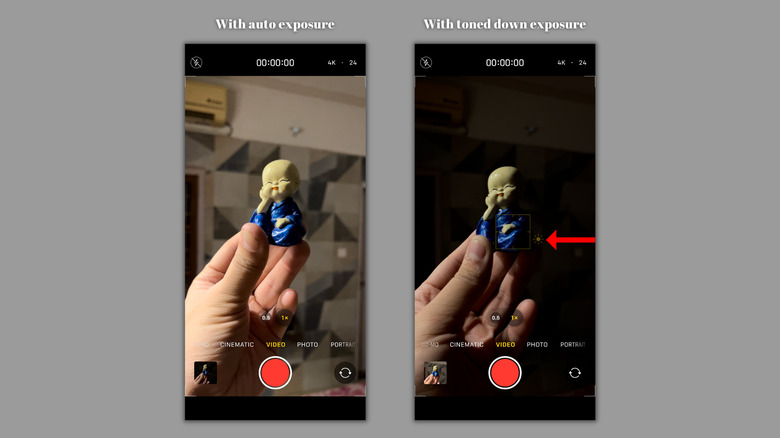
Most people simply take out their iPhones, point them at the subject, and start shooting a video. This way, they rely on the iPhone's auto-focusing and exposure management abilities, which are excellent in most situations. However, this results in a similar look in all the videos.
You can manually control the focus and exposure to add a cinematic touch to your videos. To do this, press and hold on a subject in the viewfinder, and you'll notice the "AE/AF Lock" option at the top of the screen. Once the focus and exposure settings are locked on a subject, your iPhone won't change them even when it detects another subject or a change in the lighting. This is a very helpful trick, especially if you're trying to conduct a product or profile photoshoot indoors (with a lighting setup). Even outdoors, this technique helps to shoot stunning landscape videos, especially if you're shooting from a moving vehicle.
If you wish to create even more contrast between the subject and the background, consider dragging the exposure slider (to the right of the selection square) downward until there's just enough light on the subject. This trick works best with focus lights, as you can set them to light up the subject.
Shoot videos in Cinematic Mode
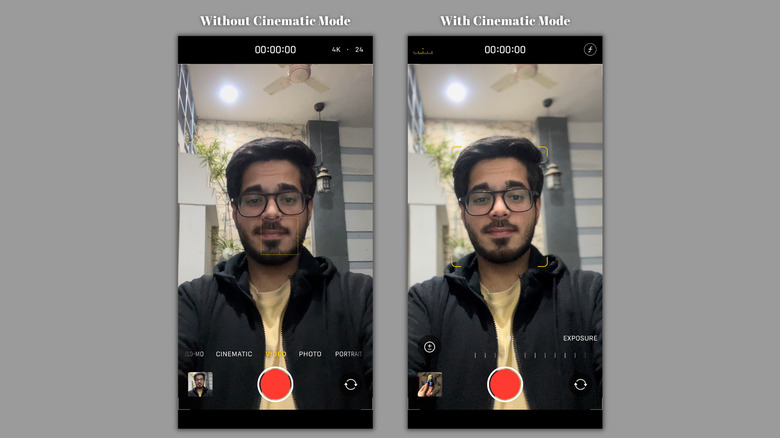
While a sweet bokeh effect comes naturally to commercial cameras with comparatively larger sensors and bigger lenses, tiny smartphone cameras can only generate this effect in a limited manner and only for objects that are very close to the camera. However, with the Cinematic Mode on iPhone 13 and later, your iPhone shoots videos with simulated shallow depth-of-field, giving the videos a dreamy, cinematic look.
Once you switch to Cinematic Mode, the camera will identify human subjects in the video and keep them in focus while blurring out the rest. You can adjust the focus manually by tapping on the intended subject and the depth of field through the aperture button at the top right. You can even adjust the exposure. The mode also gives you the flexibility to change the focus points and intensity after shooting a video. Simply open the video in the Photos app, tap the Edit button at the top right, and make the required changes.
So, whether you're filming interviews with a clear focus on the subject, creating dramatic product reveals, or adding a touch of cinematic background blur to everyday memories, Cinematic Mode can do it all without a hitch. The pro tip is to keep the blur intensity between five and seven points for a natural look.
Make sure you're using the right lens
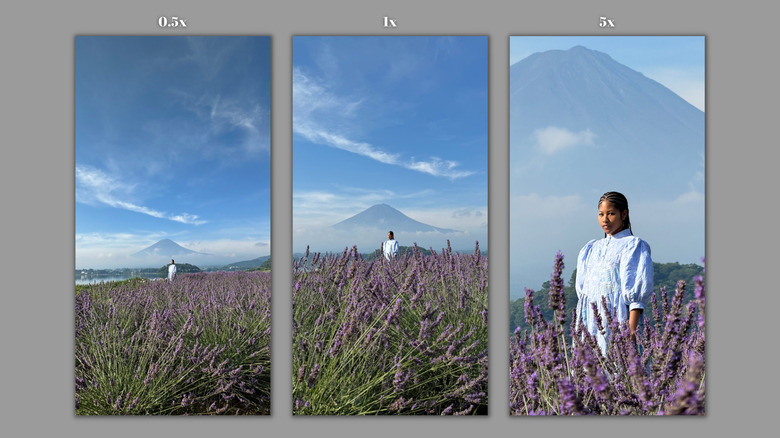
To get the best possible cinematic video, you must understand the strengths and weaknesses of all the lenses on your iPhone. Per the current camera configurations, the best lens to rely on and shoot from is the primary lens that provides a 1x field of view. Since it is bigger than the other lenses and has a higher resolution, it provides a significant amount of background blur and excellent low-light performance.
Then comes the ultrawide lens, which provides a vast field of view for shooting unique videos. It works well in well-lit environments. However, you'll notice a significant drop in quality in poorly lit conditions. So, if you're shooting indoors without enough lighting, the tip is to take a few steps away from the subject instead of switching to the ultrawide lens.
Last but not least, the Pro models have a third telephoto lens that brings the subject closer and adds a bit of natural background and foreground separation. Instead of cropping in on the main camera sensor, switch to the telephoto lens for shooting a subject that's not as close. While the iPhone 15 Pro provides 3x optical zoom, the iPhone 15 Pro Max can go up to 5x. If you want DSLR-like results, consider using the telephoto lens with your iPhone's Cinematic Mode.
Good-quality gears make a lot of difference
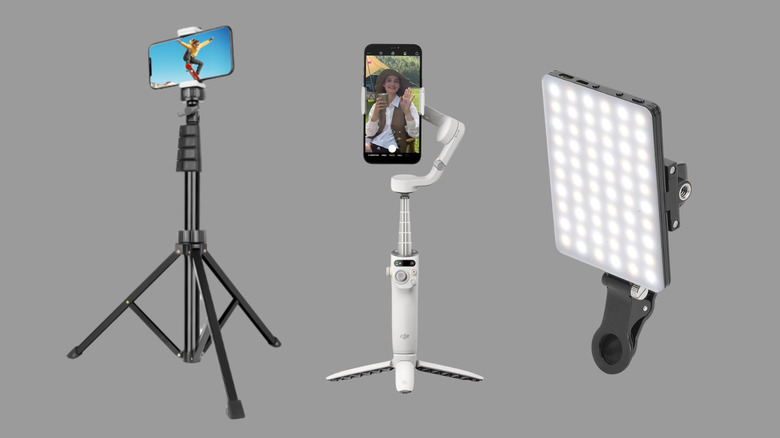
While the tips and tricks we've shared so far will help you record cinematic videos on your iPhone, combining them with some accessories could take the quality to the next level. Let's start with a must-have accessory for cinematic videos: tripods. Yes, you can hold your iPhone as still as possible or rest it against your bag or a wall, but that doesn't always provide you with the best angle. However, a tripod lets you position your iPhone on almost all surfaces. Consider getting the $19.98 Sensyne 62-inch Phone tripod or the $22.99 Eucos 62-inch tripod, which also turns into a selfie stick.
If you're into taking hand-held shots, a gimbal can make a world of difference. Some gimbals, like the $149 DJI Osmo Mobile 6, also allow you to place your phone on a surface, acting as a tripod. Even though iPhones can shoot excellent videos in almost all lighting conditions, getting portable video lights can help you avoid noisy shots. For instance, the $25.99 Newmowa 60 LED Clip Light could help brighten up a poorly lit subject. It attaches to the edge of your iPhone with the provided clip. Of course, you can also get multiple lights to create a portable setup.
Be sure to check out our article on five iPhone accessories every photographer should have.